Welcome to Creality  SPARKX i7 Buy Now 🔥

Creality
Store
  • 3D Printers
  • Ecosystem
  • Support
  • Software
  • Blog
  • Creality Cloud
  • M1 & R1
  • United States (English)
Cancel

Quick Links

    Creality
    3D PrintersEcosystem SupportSoftwareBlogCreality CloudM1 & R1
    Store
    SPARKXFlagshipHi SeriesEnder SeriesHALOT Series
    SPARKX i7
    New
    SPARKX i7
    More Products
    Compare
    K2 SE
    New
    K2 SE
    K2
    New
    K2
    K2 Pro
    K2 Pro
    K2 Plus
    K2 Plus
    K1 Max
    K1 Max
    More Products
    Compare
    Creality Hi
    Creality Hi
    More Products
    Compare
    Ender-3 V4
    New
    Ender-3 V4
    Ender-5 Max
    Ender-5 Max
    Ender-3 V3 Plus
    Ender-3 V3 Plus
    Ender-3 V3
    Ender-3 V3
    Ender-3 V3 SE
    Ender-3 V3 SE
    More Products
    Compare
    HALOT-X1
    New
    HALOT-X1
    HALOT R6
    HALOT R6
    HALOT-MAGE S
    HALOT-MAGE S
    HALOT-MAGE
    HALOT-MAGE
    More Products
    Compare
    3D ScannersLaser EngraversFilamentsAccessories
    Sermoon P1
    New
    Sermoon P1
    Sermoon X1
    Sermoon X1
    Sermoon S1
    Sermoon S1
    Creality Raptor Pro
    Creality Raptor Pro
    Otter Lite/Basic
    Otter Lite/Basic
    More Products
    Compare
    Creality Falcon A1 Pro 20W
    New
    Creality Falcon A1 Pro 20W
    Creality Falcon A1
    Creality Falcon A1
    Creality Falcon2 Pro 60W
    Creality Falcon2 Pro 60W
    Creality Falcon2 Pro
    Creality Falcon2 Pro
    Creality Falcon2 22W
    Creality Falcon2 22W
    More Products
    Compare
    Hyper Series
    Hyper Series
    CR Series
    CR Series
    Soleyin Series
    Soleyin Series
    Ender Series
    Ender Series
    More Products
    Compare
    CFS-C
    New
    CFS-C
    SpacePi X4L
    New
    SpacePi X4L
    Creality SpacePi X4
    Creality SpacePi X4
    Creality Space Pi  Dryer
    Creality Space Pi Dryer
    CFS - Creality Filament System
    CFS - Creality Filament System
    More Products
    Compare
    Download Center
    3D Models
    Creality Cloud App
    Firmware & Software
    Service Center
    Help Center
    Creality Wiki
    Product Support
    Video Guides
    Product Comparison
    Filament Guide
    Discover
    User Stories
    3D Printing in Education
    Blog Center / Cold Pull 3D Printing: How to Clean Your SPARKX i7 Hotend
    Contents
    contents

    Join Our Newsletter

    Subscribe to our newsletter for 3D printing insights, step-by-step guides, and inspirations for your next 3D printing adventure.

    By subscribing, you agree to our Terms and Privacy Policy.

    Social Media

    • Youtube
    • Facebook
    • Instagram
    • TikTok
    • Twitter
    • Reddit
    • Discord
    • LinkedIn

    Contents

    • SPARKX i7 Cold Pull Procedure

    Cold Pull 3D Printing: How to Clean Your SPARKX i7 Hotend

    Apr 27, 2026 09:32:50

    FFF 3D printing requires melting the filament and extruding it through the hotend heat break to complete the print. Therefore, keeping the heat break and nozzle channels clean and unobstructed is essential for achieving good print quality.

    Cold Pull is an efficient method for cleaning the hotend and nozzle, helping to remove blockages and maintain smooth filament extrusion.

    SPARKX i7 Cold Pull Procedure

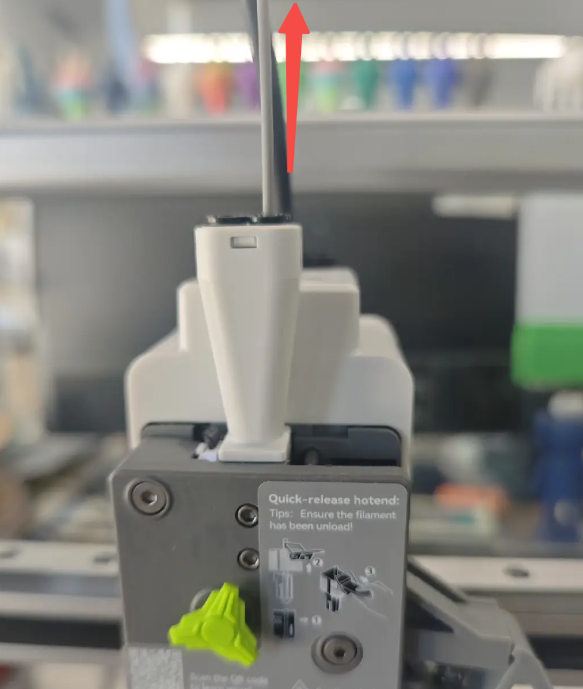
    Perform the filament unloading operation to ensure there is no filament in the i7 Extruder, then remove the i7 PTFE Tube and i7 Toolhead Back Cover.

    remove the i7 PTFE Tube and i7 Toolhead Back Cover
    SPARKX i7 Cold Pull Procedure

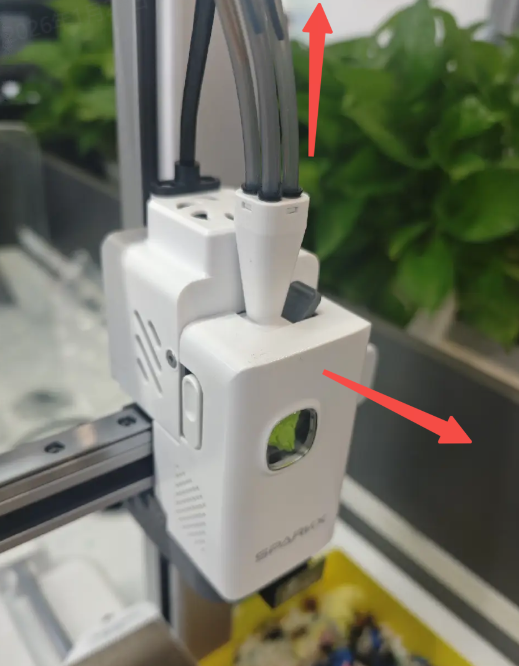
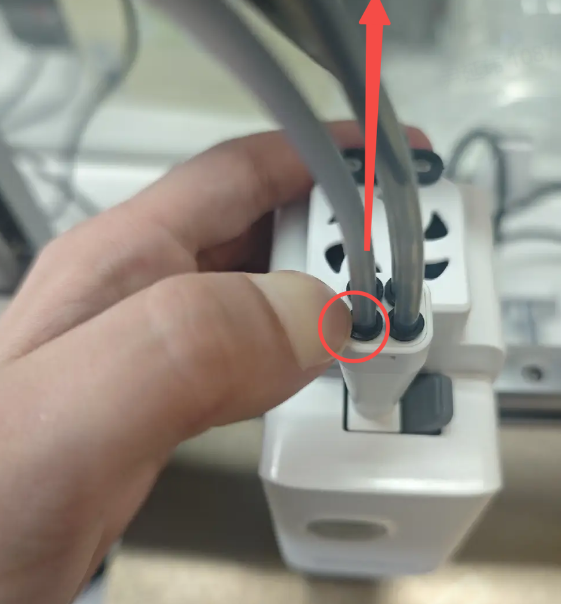
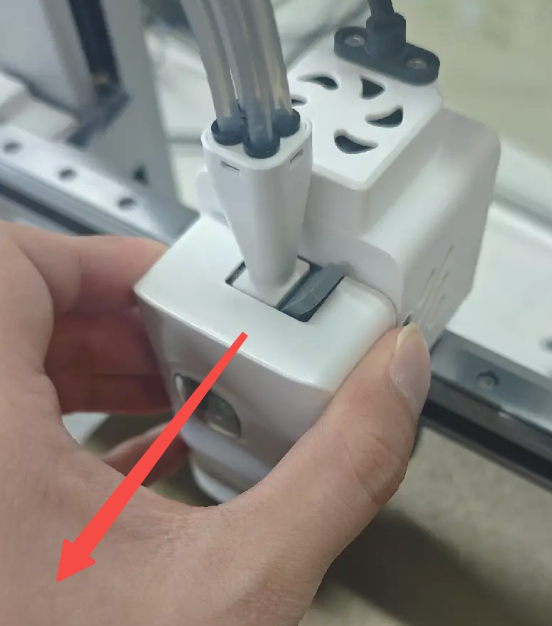
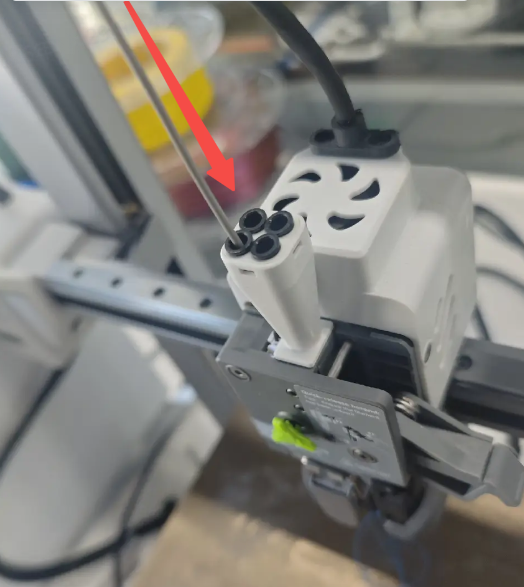
    Remove the PTFE Tube: Press the black Pneumatic Fitting while pulling the PTFE Tube upward.

    Remove the PTFE Tube

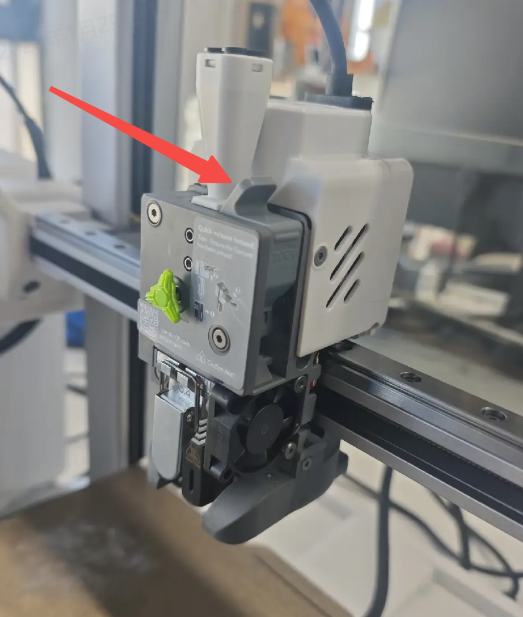
    Remove the Toolhead Back Cover: Squeeze both sides of the i7 Toolhead and lift off the i7 Toolhead Back Cover.

    lift off the i7 Toolhead Back Cover

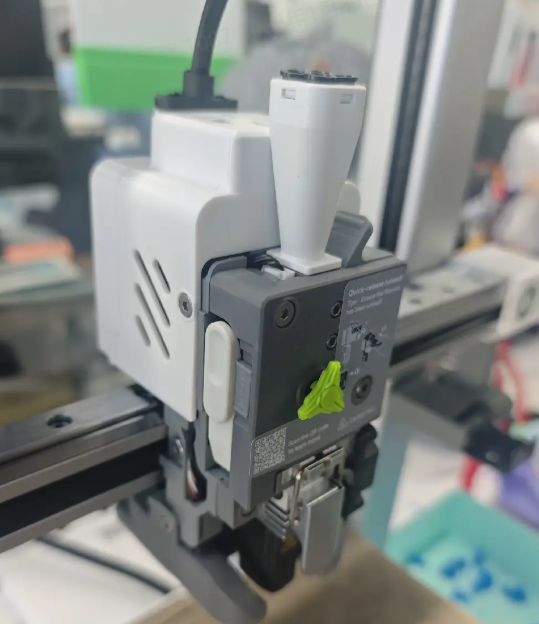
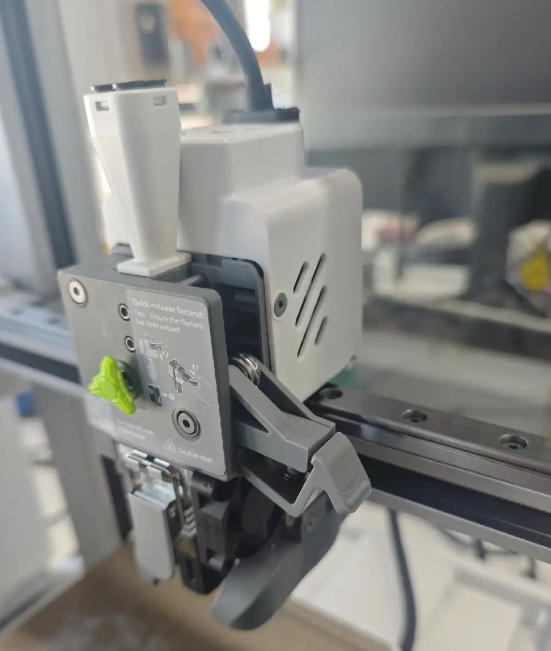
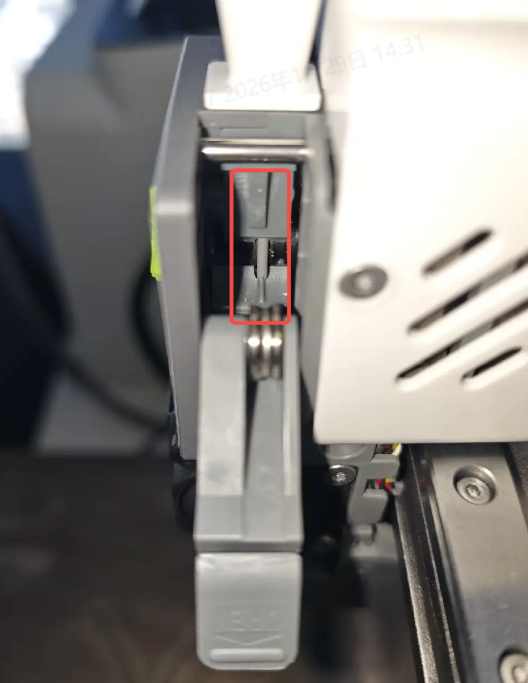
    Flip open the i7 Extruder Lever to release the i7 Extruder Gear.

    open the i7 Extruder Lever
    release the i7 Extruder Gear

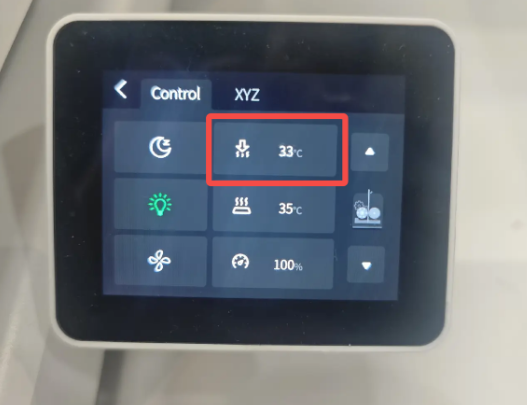
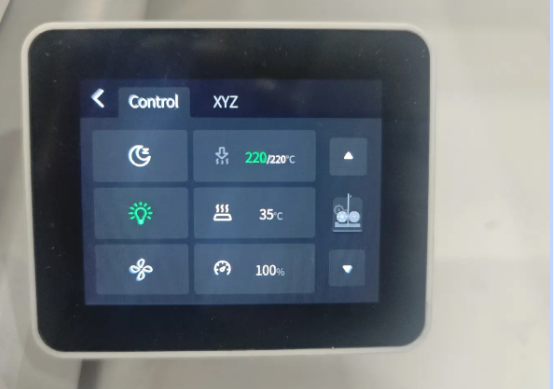
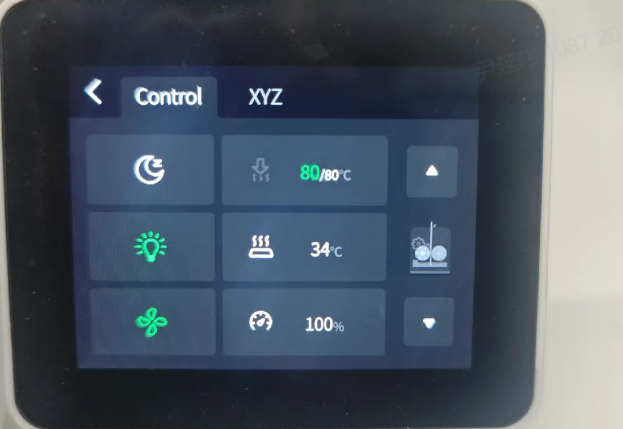
    Go to the control page and heat the i7 Hotend to the printing temperature of the filament.

    Caution: Do not touch the i7 Hotend or nozzle after heating to avoid burns! The exact temperature should be set according to the filament you are using.

    heat the i7 Hotend-1
    heat the i7 Hotend

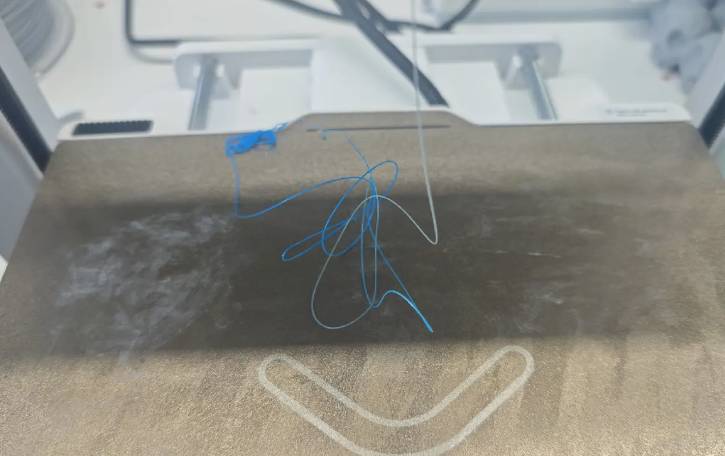
    Prepare a piece of filament about 30 cm in length.

    30 cm filament

    Feed the filament from the Toolhead Manifold into the i7 Extruder. Check through the side window to ensure the filament enters the Hotend.

    Toolhead Manifold into the i7 Extruder
    filament enters the Hotend

    Continue feeding the filament and observe the nozzle to ensure all residual filament in the Hotend has been completely extruded.

    completely extruded

    On the control page, lower the nozzle temperature to 80 °C and wait for the nozzle to cool down.

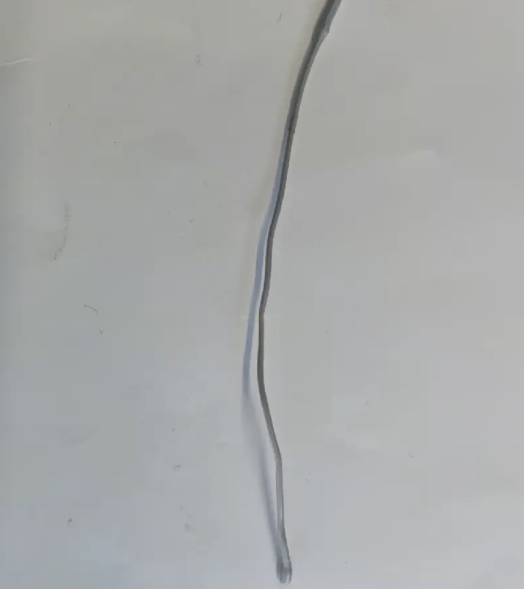
    Once the nozzle has cooled, slowly pull out the filament.

    slowly pull out the filament

    Inspect the pulled-out filament. If there are no discolored particles or burnt filament on its surface, the nozzle is clean.

    Depending on the results, multiple cold pulls may be required to thoroughly clean the i7 Hotend.

    Inspect the pulled-out filament

    SHOP

    • Store
    • Falcon Store
    • K Series
    • Hi Series
    • Ender Series

    COMMUNITY

    • Forum
    • Creality Cloud
    • Discord
    • Reddit
    • Open Source

    SUPPORT

    • Downloads
    • Help Center
    • Video Guides
    • Warranty & Repairs
    • Creality Wiki

    ABOUT

    • About Us
    • Distributors
    • ShareFest Events

    Be the First to Know

    Get the latest news from Creality.

    • Youtube
    • Facebook
    • Instagram
    • TikTok
    • Twitter
    • Reddit
    • Discord
    • LinkedIn
    Privacy PolicyTerms of SalesShipping PolicyFeedback
    United States(English)

    Copyright © 2025 Creality Co., Ltd. All rights reserved.