Welcome to Creality  SPARKX i7 Buy Now 🔥

Creality
Store
  • 3D Printers
  • Ecosystem
  • Support
  • Software
  • Blog
  • Creality Cloud
  • M1 & R1
  • United States (English)
Cancel

Quick Links

    Creality
    3D PrintersEcosystem SupportSoftwareBlogCreality CloudM1 & R1
    Store
    SPARKXFlagshipHi SeriesEnder SeriesHALOT Series
    SPARKX i7
    New
    SPARKX i7
    More Products
    Compare
    K2 SE
    New
    K2 SE
    K2
    New
    K2
    K2 Pro
    K2 Pro
    K2 Plus
    K2 Plus
    K1 Max
    K1 Max
    More Products
    Compare
    Creality Hi
    Creality Hi
    More Products
    Compare
    Ender-3 V4
    New
    Ender-3 V4
    Ender-5 Max
    Ender-5 Max
    Ender-3 V3 Plus
    Ender-3 V3 Plus
    Ender-3 V3
    Ender-3 V3
    Ender-3 V3 SE
    Ender-3 V3 SE
    More Products
    Compare
    HALOT-X1
    New
    HALOT-X1
    HALOT R6
    HALOT R6
    HALOT-MAGE S
    HALOT-MAGE S
    HALOT-MAGE
    HALOT-MAGE
    More Products
    Compare
    3D ScannersLaser EngraversFilamentsAccessories
    Sermoon P1
    New
    Sermoon P1
    Sermoon X1
    Sermoon X1
    Sermoon S1
    Sermoon S1
    Creality Raptor Pro
    Creality Raptor Pro
    Otter Lite/Basic
    Otter Lite/Basic
    More Products
    Compare
    Creality Falcon A1 Pro 20W
    New
    Creality Falcon A1 Pro 20W
    Creality Falcon A1
    Creality Falcon A1
    Creality Falcon2 Pro 60W
    Creality Falcon2 Pro 60W
    Creality Falcon2 Pro
    Creality Falcon2 Pro
    Creality Falcon2 22W
    Creality Falcon2 22W
    More Products
    Compare
    Hyper Series
    Hyper Series
    CR Series
    CR Series
    Soleyin Series
    Soleyin Series
    Ender Series
    Ender Series
    More Products
    Compare
    CFS-C
    New
    CFS-C
    SpacePi X4L
    New
    SpacePi X4L
    Creality SpacePi X4
    Creality SpacePi X4
    Creality Space Pi  Dryer
    Creality Space Pi Dryer
    CFS - Creality Filament System
    CFS - Creality Filament System
    More Products
    Compare
    Download Center
    3D Models
    Creality Cloud App
    Firmware & Software
    Service Center
    Help Center
    Creality Wiki
    Product Support
    Video Guides
    Product Comparison
    Filament Guide
    Discover
    User Stories
    3D Printing in Education
    Blog Center / SPARKX i7: TPU and Other Flexible Filaments Printing Guide
    Contents
    contents

    Join Our Newsletter

    Subscribe to our newsletter for 3D printing insights, step-by-step guides, and inspirations for your next 3D printing adventure.

    By subscribing, you agree to our Terms and Privacy Policy.

    Social Media

    • Youtube
    • Facebook
    • Instagram
    • TikTok
    • Twitter
    • Reddit
    • Discord
    • LinkedIn

    Contents

    • Preparations Before Printing
    • After Printing

    SPARKX i7: TPU and Other Flexible Filaments Printing Guide

    Apr 27, 2026 13:50:19

    Preparations Before Printing

    Filament Preparation

    • Select a filament with appropriate hardness. Common flexible filaments used in 3D printing have a wide range of hardness levels. From harder to softer, the order is: 77D > 70D > 68D > 55D > 95A > 85A > 83A > 80A > 75A > 70A.

    SPARKX i7 supports printing flexible filaments with a hardness of 95A or higher. If you want to print TPU filament using the CFS Lite, the filament must have a hardness of 64D or higher.

    Filament Hardness Recommendations:

    SPARKX i7 (Standalone): 95A or higher

    SPARKX i7 Autofill Combo: 64D or higher

    SPARKX i7 Color Combo: 64D or higher

    • Dry the filament. Use a filament dryer to dry the filament to prevent moisture absorption, which can cause print quality issues such as excessive oozing and stringing.

    Appendix: TPU Filament Hardness of Creality Brand:

    Filament Type


    Hardness


    CR-TPU


    85A


    HP-TPU


    95A


    Printer Preparation

    For flexible filaments that cannot be printed using the CFS lite, an external spool holder is required.

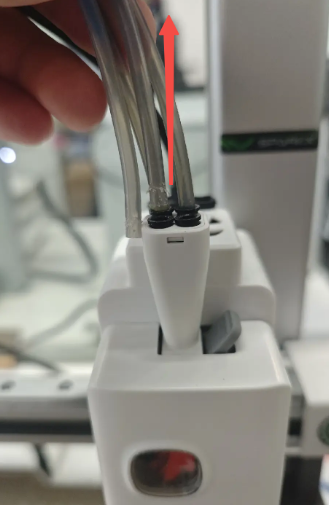
    Remove all PTFE tubes from the Toolhead.

    Remove all PTFE tubes from the Toolhead

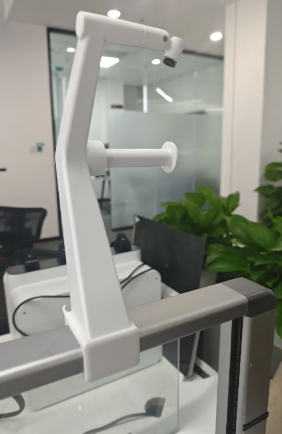
    Install the external spool holder on top of the printer gantry.

    Install the external spool holder

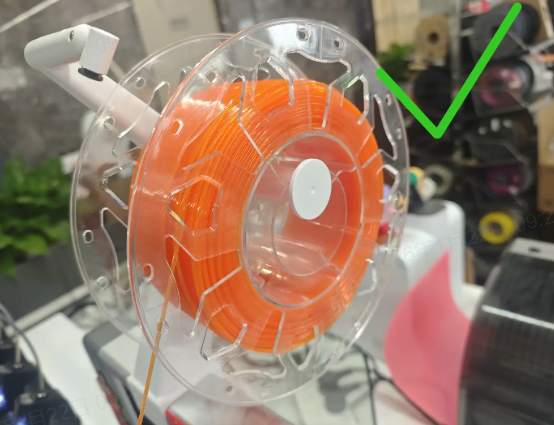
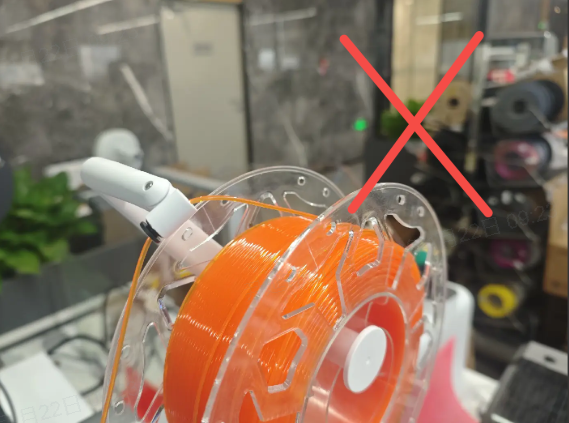
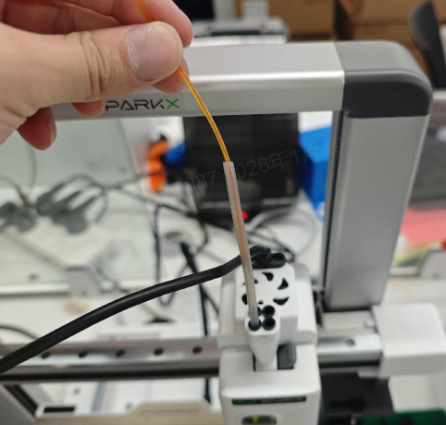
    Load the filament. When printing flexible filament, do not feed it into the extruder through the pneumatic fitting of the spool holder.

    Load the filament
    Load the filament

    Prepare a PTFE tube approximately 10 cm long and insert it into any pneumatic fitting of the five-way connector on the Toolhead.

    PTFE tube approximately 10 cm long

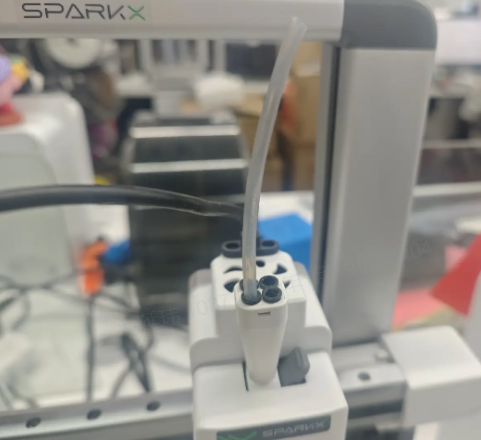
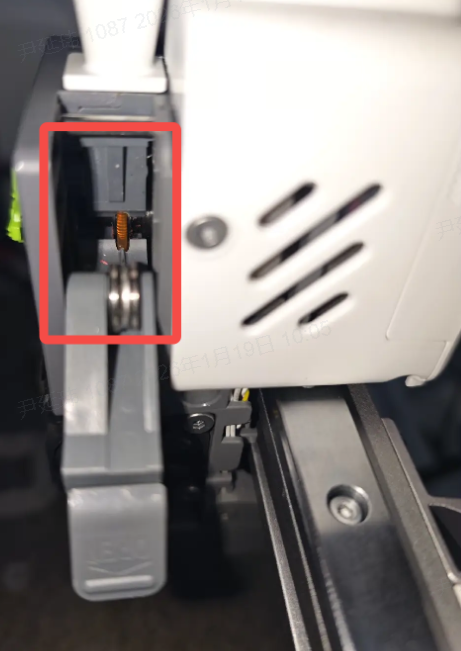
    Load the filament to be printed. Remove the extruder front cover, open the extruder idler latch, and insert the filament into the PTFE tube.

    Remove the extruder front cover

    When the filament end is observed entering the extruder drive gears, close the latch and reinstall the extruder front cover.

    extruder drive gears

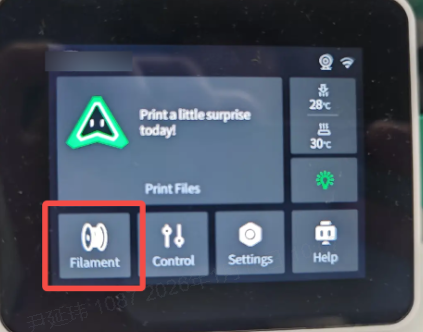
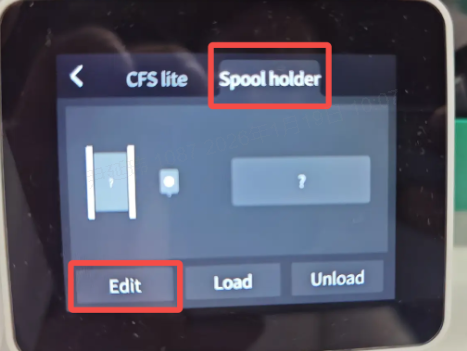
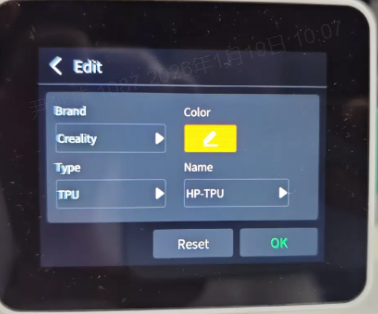
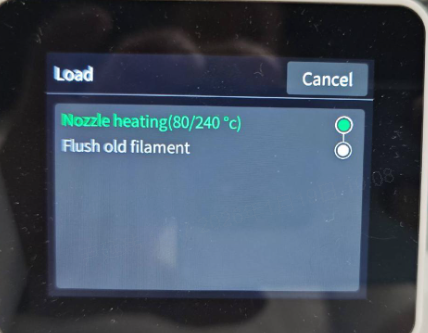
    Enter the Filament interface, select External Spool Holder, edit the filament information, and tap Load.

    Follow the on-screen prompts to complete the filament loading process.

    Enter the Filament interface
    External Spool Holder
    edit the filament information
    tap Load

    Slicing Settings

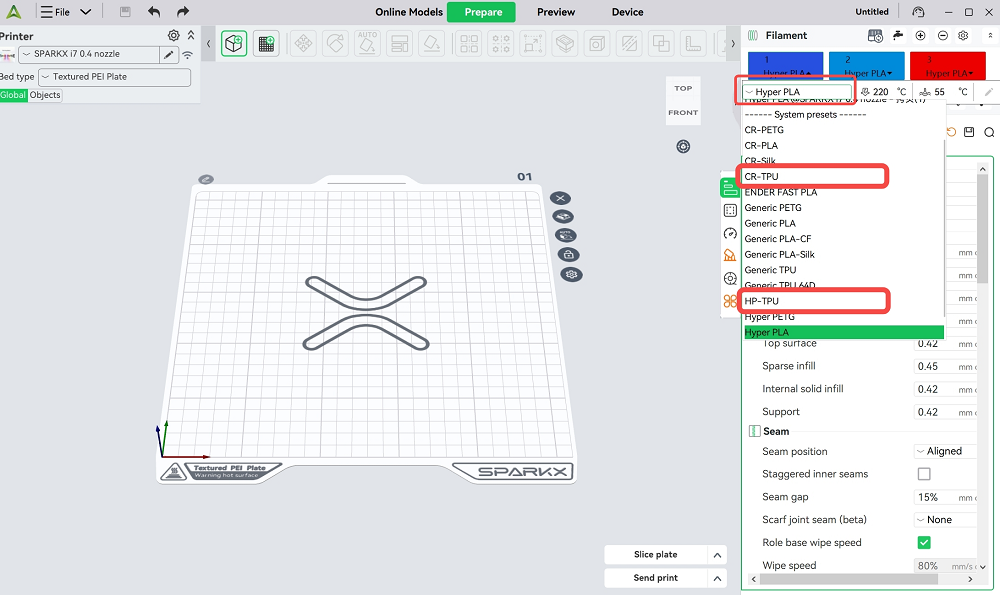
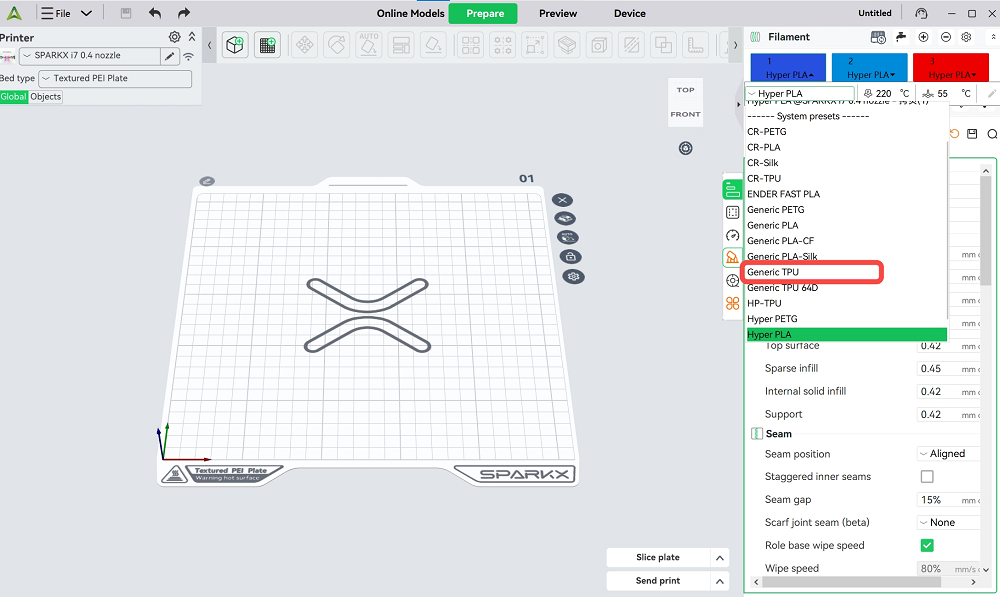
    When printing flexible filaments, it is recommended to use a 0.4 mm nozzle along with the corresponding preset parameters. For Creality CR-TPU and HP-TPU, dedicated filament presets are available. If you are using third-party flexible filaments, we recommend selecting the more conservative “Generic TPU” preset.

    Creality CR-TPU
    Creality Generic TPU

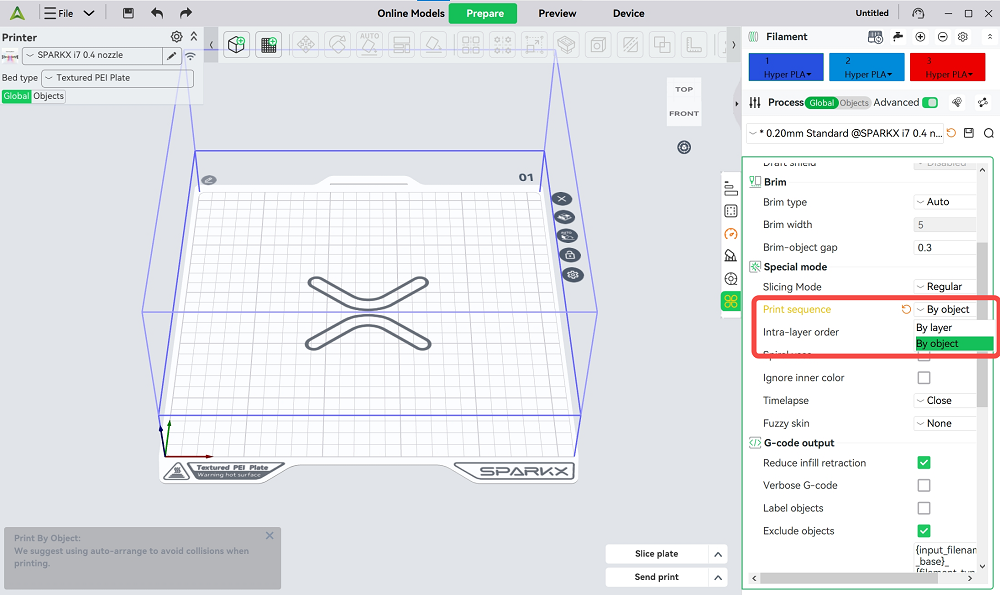
    Most flexible filaments are prone to stringing. Therefore, when arranging models on the build plate, excessive travel moves should be avoided. It is recommended not to place too many models on a single plate or use layer-by-layer printing. Instead, place only one model on the plate, or place a small number of models and use print by object mode.

    print by object mode

    After Printing

    Remove the Model from the Print Plate

    In general, flexible filaments such as TPU have strong adhesion to the Print Plate, and models with a large bottom surface can be difficult to remove. Do not use excessive force, as this may damage the model or the print plate. Instead, gently lift one corner of the model to create a small gap, spray alcohol into the gap, and then gradually separate the model from the print plate.

    Remove Stringing from the Model

    Drying TPU filament before printing can reduce stringing but cannot completely eliminate it, especially for models with frequent travel moves. To remove stringing from the printed model, you can use a hair dryer with hot air, or briefly pass a lighter flame over the stringing areas. Be careful to avoid damaging the model.

    SHOP

    • Store
    • Falcon Store
    • K Series
    • Hi Series
    • Ender Series

    COMMUNITY

    • Forum
    • Creality Cloud
    • Discord
    • Reddit
    • Open Source

    SUPPORT

    • Downloads
    • Help Center
    • Video Guides
    • Warranty & Repairs
    • Creality Wiki

    ABOUT

    • About Us
    • Distributors
    • ShareFest Events

    Be the First to Know

    Get the latest news from Creality.

    • Youtube
    • Facebook
    • Instagram
    • TikTok
    • Twitter
    • Reddit
    • Discord
    • LinkedIn
    Privacy PolicyTerms of SalesShipping PolicyFeedback
    United States(English)

    Copyright © 2025 Creality Co., Ltd. All rights reserved.