


The Ender-5 Max is one of the newest Creality printers, launched in February 2025. Designed to maximize productivity, this 3D printer delivers superior print quality with consistent layer bonding and lightning-fast speeds. The Ender-5 Max is the ideal Creality 3D printer for hobbyists and businesses alike as it’s suitable for creating larger 3D models.
We’re sharing a step-by-step breakdown of everything you can expect when you unbox the Creality Ender-5 Max, from what’s included in the box to a step-by-step assembly guide. If you’re a visual learner or need a little extra help, watch our in-depth Ender-5 Max unboxing and setup video.
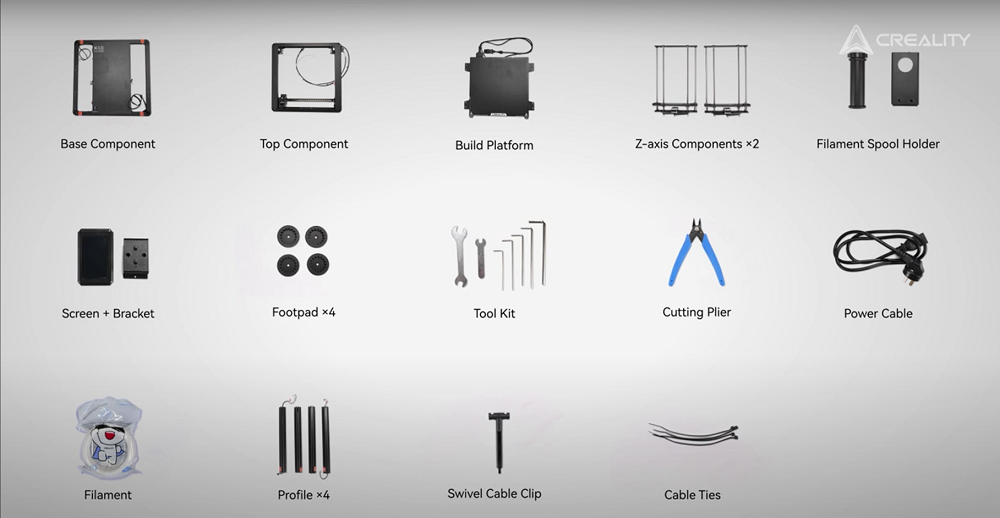
What’s Included with a Creality Ender-5 Max
Inside your Ender-5 Max 3D Printer box, you’ll find:
-
Base component
-
Top component
-
Build platform
-
Z-axis components x2
-
Filament spool holder
-
Screen and bracket
-
Footpad x 4
-
Tool kit
-
Cutting plier
-
Power cable
-
Filament
-
Profile x 4
-
Swivel cable clip
-
Cable ties
-
TPFE Tubes for TPU
-
Nozzle cleaner
-
USB drive
-
Nozzle
Packed securely in individual bags, you’ll also find:
-
M5x18 screw & washer x8
-
M4x12 screw & washer x4
-
M4X6 screw x3
-
M5x22 screw x4
-
M5x12 button head screw x4
-
M5x30 screw x2
-
M5x12 socket head screw & washer x8
-
M5x65 screw & washer x6
-
M3x6 screw x3
How to Safely Unbox Your Creality Ender-5 Max Printer
Place the box on a stable surface and take your time unboxing your new 3D printer, comparing the contents with the list above.
-
Open the top of the box, removing the first layer of foam.
-
Move aside the cables nestled within the next layer of foam.
-
Remove the remaining foam layers, including parts and accessories, setting them aside for now.
How to Assemble Your Creality 3D Printer
It takes just 10 minutes to assemble your Creality Ender-5 Max. To get started:
-
Place the base on a stable surface and connect one of the profiles. Flip the base sideways to make it easier to fasten the profile from the bottom with two M5x18 screws.
-
Repeat step 1 to attach the 3 remaining profiles.
-
Install the 4 foot pads to the bottom of the base using M4x12 screws and washers.
-
Return the base to its upright position and mount the top component onto the four profiles, securing it with six M5x65 screws and washers.
-
Remove the screws at the top of the Z-axis component and place the Z-axis component inside the side frame.
-
Fasten the bottom of the Z-axis component with two M5x22 screws and loosen the linear rod screws on the side.
-
Secure the top of the Z-axis component with two M5x12 button head screws, then tighten the linear rod screws.
-
Repeat steps 6 and 7 to install the other Z-axis component on the opposite side.
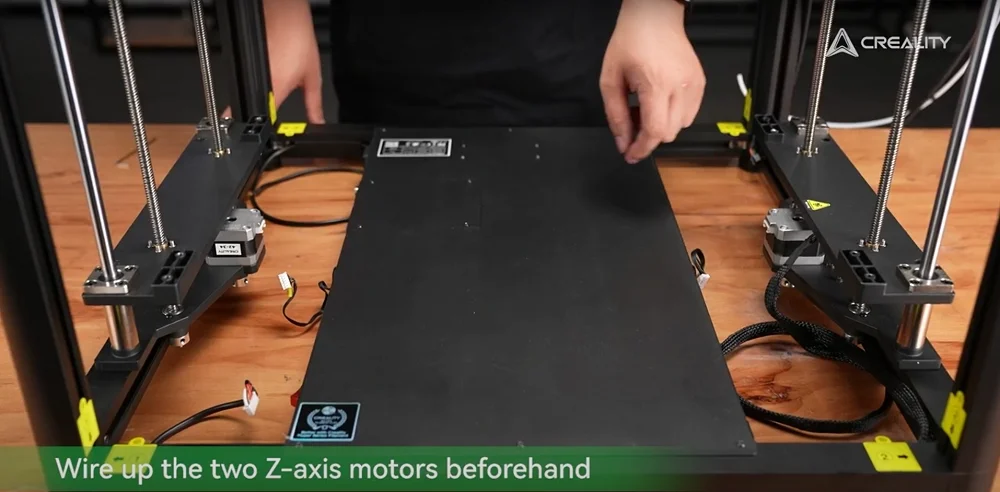
Installing the Ender-5 Max’s Hotbed
Start by wiring up the two Z-axis motors and removing the hotbed power cover from the base. Connect the bed leveling wire and secure it by locking it into place. Plug the hotbed power cord in tightly, locking it into the U-groove by twisting the ring.
Reinstall the hotbed power cover, ensuring the screws are correctly tightened into place. Align the hotbed to the screw holes in the Z-axis components and fasten with eight socket head cap M5x12 screws.
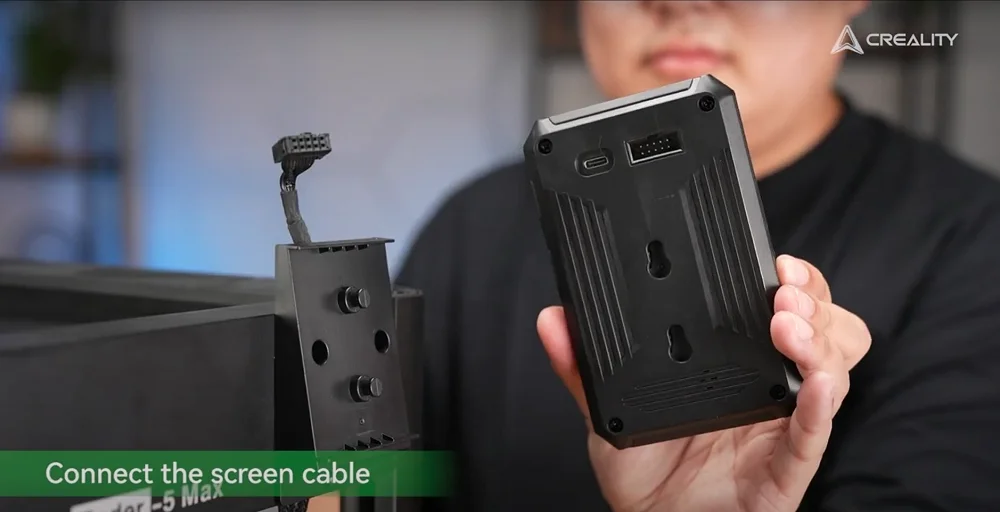
How to Setup the Ender-5 Max’s Screen and Spool Holder
Remove the profile seal over the screen cable, passing the cable through the two holes in the top frame before installing the screen bracket using M4x6 screws. Check that no wires are caught between the profile and bracket.
Connect the cable to the screen before snapping the screen into the bracket. Once complete, align the screen cable with the profile and conceal the cable within the profile seal.
Install the material rack with M5x30 screws and mount the filament tube into place. At the top of the profile, use the open wrench to screw the universal clip seat into place.
Wiring the Ender-5 Max Printer
Look for the ‘notice’ label on the extruder cable and snap it into the clip seat, using cable ties to wrap the label and wires to the clip seat. Connect the extruder cable, securing it with M3x6 screws, before inserting the Teflon tube into the extruder.
Wire up the filament run-out sensor and Y-axis motor, then connect the XY end stops. Remove the profile seal nearest the XY end stops and bind the cables with a cable tie. Conceal the cables by sealing them within the profile.
Plug the bottom end of the cable into the base before removing the profile seal close to the X-axis motor. Connect the X-axis motor using the wire and seal it into the profile. Wire the LEB indicator and light bar, before plugging the bottom of the wire into the base.

How to Power On Your New 3D Printer
Connect the power cable to your Ender-5 Max and turn the 3D printer on by using the red side switch. The screen will turn on, prompting you to select your chosen language. Read and accept the privacy policy before following the on-screen instructions to connect to your local network. Carry out a self-check and calibration, including setting your chosen nozzle temperature.
How to Start 3D Printing with the Ender-5 Max Printer
Now, you’re almost ready to make your first 3D prints. To get started:
-
Cut the filament at a sharp angle.
-
Pull the Teflon tube from the extruder and push the filament through the Teflon tube.
-
Open the extruder latch and insert the filament.
-
Lock the latch and return the Teflon tube to its original position, locking it into place.
-
Plug the USB drive into the screen and select your 3D file to start printing.
FAQs about the Ender-5 Max Printer
-
When was the Ender-5 Max released?
The Ender-5 Max was released on 10(th) February 2025.
-
What is the Ender-5 Max price?
The latest Creality 3D printer retails at $849.
-
How fast can an Ender-5 Max print?
This 3D printer has a max printing speed of 700 mm/s.
-
What is the acceleration of the Ender-5 Max?
The Ender-5 Max has a top acceleration of 20,000mm/s².
Getting Started with Your Creality Ender-5 Max Printer
With the help of this in-depth guide, your Ender-5 Max should be online in under an hour. Get started by creating your first 3D prints with the Ender-5 Max or exploring our blog for inspiration and advice on how to get the most from your Creality 3D printer.
Already creating 3D designs with your Creality printer? Show off your 3D printer creations on our private Facebook group or tag us on your social media posts.