


The most difficult part after buying a printer is setting it up. Even after watching countless videos, you still don't get 100% clarity on what to do after unboxing the printer. At Creality, we understand how difficult it can be to do all of this.
But not anymore.
We are here to help you gain clarity on how to use your K2 Plus Combo step-by-step. Not only this, you'll learn about how to do installation, self-check, print test, and much more.
So what are you waiting for?
Let's dive deeper so you can start using this incredible printer.
Step-by-step Guide To Unbox K2 Plus Combo
You've bought the best printer in town. Now, what's next?
The first thing you need to do is UNBOXING. So, let's look at how you can do it like a professional.
Step 1: Find The Sticker
You'll get the printer in cardboard packaging. It's to ensure the product stays safe even in extreme conditions. When it arrives at your home or office, it'll be in its best condition, without any scratches or damage.
Look closely at the packaging, and you'll see an unboxing sticker. We have presented everything in a diagrammatic format, making it easy for everyone to understand.
Step 2: Remove Clasps
On the packaging box, you'll see 8 clasps. These clasps keep the box firm and interconnected.
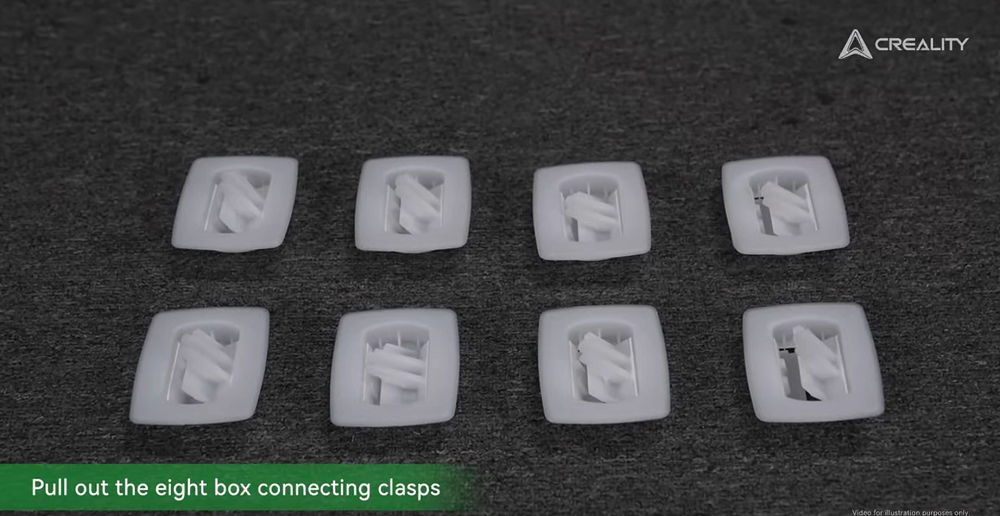
To unbox, you've to remove these clasps. But which equipment should you use to remove it? Screwdrivers? Hammer?
None of these. You can remove it with your hands because they are clasps.
Rotate the box to remove clasps on the other side as well.
Step 3: Lift The Box
Now, it's time to remove the box. For your ease, we have added special cut-out handles that offer additional grip. Lift it upward slowly.
Pro Tip: At this step, get help from a colleague, friend, or family member for convenience. However you can do it alone, but it's recommended to have at least 2 people do it, as shown in the picture.
Step 4: Remove Outer Packaging
When you remove the box, you'll see the box wrapped in cling wrap. After removing it, you'll get one step closer to opening your printer.
After that, remove the cardboard materials that are added to ensure your printer's safety during shipping.
Now, you'll see a small booklet on top of the box. Keep it aside, as this will serve as your mini-guide for this incredible printer. Remove the foam present on the top.
Step 5: Foam & Filaments
Now, the first thing you'll see on top is foam. Remove it.
Behind this, you'll see two filaments. Remove these filaments as well, but ensure they are kept safe, as you may need them later.
Step 6: Take Out Foam
Even after removing filaments, you'll see a lot of foam. But the question is, how do you remove it?
For that, you'll need to push aside the X-axis. After that, removing foam will be much easier and quicker.
Keep removing foam until you see this.
Step 7: Unveil Your Printer
Now it's time for the grand reveal. Lift out the printer from the box. But if you're planning to do it alone, then stop.
Because the printer is heavy, you might need another person to pull it out. Handle it carefully so it doesn't fall.
Step 8: Remove Materials
Peel off the protective film because you don't need it anymore. You can peel it off with your hands easily. Avoid using any pointed tools at this stage.
At the side, you'll see a board lid attached to the printer. However, now that the printer has arrived at its rightful owner, you no longer need it. So, detach it as well.
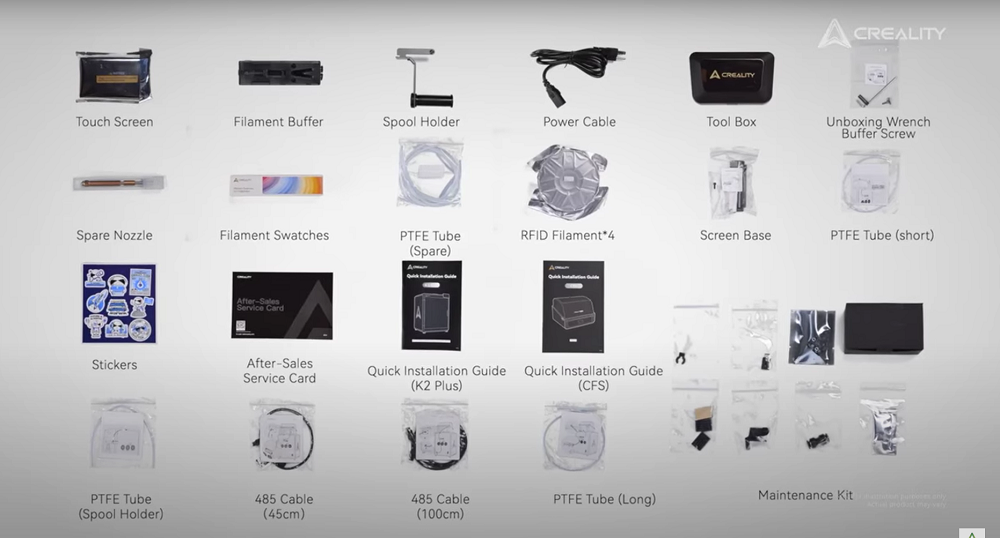
Step 9: Take Out the Accessories
There are plenty of accessories that you'll get with the K2 printer. Take them out from the embedded foams so you can use them.
Step 10: Use Wrench
We mentioned earlier that you don't need any additional equipment for the unboxing. However, as we move to the final stages, you will need one additional piece of equipment. What's that?
It's an unboxing wrench.
Now open the glass door.
If you look closely, you'll see some screws. You need to unlock all the screws that are locking the CFS guard rail.
Start unscrewing them with the help of an unboxing wrench.
Remove all of these carefully.
Now, take out the CFS unit from the box. It's mostly wrapped to ensure there's no damage to any part.
Step 11: Internal Compartment
Here, you'll see a lot of foam. Remove all of it.
Now you'll be able to see 2 filaments present at the back. Remove them. In total, you'll get 4 spools of 500g Hyper PLA RFID.
After removing the filaments, there will still be some foam, especially on the backside. Remove it from the compartment. You'll see two Z-axis fasteners. Remove them from both sides with your hands. No need to use any wrench or equipment at this step.
Step 12: Remove Camera Cover
Look closely at the side. Remove the camera covers present on top and bottom.
Step 13: Remove Screws
On the heatbed, there are approximately 4 screws. But what's their purpose?
They lock the heatbed.
To unlock it, you need to use an unboxing wrench. Unscrew all the screws.
Congratulations! You've completed the unboxing of the K2 Printer.
Step-by-step Guide For Installation In K2 Plus Combo
You've done the unboxing now. What's next?
Now, you need to do the installation. This step would have been tricky. But with Creality, you can do it easily.
Just follow the steps mentioned below.
Take the screenbase in your hand and align it carefully with the installation hole. Follow this picture and do this alongside.
To ensure it stays put, fasten it with screws. You can use an unboxing wrench for this purpose.
Now start installing the screen base with the help of screws.
Set the screen cable through the connection hole to the front. However, you need to remove the transparent sheet covering the hole.
After removing the sheet, you'll see the cable. Now, set the screen cable through the connection hole to the front side.
What are you waiting for?
It's time to connect the screen cable.
But how can you do that?
At the back of the screen, you'll see a small connection port. Join it with the screen cable.
Now that the connection has been established, it's time to push the screen into its slot. Move it in the left direction to firmly adjust.
Take out the glass side. Remove all of the packaging and wrapping sheets.
Now, carefully put it on the lid.
Now, you're at the last step of installation. Install filament buffer. There are specific spots on the buffer, so follow it for proper orientation.
But it'll fall.
That's why you need to secure it properly with the help of screws. Tightly screw them with an unboxing wrench.
How to Connect CFS?
By connecting your 3D printer to CFS, you can enable multi-color printing and automatic filament replacement. Not only this, it ensures proper filament
- Spool placement
- Prevents jamming
The list of benefits goes on. So, here comes the real question: How can you connect it?
Here are the steps you need to follow.
Step 1: CFS on Top
Take out the CFS and place it on the top of the printer.
This is what it'll look like.
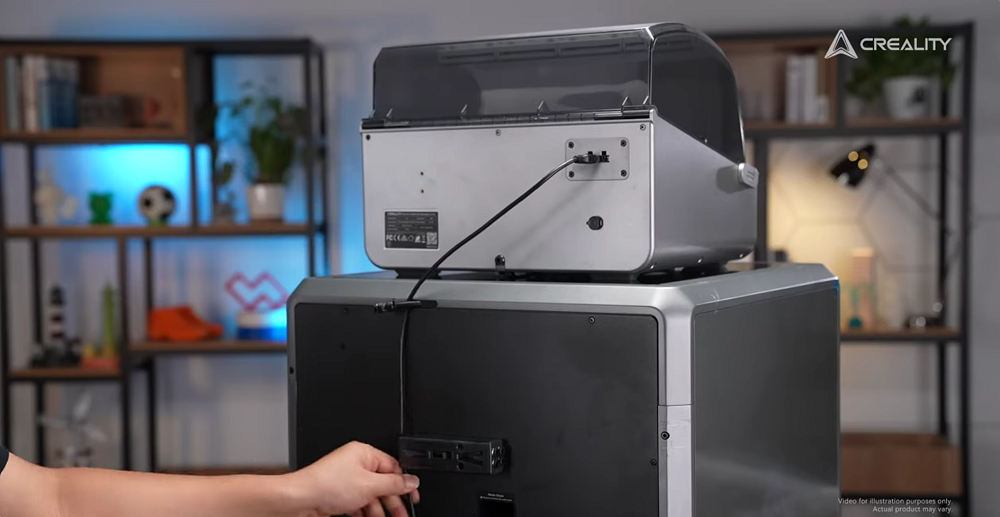
Step 2: 485 cables
Now, you'll need some 485 cables, which should be approximately 100 cm to 50 cm in length.
But what will you do with these cables?
You need to connect them to the printer. Use 100cm cable for this purpose.
Ensure you connect it to the correct ports.
Don't forget about the buffer. You need to connect it with CFS as well. Use 45cm 485 cables for this purpose.
Connect it with relevant ports, as shown in the picture.
Step 3: PTFE Tubes
Now you need PTFE Tubes.
Link the buffer inlet to CFS with the PFTE tube. It should be a long tube.
This is how you need to connect the tubes.
Push the buffer latch to the left and insert the PTFE tube. For this, you can use a short tube.
But what about the other end?
For that, you need to insert it into the extruder inlet.
This is how it'll look at the end of the procedure.
Power On Self-Check Guide
Now, you've almost completed all the critical aspects of setting up your printer.
Want to do a self-check?
Here's a quick and easy method to perform a power-on self-check.
Firstly, you need to peel off the screen protection film.
Plug the cable into the electric port and turn on the switch. A button is present on the printer.
Now your Creality printer will turn on.
But do you need to do the advanced setup? So how will you do it?
With the help of a boot-up guide. Choose the language of your choice.
It'll even show you details about screws that you might need to unscrew or tips that'll enhance its functioning.
Lastly, accept the Privacy Policy.
Now you've entered the main settings. But to access advanced features, you need to connect to a secure Wi-Fi network.
Add the password by using the inbuilt screen keyboard.
After some tabs, you'll see the Self-Check option. Click on it.
Now, it'll start conducting self-check.
Once it's completed, you'll see this on the screen.
If you want to know more about how a 3d printer works then check out our guide now. It'll help you understand more about printers and increase efficiency.
Step-by-step Method To Load RIFD Filaments
Loading filaments might be the most hectic task for some people. But with the Creality printer, you don't have to go through a lot of hassle.
Here's a simplified guide on how to do it.
Step 1: Take Out Filaments
The first thing you need to do is take out the RIFD filaments. Lay them on a table, as shown in the picture below.
Step 2: CFS
Now open the CFS. But how can you do that?
By pushing back the latches.
Step 3: Feeding Tube
Since it's open, you can easily install the RIFD. Now, carefully insert the feeding tube into the opening.
After connecting, slightly rotate it. Then, the filament will begin to move automatically.
You'll get automatic syncing of all filament information.
Step 4: Non-RFID Filament
You can use non-RFID filament as well.
But for it to function properly, you need to edit the settings. Go to Filament Info and change:
- Brand
- Color
And then click on Save.
Note: If you want to learn about filaments in detail, then check out this detailed guide now.
Step 5: Install Filaments
You can install more filaments as well.
Step 6: CFS Lid
Now, it's time to close and lock the lid.
Print Test Of K2 Printer
Now, let's move to the last step, which is print testing. Firstly, choose a local model, and you're ready to start printing.
Select the correct settings to ensure seamless printing.
This is how the screen will appear once printing begins.
Good News: Your printer has started printing.
If you want to learn more about how to make 3d files for printing, then click here. Or check our guide on how to 3D print F1 car.
To Sum Up
In this detailed guide, we have summarized how you can use the K2 Plus Combo. If you've any further queries, then don't hesitate to reach out to us. Our team is available to assist you so you can enjoy printing.
If you want to explore more printer options, then read this latest article. Our experts have carefully crafted the best printers for you.