


3D printing is like using Lego blocks to make things. Little pieces are being added on top of each other instead of being cut away from a big block. Usually made of plastic, these layers are stacked on top of each other to make the end item. It starts with a computer drawing, like a blueprint, and is sent to the printer in the same way that an email is sent. The printer then makes the real thing by following the plan. A 3D printer constructs a final thing by adding layers on top of each other. 3D printing allows for the production of complex models with a small amount of material, exceeding the limits of traditional manufacturing processes.
What is a 3d printer?
3D printers are interesting machines that use computer designs to make real things by adding layers one at a time. It's called "additive manufacturing" because it doesn't take away material, it merely adds it. Initially, you need a digital model, which is like a plan and is created using special computer software. The program makes thin sections of the model. Following the design, the printer builds each layer to make the result. One may print metals, ceramics, resins, thermoplastics, and even food items like chocolate or sugar with a 3D printer. Within 3D printing, various materials are utilized based on the requirements of the end item. The material you choose is very important, like if it needs to be strong or bendable, or if it's going to be used in a medical treatment. That is why the type of material used depends on what the final result needs to be like.
How does a 3d printer Work? Simple Explanation
Here's a simple explanation of how a 3D printer works:
Design: The first step in printing is creating a digital model of the item using a computer-aided design (CAD) application. This program divides the original image into smaller pieces using an image-slicing technique.
Preparation: The 3D printer gets the image that has been sliced up. For some printers, the printer gets ready by heating the print bed and tip. For others, the resin is turned on.
Printing: The printer starts to work and builds the thing layer by layer. Some printers, such as FDM, heat the plastic and apply it to the print bed via a tube. Others, such as SLA and DLP, create each layer of an item using a specific liquid plastic that develops when exposed to light, such as UV light.
Layer by Layer: Layer by layer, the printer follows the cut model and adds material or hardens resin. This process continues until the whole item is made.
Cooling and Solidification: In some cases, the item may need time to cool down and harden after being printed. Fast cooling is needed for FDM printing. To fully harden, the item might need to be washed in a liquid and then put in UV light for SLA and DLP.
Finishing: To make the object seem flawless, it could need some last touches once it has been printed and hardened. This includes, for instance, removing any superfluous support structures, smoothing down rough edges, and adding color with paint.
How does a 3d printer Work step by step?
Here's a step-by-step breakdown of how a typical Fused Deposition Modeling (FDM) 3D printer works:
- Preparation:
- A digital 3D model of the thing that the person running the 3D printer wants to make is either made by them or found online. Such software is available for purchase or can be downloaded from websites where people share their ideas.
- The user then uses software called "slicing" to get the model ready to print. For each layer, this program tells the printer how to build it, by breaking the 3D model into thin horizontal layers.
- Loading Filament:
- The operator loads a spool of thermoplastic filament (such as PLA or ABS) into the 3D printer.
- A motorized extruder device feeds the material into the printer.
- Heating the Nozzle:
- The printer's nozzle, connected to the extruder, gets hot to melt the filament. The temperature changes depending on the type of filament.
- Building the Base (First Layer):
- The printer's build platform (print bed) moves to the starting position.
- The needle starts to squirt melting filament onto the build platform. This makes the object's first layer. It sticks to the base so that the layers below it can build on top of it.
- Layer-by-Layer printing:
- When the first layer is done, the build stage is moved down a bit, and another layer of filament is put on top of the first one.
- The nozzle continues to move around, laying down new layers of filament. Each time a layer is completed, the construction platform slides down slightly. This process repeats until the entire thing is completed.
- Each layer fuses with the previous one as it cools, gradually building up the object's shape.
- Support Structures (if needed):
- When a product contains pieces that stick out or require support, the printer can create temporary structures out of the same material. These supports keep the model stable while it is being printed, preventing it from falling apart.
- Cooling and Solidification:
- As each layer of filament is deposited, it cools and solidifies almost immediately, bonding to the previous layers.
- Certain printers contain built-in fans or heated areas to assist govern how the item cools, making sure of a good result.
- Completion:
- Once all layers are printed, the build platform returns to its original position, and the nozzle retracts.
- After printing, the item needs to cool completely before being properly removed from the construction platform.
- Post-Processing:
After printing, the item may need extra work, such as sanding down rough spots, removing supports, or painting to add color.
How does a Resin 3D printer Work?
Resin 3D printers, also known as Stereolithography (SLA) or Digital Light Processing (DLP) printers, work quite differently from Fused Deposition Modeling (FDM) printers. Here's a step-by-step explanation of how a resin 3D printer works:
1.Preparation:
Like FDM printers, it starts with a 3D model that was made in CAD software or found online. After that, slicing software makes it ready to print by telling the printer how to make each layer of the item.
2.Resin Tank:
Resin 3D printers have a tank that holds a special kind of liquid resin. This material changes when it comes in contact with light, especially UV light.
3.Building the Base (First Layer):
The base of the printer, which is normally attached to a moving arm, moves down into the resin tank until it's almost at the bottom. Then, at the bottom of the tank, and a thin layer of liquid glue is spread out evenly.
4.Curing the First Layer:
A UV light source, such as a laser or projector, emits a pattern of UV light that corresponds to the object's first layer. The liquid resin solidifies when it comes into contact with light, forming the object's initial layer.
5.Layer-by-Layer printing:
After the initial layer is completed, the platform is raised slightly, and liquid resin is applied to it. The UV light then creates a pattern for the next layer on the fresh resin, hardening it and attaching it to the one underneath. This process continues, with the platform rising slightly after each layer is completed until the entire thing is done.
6.Support Structures (if needed):
Like FDM printing, plastic 3D printing might need support systems for parts that stick out. Most of the time, these supports are made from the same resin as the rest of the item and are sealed at the same time.
7.Rinsing and Curing:
After printing, the item is removed from the resin tank and cleaned with a solvent such as isopropyl alcohol to remove any remaining resin. Then it's thoroughly cured using UV radiation to ensure it's firm and robust.
8.Post-Processing:
After it has dried, the printed item may need more work, such as taking away the support structures, sanding down rough spots, or painting to make it look just right.
Resin 3D printers use a liquid resin that dries under UV light to make accurate and detailed prints. This is a different way to make things. It's an interesting technology that makes it easier to make things with lots of small details.
How does a FDM 3D printer Work?
Fused Deposition Modeling (3D printers) make things by adding layers of hot resin filament. Here's how it works:
- Filament Feed:A spool of thermoplastic filament, such as PLA or ABS, is fed into the printer.
- Extrusion:The filament passes through a heated extruder nozzle, which melts it into a semi-liquid state.
- Layer-by-Layer Deposition:Moving along the X, Y, and Z directions, the printer's nozzle puts thin layers of melted material on the build platform based on the digital design.
- Cooling and solidifying: As the next layer is added, it quickly cools and solidifies, joining the one below it.
- Build Platform:Because the build platform moves slowly down (or up, depending on how it's made), each new layer can go on top of the one below it.
Repeat:This process will keep going until the whole thing is built up, one layer at a time.
How Does a Metal 3d printer Work?
A strong laser is used by metal 3D printers like Direct Metal Laser Sintering (DMLS) or Selective Laser Melting (SLM) to melt and join metal powder together to make things. How it works:
- Metal Powder Bed:The build base inside the printer is covered with a thin layer of metal powder that is spread out evenly.
- Laser Melting:To make the first layer of the item, a strong laser melts metal powder exactly as shown on the computer model.
- Layer-by-Layer Building:The base goes down a bit, and on top of the last layer, more metal powder is added. The laser then melts this new layer, sewing it to the layer below.
- Cooling and Solidification:As each layer is melted and fused, it quickly cools and solidifies, forming a solid metal structure.
Repeat: This process continues layer by layer until the entire object is complete.
Block Diagram of 3d printer?
Here's a simplified block diagram of a typical Fused Deposition Modeling (FDM) 3D printer:
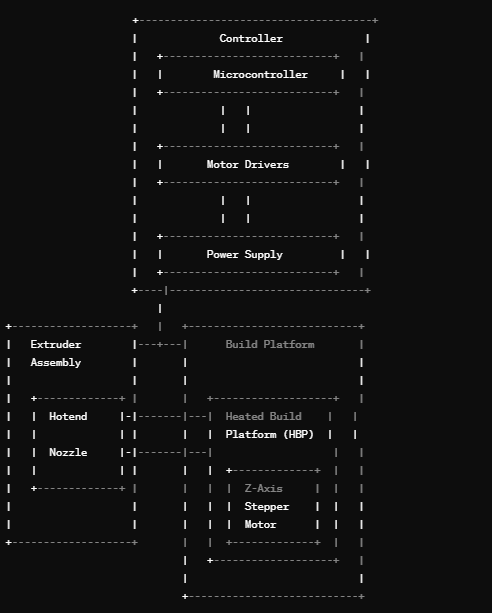
Explanation:
- Controller:In most 3D printers, a microprocessor runs this part, which is like the brain. It reads the slicing software's directions and tells the printer's different parts how to move.
- Extruder Assembly:This includes both the hotend (which melts the filament) and the tip (which fires the filament). A motor moves the material through the extruder.
- Build Platform:The platform where the object is built. It may be heated to improve adhesion with the first layer of filament.
- Z-Axis Stepper Motor:This motor controls the vertical movement of the build platform, allowing layer-by-layer construction of the object.
- Power Supply:Provides power to all components of the printer.
- Motor Drivers:It controls the X, Y, and Z stepper motors that move the printer and build platforms in different directions.
The main parts of a 3D printer are shown in this diagram, along with how they work together. However, the real construction may be different based on the model and the manufacturer.
Conclusion: How does 3d printing Work
3D printing changes the way things are made by making it possible to create quick prototypes, unique customizations, and complicated forms that are hard to make with other methods. Because it works so well and can be changed to fit different needs. 3D printing is essential in many fields, from cars and airplanes to healthcare and market goods.
FAQ:
Can I teach myself 3D printing?
Of course! Learning how to use 3D printing on your own gives you a lot of options for making things and coming up with new ideas. You can use this skill in a lot of different ways, whether you want to make prototypes, customize things, or just try out your imagination. Also, the Internet is full of tools that can help you get started and improve your skills as you go.
How to make 3d printer diagram?
Here's a general approach for creating a diagram:
Research: Look at 3D printer models that are already out there and learn about the main parts (gantry, extruder, build platform, control board, motors, etc.).
Choose Your Focus: Figure out whether you want to draw the whole printer or just one part, like the extruder unit.
Define Scale and Views: Pick the right size and decide which views to draw (front, side, top, and isometric)..
Start with Basic Shapes: Use simple geometric forms to block out the main parts.
Add Details: Gradually add in more complex features, motors, wiring, etc.
Labeling: Label each part clearly, and you might want to add notes to explain roles or requirements.