


There’s nothing more frustrating than seeing your 3D printer lay down a seemingly perfect first layer, only to come back and find your model dotted with tiny bumps, foamy patches, or strange “zits.” You didn’t ask for a mini lunar landscape—you just wanted a smooth, clean print.
This issue is called 3D print bubbling, one of the most common beginner problems—and entirely fixable. In this guide, we’ll explore what causes these bubbles, how to fix them, and how to prevent them so your prints come out smooth every time.
What Is 3D Print Bubbling?
3D print bubbling is a visible symptom that has something to do with smooth extrusion. It occurs when small bubbles of gas are expanding inside your printer’s nozzle. The bubbles then burst as the filament is extruded.
Think of squeezing a toothpaste tube with air trapped inside—when the air hits, the paste sputters instead of flowing evenly. The same thing happens in your hotend, leaving bubbles, pits, or bumps on your print that spoil the finish and can even weaken the part.
Common Symptoms of 3D Bubbling
Before you start tearing your printer apart, you need to confirm that bubbling is actually the blame. Sometimes it can be mistaken for other issues like z-seam misalignment or over-extrusion. Look for these tell-tale signs:
-
Audible popping or hissing: The most obvious symptom. If you hear popping, hissing, and sizzling sounds while printing, it is a surefire sign that bubbles are popping in the nozzle.
-
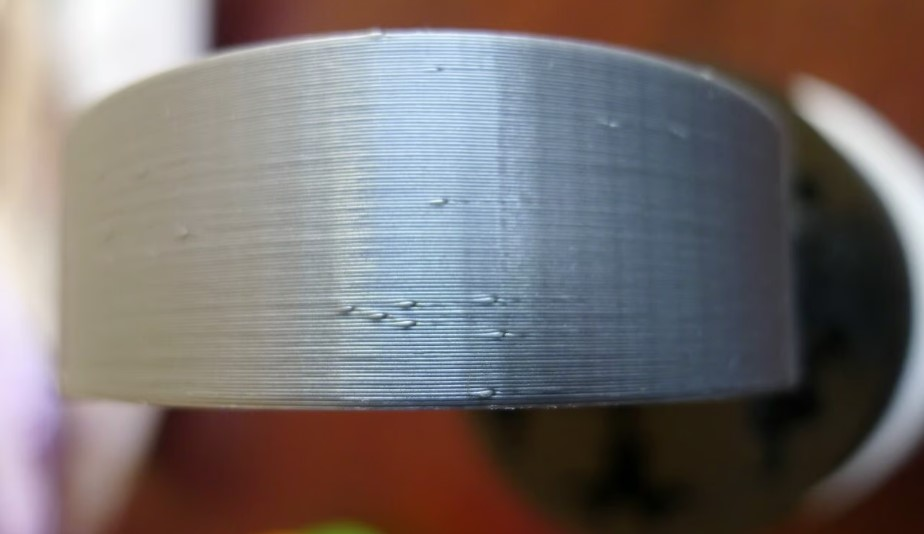
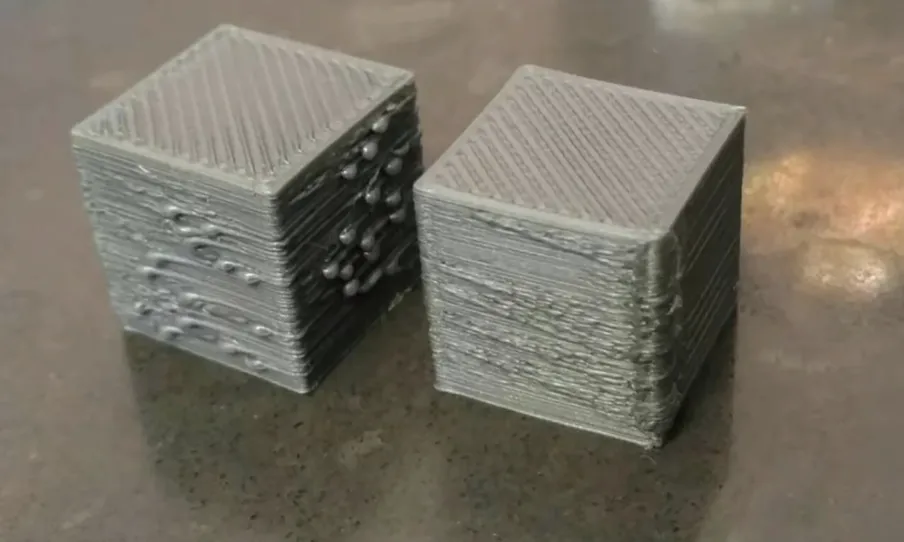
Pockmarked Surface: Your print may look like it has tiny “acne.” If you notice small holes, it is a sign of bubbles popping inwards. Small blobs indicate the plastic being pushed out.
-
Inconsistent layer lines: After a bubble bursts, you might notice gaps or thinner spots in the surrounding extrusion. This causes small imperfections in the layers of the print.
-
Rough Texture: If you run your finger over the print, it feels like sandpaper rather than smooth plastic.
-
Hazy or Cloudy Prints: specifically with clear or transparent filaments, bubbling will turn a glass-like finish into a cloudy, milky mess due to the trapped micro-bubbles.
-
Dimples on top layers: Not all bubbling occurs in the first layer. If the top layers have dimples, it is a sign of bubbles popping out during the later layers.
What Causes 3D Print Bubbling?
Bubbling doesn’t have a single cause. It’s the result of gas forming where it shouldn’t, and several conditions can lead to that.
Moist filament (the most common cause)
PLA absorbs moisture from the air over time. Even though it feels solid, water slowly works its way into the filament. When that filament enters a hot nozzle, the moisture turns into steam almost instantly.
In fact, steam takes up a lot more space than liquid water. As the steam expands, bubbles form inside the molten filament. These bubbles then pop as the filament is extruded out of the nozzle. This is the reason behind the popping sounds made by wet filaments. This is the most common cause of bubbling, but it is not the only cause.
Printing temperature that’s too high
PLA doesn’t like excessive heat. When printed hotter than necessary, it can release trapped gases more aggressively or begin to degrade slightly. Both effects increase bubbling.
High temperature also amplifies the impact of moisture. A filament that prints acceptably at a lower temperature may bubble badly when overheated.
Over-extrusion on the first layer
If too much plastic is being pushed through the nozzle, pressure builds up in the hotend. That pressure makes it easier for trapped gas to expand into visible bubbles as the filament exits.
A nozzle that’s too close to the bed can have the same effect. The plastic has nowhere to go, pressure rises, and imperfections become more obvious.
Printing too fast at the start
Fast first layers don’t give molten PLA time to settle and bond smoothly. Any trapped gas or extrusion instability becomes more visible, especially on wide first-layer lines.
Contamination or nozzle issues
Dust, degraded filament, or partial nozzle clogs can disrupt smooth flow. While these issues don’t always cause bubbling directly, they can make bubbling worse or harder to diagnose.
How to Fix 3D Print Bubbles (Step-by-Step)
The key to fixing bubbling is to address causes from filaments to printers. Start with the most likely and work your way down.
Step 1: Dry the filament
If you suspect moisture at all, dry the filament first. This step solves the majority of bubbling problems.
Use a filament spool dryer, food dehydrator, or a household oven set to a low, safe temperature. PLA should be dried below its softening point. Leave the spool to dry for several hours, then store it in a sealed container with desiccant. If bubbling disappears after drying, you’ve found the root cause.
Realted Post: Complete Guide to PLA Temperature
Step 2: Lower the nozzle temperature
Next, reduce the printing temperature in small steps. Drop it by about 5°C at a time and observe the extrusion.
You’re looking for the lowest temperature that still gives consistent flow and good layer adhesion. Lower temperatures reduce gas expansion and often improve surface quality at the same time.
Step 3: Adjust first-layer extrusion
Fine-tuning the first layer makes a big difference.
Check the following:
-
Reduce first-layer flow slightly if it’s higher than normal
-
Adjust Z-offset so the nozzle isn’t pressing too hard into the bed
-
Slow down the first layer so extrusion is smooth and controlled
The goal is steady, relaxed extrusion rather than forced plastic.
Step 4: Check retraction and flow consistency
If bubbling is accompanied by 3D printing blobs or zits, retraction and flow calibration may be contributing.
Calibrate flow rate to ensure you’re not over-extruding, and make sure retraction settings aren’t causing pressure surges in the hotend. Stable pressure equals more predictable extrusion.
Step 5: Inspect the hotend and filament path
Finally, make sure there’s nothing physically interfering with extrusion.
Clean the nozzle if it’s old or contaminated. Check that the filament feeds smoothly without grinding or slipping. Replace filament that’s brittle or visibly degraded.
How to Prevent Bubbling in Future Prints
Once you’ve fixed bubbling, prevention becomes much easier than repeated troubleshooting.
Store filament properly Keep PLA in an airtight container with fresh desiccant. Open-air storage allows moisture to creep in, even in dry-looking rooms.
Dry filament before printing If PLA has been sitting out for more than a few days, dry it before use. Dry filament flows smoothly and prints quietly.
Lower your nozzle temperature Print at the lowest temperature that still gives good layer adhesion. Excess heat makes moisture-related bubbling more aggressive.
Avoid long idle heat times Don’t let the nozzle sit hot without printing. Heated filament can degrade and trap gas before extrusion starts.
Keep the nozzle clean Burnt plastic or partial clogs can trap air and cause sputtering. Clean or replace nozzles regularly.
FAQs
Q1: Why does bubbling sometimes stop after the first few layers? A: As the system stabilizes, moisture may be expelled and extrusion becomes more consistent. That doesn’t mean the first layers were fine, just that the problem became less visible.
Q2: How do I know if my PLA has too much moisture? A: If your PLA pops or crackles while printing, extrudes with bubbles or foam, or leaves a rough, pitted surface on your print, it likely contains moisture. Clear PLA may also turn cloudy, and heavily moisture-exposed filament can feel brittle or snap easily.
Q3: Why is my PLA bubbling on the build plate?
A: PLA bubbles on the build plate because moisture trapped in the filament turns into steam when heated in the nozzle.
Q4: Why are my 3D prints bubbling on the first/top layer?
A: The first layer is printed hotter and slower with more pressure against the bed, which makes trapped moisture burst more visibly. While top layers have no material above them to hide defects, so any sputtering or air pockets remain visible on the surface.
Wrapping Up
3D print bubbling isn’t mysterious once you break it down. It’s a sign that gas is getting into the extrusion process, most often from moisture, but sometimes from heat, pressure, or setup issues. Once you understand that bubbling is a symptom, not a diagnosis, troubleshooting becomes much simpler and far less frustrating.