


You dial in the temperature, level the bed, the first layers go down clean… and then you notice them: tiny bumps and random dots. A line of little pimples marching up one side of your print like a bad secret trying to escape. These surface defects don’t usually mean your printer is broken — they mean something subtle is happening inside the nozzle.
In this guide, we’ll break down what blobs and zits really are, why they appear even on “good” prints, and how to fix them step by step.
What Are Blobs and Zits in 3D Printing?
In 3D printing, blobs and zits refer to small, unwanted protrusions or bumps that appear on the surface of your printed models.
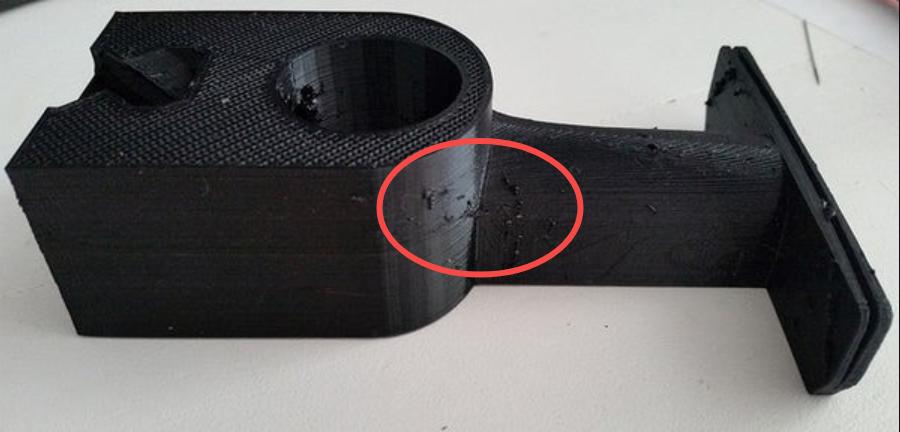
Blobs are larger, localized lumps of excess filament that usually appear at layer starts, ends, or direction changes when built-up nozzle pressure is released.
Zits are much smaller, pimple-like dots scattered across the surface or along seams, typically caused by minor oozing or brief over-extrusion.
Why Does My 3D Print Have Blobs and Zits?
You may ask: why do blobs and zits happen on my 3D prints? They don't usually indicate a major hardware failure, but rather point to settings that need fine-tuning. Simply put, these two are symptoms of excess filament being deposited in the wrong place or at the wrong time, but the exact reasons can vary based on your setup.
Excess Nozzle Pressure and Oozing
When the nozzle is hot and filament is flowing, pressure builds up inside the melt zone. If movement pauses or extrusion stops, that pressure can force molten filament to ooze out during travel moves or at layer starts and ends. The excess material then hardens on the surface, forming visible blobs—especially on curved or highly detailed prints.
Retraction and Temperature Issues
If retraction distance or speed is too low, filament isn’t pulled back far or fast enough to relieve nozzle pressure, allowing it to ooze during travel moves or layer changes.
When combined with overly high temperatures, the filament becomes more fluid and slow to solidify, making leakage worse. As a result, zits can form at nearly every layer change—especially if the nozzle temperature is 10–20 °C above the filament’s optimal range.
Z-Seam and Layer Change Behavior
The Z-seam marks where each layer starts and ends, making it a natural point for minor oozing as the nozzle pauses or restarts. If the slicer aligns every seam in the same location, these small defects stack into a visible line of blobs.
Randomizing seam placement spreads them out, but can make zits appear across multiple surfaces, especially when speed changes or insufficient cooling allow molten filament to shift during layer transitions.
Hardware and Filament Factors You Should Not Ignore
Hardware issues like a partially clogged nozzle or worn extruder gears can cause irregular flow, leading to blobs.
Filament moisture: Wet filament expands and extrudes inconsistently, causing extrusion spikes.
Nozzle condition: Partially clogged or worn nozzles create pressure fluctuations.
Extruder calibration: Incorrect e-steps or over-extrusion leaves excess material during transitions.
Bowden vs direct drive: Long Bowden tubes increase the elastic “spring” in the filament path and can worsen pressure/ooze behavior.
How to Fix Blobs and Zits in Creality Print
If you are a Creality user, then Creality Print offers the common and straightforward slicer options you need to tackle blobs and zits. In the following sections, we will use Creality Print 6.1 version as an example.
Adjust Retraction Settings
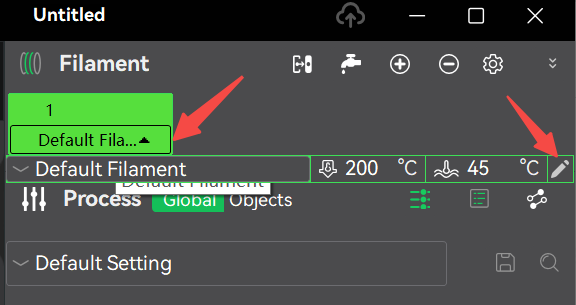
Step 1: Launch your Creality Print on your PC, navigate to the option "Default Filament", and click on the "pen" icon to modify the reraction settings.
Step 2: When ready, the "Filament settings" window pops up. Move to the "Setting Overrides" section to adjust the retract distance, speed, z-hop, and unretraction compensation.
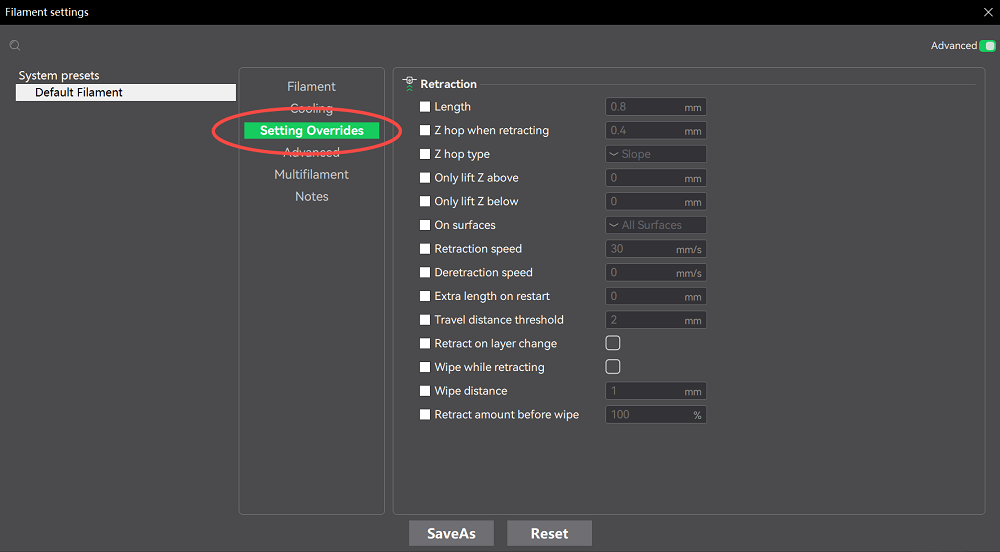
Generally, for direct-drive printers, start around 0.5–2 mm for the retract distance and 20–60 mm/s for the retract speed.
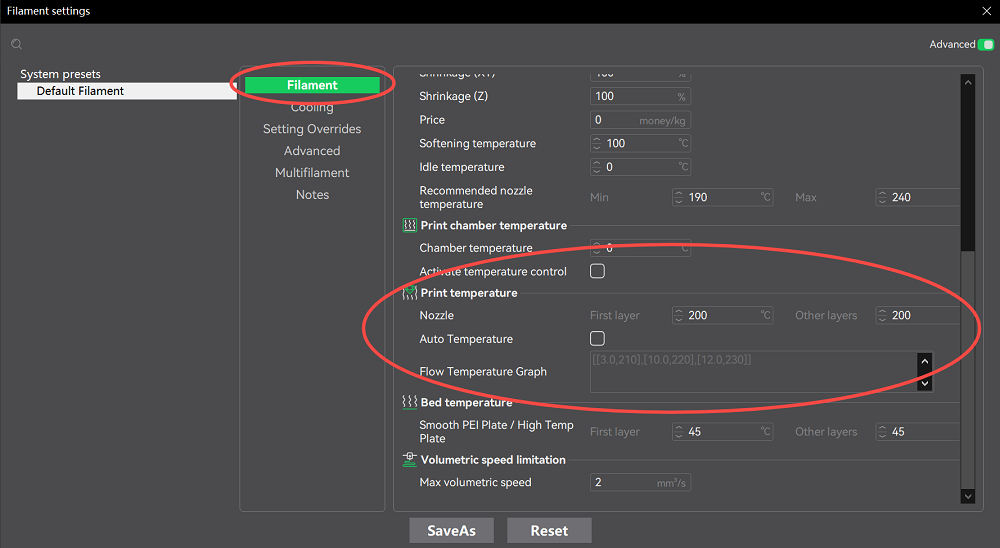
Lower Printing Temperature
Cooler filament flows less readily and reduces oozing, but too cool causes under-extrusion or weak layer bonds.
On the same interface, click "Filament" and go to "Print temperature". Here, you can change the chamber, nozzle, and hotbed temeperature. Reduce temp to 2–5°C steps while watching layer adhesion and bridging.
Change Speed, Acceleration, and Flow Tuning
These are three factors that can resolve the blobs and zits issues in 3D printing:
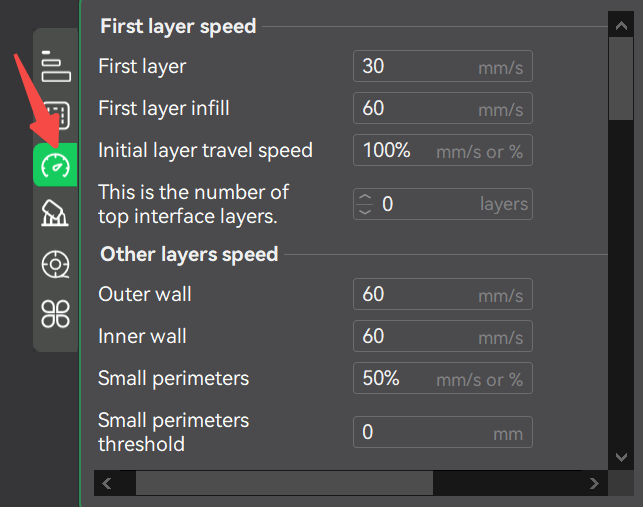
Outer wall speed: Slower outer walls improve finish and give the printer time to recover from retractions.
Tips:
PLA/PETG & ABS/ASA: outer wall speed: 25–35 mm/s; outer wall speed: 20–30 mm/s. Outer walls should be 30–50% slower than inner walls.
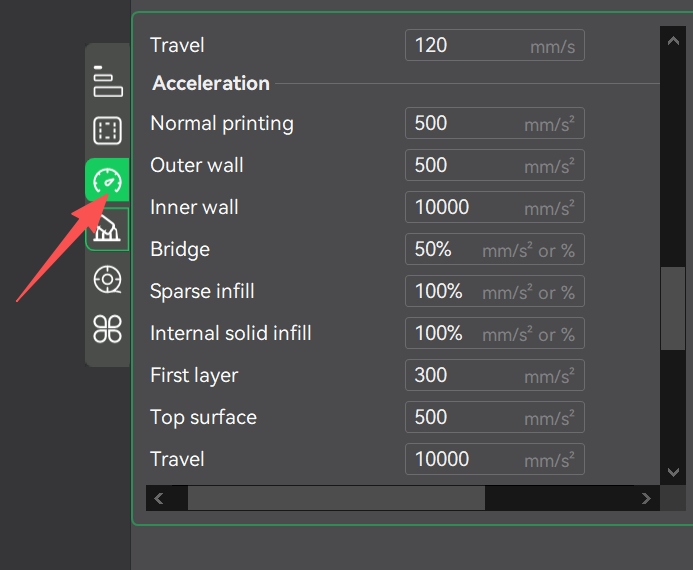
Acceleration/jerk: Reducing acceleration can smooth pressure changes. With regard to the acceleration, a conservative, high-quality range should be 300–500 mm/s², while for the jerk, 5–8 mm/s (classic) and 0.02–0.05 (Marlin).
Coasting: If your slicer supports coasting, it can stop extruding a tiny bit before the end of a perimeter to relieve pressure and prevent a blob at the end. A suggested coasting distance is 0.05–0.20 mm, but you can start at 0.10 mm. For the coasting volume (if volume-based), it's 0.02–0.06 mm³.
How to Prevent Blobs and Zits in Future Prints
Now you have figured out how to fix this problem, but it's of huge importance to know how to avoid 3D blobs and zits in the future. As shown below
| Prevention Strategy | Action Steps | Benefits |
| Filament Quality | Choose high-quality filament brands like Creality | Consistent extrusion |
| Storage | Use vacuum bags with silica | Prevent moisture-related zits |
| Nozzle Maintenance | Clean weekly; replace every 500 hours | Avoid clogs and irregular flow |
| Slicer Optimizations | Enable coasting and wipe | Hide seams and reduce oozing |
| Calibration | E-steps and flow tests | Accurate filament delivery |
FAQs About 3D Printing Blobs and Zits
Q: What is the 3D printer blob of death?
A: The blob of death is a massive buildup of molten filament that leaks out of the hot end and engulfs the nozzle, heater block, and sometimes the entire print head. Unlike normal blobs or zits on a print surface, this one keeps growing until it hardens into a plastic cocoon around critical components.
Q: Why do 3D printer blobs appear on corners?
A: Blobs often appear on corners because the print head slows down to change direction while pressure inside the nozzle remains high. This mismatch causes excess molten filament to ooze out and accumulate at the corner.
Conclusion
Blobs and zits don't have to plague your 3D printing journey—with the right adjustments to retraction, temperature, and other settings, you can achieve professional-quality results.