


Extrusion issues are among the most common and frustrating problems in 3D printing. Whether your print looks blobby, thin, or doesn’t print at all, chances are something’s wrong with how your printer is pushing out filament. Issues such as over-extrusion, under-extrusion, and complete lack of extrusion can derail your projects, wasting time and materials.
Here's a rundown of the three most critical extrusion problems: over extrusion, under extrusion, and simply not extruding, so you can quickly identify what's going wrong and how to fix it.
What Is Extrusion in 3D Printing?
Extrusion is a process where the filament is melted and pushed through the printer's nozzle during the printing of your 3D print layer by layer. To simplify the concept, extrusion can be described as similar to squeezing toothpaste from a tube. For a successful print, your extruder should deliver the right amount of filament at the right temperature and speed.
Whether too much, not enough, or no extrusion at all, it is when extrusion is off that the print's surface, strength, and overall quality suffer. The good news? Most extrusion problems can be diagnosed visually and fixed with a few adjustments.
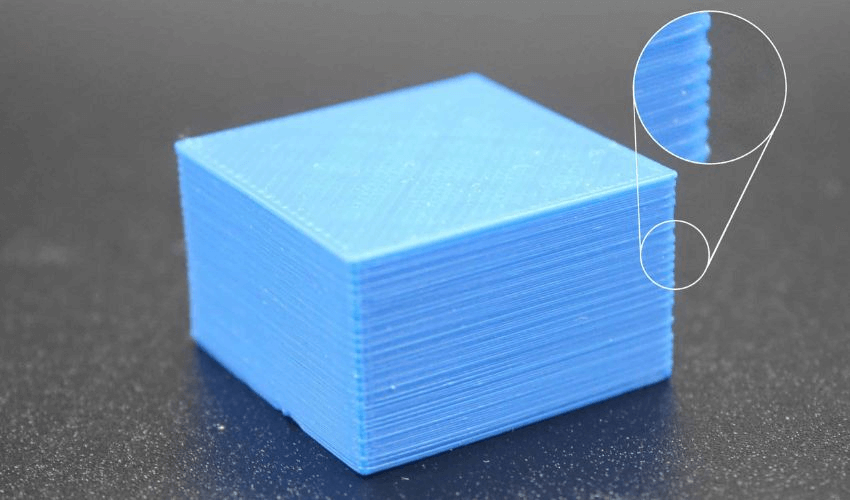
3D Printing Over Extrusion
Over-extrusion happens when your 3D printer pushes out more filament than is required for the model. This excess material will build up, and that naturally translates to more plastic-meaning stronger prints-but actually results in messy surfaces, dimensional inaccuracy, and wasted material. It is also one of the most frequent problems with FDM printing and can affect the structural integrity of the final object.
What It Looks Like
If your print shows these signs, it’s likely over extruding:
-
Blobs or zits forming on the outer surface
-
Stringing or oozing between parts
-
Rough, uneven walls
-
Layers that appear thicker or squished together
If you’ve ever seen your model “bulge” or lose detail—this is a classic case of over extrusion.
Causes
Over-extrusion can be caused by several factors:
Flow rate too high: Your slicer may be set to extrude more filament than necessary.
Temperature too high: Filament becomes too runny and flows uncontrollably.
Incorrect filament diameter: If your slicer assumes the filament is smaller than it actually is, it’ll push out too much.
How to Fix 3D Printing Over Extrusion
Now that you have figured out what could be the cause of the overextrusion during 3D printing, here's how to fix it easily:
Calibrate your extrusion multiplier (flow rate). Most slicers let you lower it slightly—start with a 2–5% reduction.
Lower nozzle temperature. Try reducing it in small steps (5°C increments) to find the sweet spot.
Check filament diameter. Measure with calipers and make sure it matches your slicer settings.
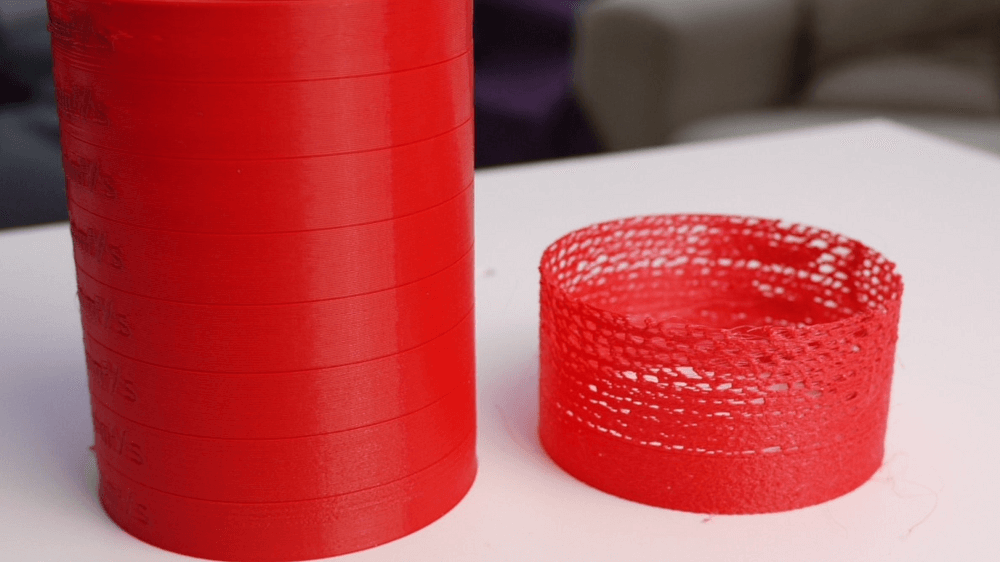
3D Printing Under Extrusion
The opposite of over-extrusion is under-extrusion, where the printer extrudes less than the amount of filament needed, making prints weak, incomplete, or gappy. This leads to layerless models or those with thin walls, compromising strength and detail.
What It Looks Like
Signs of under extrusion include:
-
Gaps between lines or layers
-
Sparse or missing infill
-
Weak, brittle parts that break easily
-
Thin outer walls or incomplete perimeters
If your print looks like it’s “starved” of plastic or you can see daylight through the layers, that’s under extrusion.
Causes
These factors can cause under-extrusion:
Partial nozzle clog: Dirt, burnt filament, or debris restricts flow.
Extruder tension issues: The gear may not grip the filament tightly enough.
Low temperature: Filament isn’t melting completely.
Incorrect filament diameter or flow settings: The printer is simply not commanded to push enough plastic.
How to Fix
If your print develops under extrusion, the following might work:
Clean or replace the nozzle. Run a cold pull or replace it if clogged.
Check extruder tension. Ensure the feeder gear bites the filament properly.
Raise the nozzle temperature. Try 5–10°C higher to improve flow.
Increase flow rate slightly. Adjust your slicer by 2–5%.
Check for filament path obstructions. Make sure the spool moves freely.
3D Printer Not Extruding
Sometimes, your 3D printer simply doesn’t extrude any filament at all—no lines, no first layer, just an empty print bed. No filament is coming out of the nozzle, often halting the print entirely. This is known as a no extrusion issue, and it’s often mechanical rather than slicer-related.
What It Looks Like
Signs of under extrusion include:
-
No filament comes out of the nozzle
-
Clicking or grinding noises from the extruder motor
-
Blank first layer or faint scratches from the nozzle
Causes
Completely clogged nozzle blocking all flow
Filament not loaded or stripped at the feeder
Extruder motor issue (loose cable, overheating, or driver failure)
Incorrect starting temperature (nozzle not hot enough to melt filament)
H3: How to Fix
Not extruding is often mechanical rather than slicer-related. Therefore, the solutions focus on the printer itself:
Check filament path first. Ensure it’s loaded correctly and not tangled.
Heat the nozzle manually and try extruding. If nothing comes out, it’s clogged—clean or replace it.
Inspect extruder motor. Make sure it’s spinning and gripping the filament.
Verify slicer start commands. A misconfigured start G-code might be stopping extrusion.
How to Prevent 3D Printing Extrusion
The best way to avoid 3D printing extrusion headaches is by preventing them. A bit of regular care goes a long way toward preventing it from happening again, after you've fixed an extrusion issue.
-
Store filament properly. Moisture can cause inconsistent extrusion.
-
Clean the nozzle regularly. Prevent buildup before it clogs.
-
Calibrate often. Recheck flow rate, steps/mm, and temperature with each new filament brand.
-
Use quality filament. Cheap or unverified spools often vary in diameter.
-
Keep your extruder gear clean. Remove plastic shavings that can reduce grip.
-
Optimize slicer settings. Avoid extreme temperatures, use appropriate retraction to minimize oozing, and enable features like linear advance for better flow control.
-
Print test models regularly to catch issues early.
Quick Comparison: Over vs Under vs No Extrusion
| Issue | What It Looks Like | Typical Cause | Fix |
| Over Extrusion | Blobs, rough surface | Flow too high, temp too high | Lower flow, lower temp |
| Under Extrusion | Gaps, thin walls | Clog, low temp, low flow | Clean nozzle, raise temp |
| Not Extruding | No filament at all | Full clog, motor issue | Clear nozzle, check motor |
FAQ: Common Extrusion Questions
Q1: Why does my printer stop extruding mid-print? Usually, this is due to filament grinding or a partial clog that worsens as printing continues. Check the nozzle and make sure the spool moves freely without tension.
Q2: Can filament moisture cause under extrusion? Yes, moist filament forms steam bubbles inside the hotend, which disrupts the flow. Always dry filament before printing if it has been exposed to humidity.
Conclusion
These are common problems in 3D printing, but are fully controllable if you have the proper knowledge. By understanding how extrusion works, being aware of the early symptoms, and knowing the right target fixes to employ, you'll turn frustrating failures into successful prints.