


G code is the programming language your 3D printer uses to function. Without it, your printer can't do anything. It's a set of instructions that tells your printer exactly where to move, what temperature to reach, and how much filament to extruder.
Every single print runs on it. Think of it as the recipe your printer follows to create physical objects from digital files. Your printer receives thousands of these instructions for even simple prints, executing them one by one to build your model layer by layer.
If you want to understand 3D printing better, troubleshoot problems faster, and improve your print quality, you need to know how G code works.
What Is G Code in 3D Printing?
G code has been around since the 1950s. It was originally created at MIT for industrial CNC machines and now runs modern 3D printers.
The technology has evolved, but the basic concept remains the same. It's a standardized language that machines understand across different manufacturers and industries.
The "G" stands for "Geometric" because it controls the geometric movements of your printer. Left, right, up, down, forward, backward. Every movement your print head makes is controlled by G code commands.
How G Code Works in 3D Printing
Understanding the process from digital file to physical object helps you print better and troubleshoot faster. The workflow involves several steps that transform your 3D model into instructions your printer can execute. This process is automated by software, but knowing what happens behind the scenes gives you more control over your results.
From 3D Model to G Code
Your printer cannot read 3D model files directly. STL files are just mathematical representations of shapes with no instructions your printer can use.
They define the geometry but contain no information about how to actually build that geometry. This is where the conversion process becomes necessary.
Here's the conversion process:
-
Download a 3D model file (STL format is most common)
-
Open it in slicer software on your computer
-
The slicer cuts your model into thin horizontal layers
-
It creates instructions for each layer
-
Save the file to an SD card or send it to your printer
-
Your printer reads the G code and starts printing
What Slicer Software Does
Slicer software converts your 3D models into G code. Popular options include Cura, PrusaSlicer, and Creality Print. Each has different features and interfaces, but they all perform the same basic function. Your choice of slicer can significantly impact print quality and success rates.

What the slicer does:
-
Slices your model into hundreds or thousands of thin layers
-
Calculates where you need solid parts versus hollow parts
-
Determines exactly how much filament you'll need
-
Sets temperature parameters for your nozzle and heated bed
-
Generates the final G code file with all commands
Different slicers create different G code for the same model. Many people experiment with different slicers to find what works best for their printer and print types.
Important G Code Commands for 3D Printing
You don't need to memorize every command. Knowing these basic ones helps when troubleshooting problems or editing G code files. These commands form the foundation of every print file you'll use. Understanding them gives you insight into what your printer is actually doing during a print.
Movement Commands
These commands control how your printer moves. Movement is the core function of any 3D printer. Getting the printer head to the right position at the right time is what builds your model. Understanding these commands helps you diagnose movement issues.
-
G28 - Returns the printer to its starting position (homing)
-
G1 - Moves the printer head while extruding plastic
-
G0 - Moves the printer head without extruding (travel moves)
Example: G1 X50 Y100 Z0.2 F3000 tells your printer to move to X=50mm, Y=100mm, Z=0.2mm at 3000 mm per minute while extruding filament.
Temperature Commands
Temperature control is critical for print success. Wrong temperature equals failed prints. Too cold and your filament won't flow properly. Too hot and you get stringing and poor surface quality. These commands give you precise control over heating.
-
M104 - Sets nozzle temperature and continues with other commands
-
M109 - Sets nozzle temperature and waits until it reaches that temperature
-
M140 - Sets bed temperature and continues
-
M190 - Sets bed temperature and waits for it to heat up
Pro tip: Use a temperature tower to find the perfect temperature for your specific filament brand and color.
How to Create G Code Files
Creating G code files is straightforward. Modern slicer software handles all the technical calculations and code generation.
You just need to make the right choices about print settings. The process becomes second nature after you've done it a few times.
Choosing Slicer Software
Pick your slicer based on your printer model and experience level. For Creality printers like the Ender 3 or K1 series, these options work well. Each slicer has strengths and weaknesses, so your choice depends on what features matter most to you.
-
Creality Print - Built specifically for Creality printers. User friendly interface.
-
Cura - Free and open source, compatible with most printers
-
PrusaSlicer - Free with advanced features like variable layer height
-
Simplify3D - Paid software with professional level features
If you're starting out, use Creality Print or Cura. Both are free with plenty of tutorials available online.
Basic Steps to Create G Code
Follow these steps:
-
Open your slicer software
-
Select your printer model from the dropdown menu
-
Import your 3D model file (STL, OBJ, or 3MF formats)
-
Position it on the virtual build plate
-
Choose your settings (quality, speed, infill, supports)
-
Click "Slice" to generate your G code
-
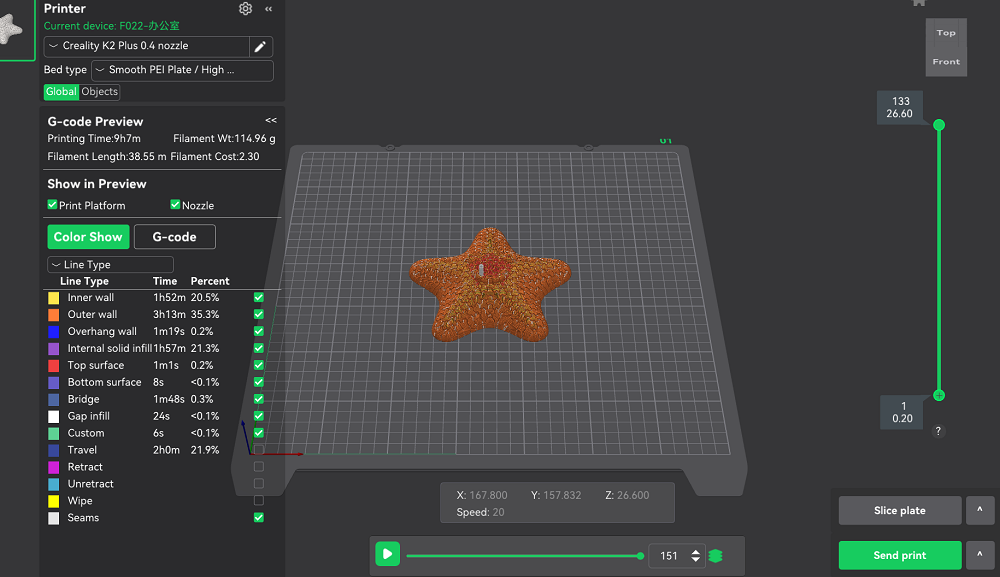
Preview the layers to check for problems
-
Save the G code to your SD card
Most slicers show you estimated print time and filament usage before you print. This helps you plan and ensure you have enough material loaded.
Common G Code Problems and Fixes
Most G code problems are easy to fix once you identify the root cause. Print failures often come down to incorrect settings rather than hardware problems. Learning to recognize these common issues saves you time and material.
Problem: Print Not Sticking to Bed
This happens when your bed temperature is wrong or your first layer prints too fast. Check your slicer settings. PLA needs 50 to 60°C on the bed. PETG needs 70 to 80°C. Always match your temperatures to your filament type. Also verify your Z offset is set correctly.
Problem: Stringing Between Parts
Those plastic strings between parts are a retraction issue. Retraction pulls filament back to prevent oozing during travel moves. Check this stringing troubleshooting guide for solutions. Temperature also plays a role, as printing too hot makes filament more fluid.
Problem: Layers Not Aligned
Shifted layers mean you're printing too fast. Your G code contains speed settings your printer can't handle reliably. Reduce your print speed in slicer settings. Also check that your belts are properly tensioned. Loose belts cause similar issues.
Problem: Filament Not Coming Out
No extrusion means your nozzle is clogged or temperature is too low. Make sure your nozzle temperature matches your filament requirements. PLA prints around 190 to 220°C, PETG around 220 to 250°C. If temperature isn't the issue, check your extruder for clogs.
Tips for Better G Code Results
These practical tips will improve your printing results:
-
Save Your Good Profiles - When you find settings that work perfectly, save that profile with a descriptive name. Build a library of proven profiles for different materials and quality levels.
-
Always Preview Before Printing - Check the layer preview in your slicer before hitting print. Look for support structures, verify overhangs are supported, and check the first layer. This catches problems early.
-
Start Simple - Use default profiles first. Change one setting at a time so you know which change made a difference. Making multiple changes simultaneously makes troubleshooting impossible.
-
Keep Your Slicer Updated - Slicer developers constantly fix bugs and add features that improve G code generation. Check for updates monthly. Better software creates better prints.
-
Use Community Profiles - People share slicer profiles on forums and Reddit. Download and test profiles from others with your same printer. Learn from their experience.
-
Match Your Slicer to Your Printer - Some slicers are optimized for specific models. If you have a K1 Max, use the correct printer profile for best results.
Your first prints won't be perfect. Every print teaches you how G code and your printer work together. Pay attention to what works and what doesn't.
Start Printing With G Code
G code makes 3D printing work. You don't need to become a programming expert. Modern slicers handle the code generation automatically. Your job is to understand the basics and make good decisions about print settings.
As you print more, you'll develop intuition for how it works. You'll predict what settings work for different models. Focus on the core fundamentals. It tells your printer what to do. Slicers convert models into G code. Good settings create great prints.
Whether you're printing projects for school or useful items for your house, understanding it makes you a better maker. You'll troubleshoot faster and get better quality prints.
Keep experimenting with settings. Keep learning from successes and failures. And most importantly, keep printing.