


Accuracy is everything in 3D printing, and temperature is perhaps the most critical variable. The temperature of extrusion of filament will have a direct influence on layer adhesion, surface finish, and print quality.
Getting the perfect temperature for your filament can be finicky—too hot, and you risk stringing or warping; too cold, and layers won't stick. That is where a 3D print temperature tower comes in, an individual calibration print utilized in 3D printing to find the optimal nozzle temperature for a given filament.
What Is a 3D Print Temperature Tower?
A temp tower is a calibration model used in 3D printing to determine the ideal nozzle temperature for a specific filament. It’s printed in sections, with each level produced at a slightly different temperature — for example, 240 °C at the base, then 235 °C, 230 °C, and so on.
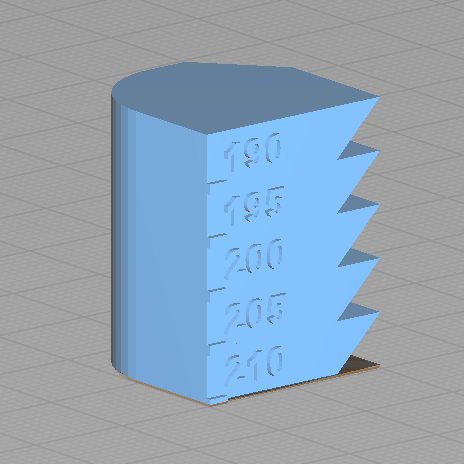
By examining the quality of each section, you can easily identify which temperature gives the best adhesion, surface finish, and overall print performance for materials like PLA, ABS, or PETG.
Why Do You Need a Temperature Tower?
A temperature tower test helps 3D printer users fine-tune settings easily, a game-changer for 3D printing enthusiasts. Here’s why they’re essential:
-
Efficiency: Experiment with several temperatures in one print, conserving time and filament vs. trial-and-error with full models.
-
Better Quality: Determine the ideal temperature for solid layer adhesion, reduced stringing, and a glossy finish.
-
Troubleshooting: Identify temperature-related issues like warping, cracking, or poor adhesion.
-
Filament Customization: Different materials (PLA, ABS, PETG, etc.) require unique temperature settings—a tower helps you fine-tune each one.
As a beginner or expert maker, a temperature tower is a fundamental tool to enhance your 3D printing results.
Related Post: PLA Print Temperature Guide
How to Print a Temperature Tower (Step-by-Step Guide)
Printing a temperature tower is a simple process with a few easy steps, especially you have a robust 3D printing software like Creality Print.
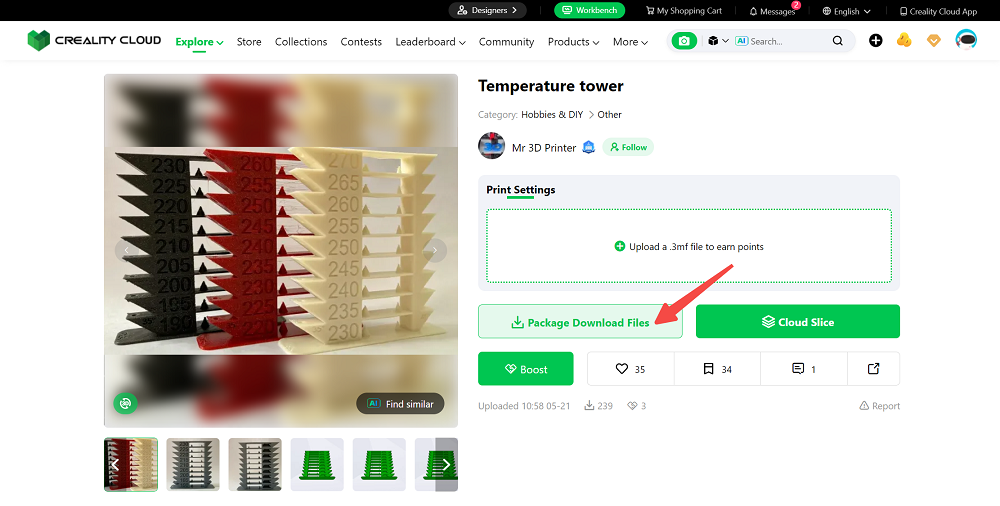
Step 1: Get a free model
Download a temperature tower for free from Creality Cloud, or create your own with CAD software. Look for a model with clearly spaced and visible levels. Then, import it into the slicer.
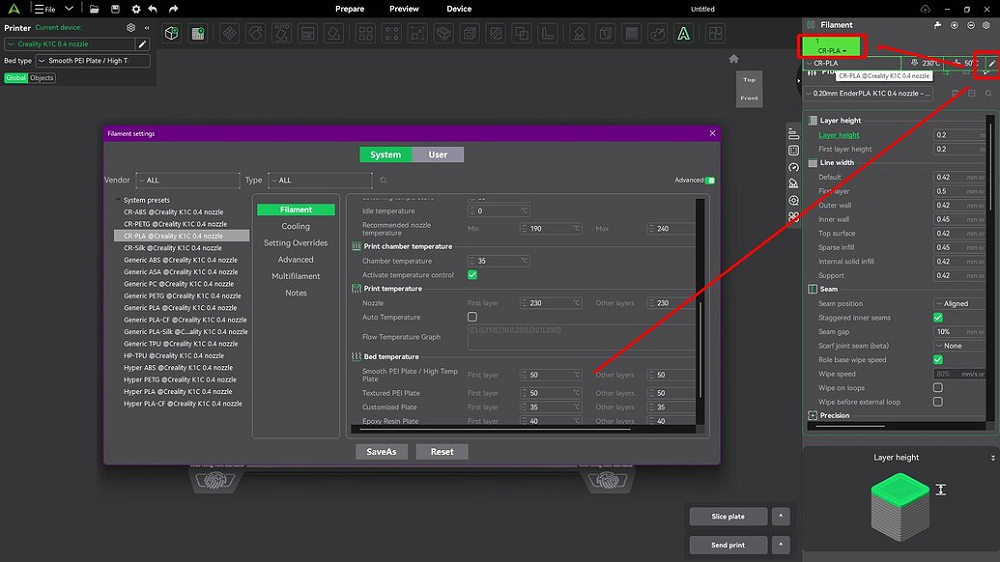
Step 2: Configure temperature changes
Once set, press the "Filament" button and afterward the brush icon to set the extruder temperature to exact layer heights, matching each level of the tower.
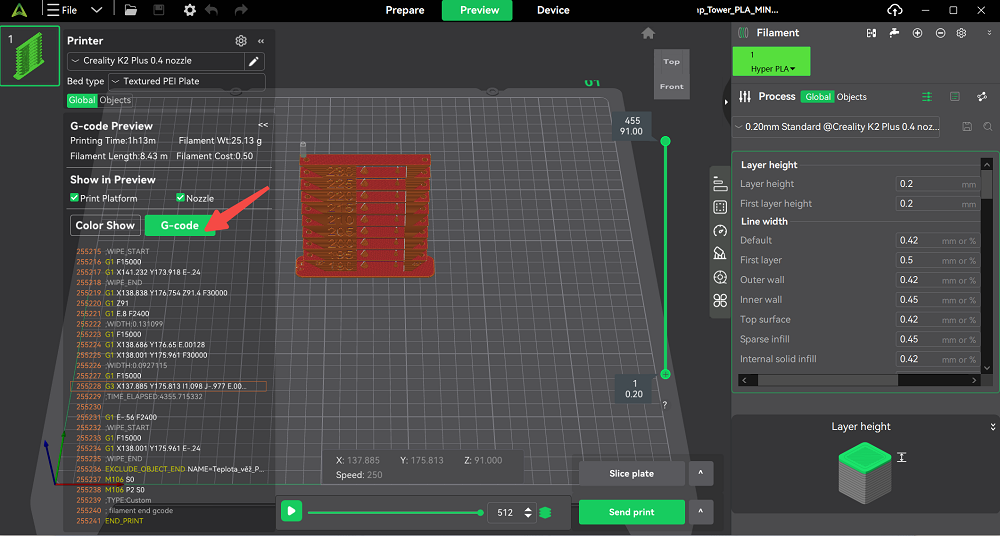
Step 3: Slice and start printing
Generate the G-code and start printing, ensuring your printer carries out the temperature adjustments as expected.
How to Set Up a Temperature Tower in Cura
Here is a step-by-step guide for installing a temperature tower in Cura:
Step 1: Open Cura and load your temperature tower STL file.
Step 2: Go to Extensions > Post Processing > Modify G-Code. Click Add a script and select Change at Height.
Step 3: For each temperature change, input the Z height (e.g., 10mm, 20mm) and the new temperature (e.g., 190°C, 195°C).
Step 4: Preview the G-code so temperature changes are synchronized with each tower section. Cura will automatically change temperatures at every level.
Tip: For Z height calculations, multiply layer thickness (e.g., 0.2mm) by layers per section (e.g., 50 layers = 10mm).
How to Read a Temp Tower
After the print finishes, carefully inspect each section (or “rung”) of the tower. Look for common issues at each temperature:
Layer adhesion: Try flexing or snapping the printed pieces. Layers can be quickly delaminated by too-low temperatures (insufficient bonding), and layers will bond too strongly at too-high temperatures.
Bridging and overhangs: Check the quality with which the printer bridged or spanned horizontally at every level. Sagging, curled-overhanging or poor bridging can indicate that the temperature is skewed.
Surface finish and detail: Inspect the sidewalls and small details. Look for blobs, zits, or corner ringing. Lower temps produce a crisp finish but may produce under-extrusion; higher temperatures give smoother flow but produces blobs or a "shiny" finish.
Stringing/oozing: Observe to determine whether there are thin lines of plastic between features. Excessive stringing seems to occur at higher temperatures.
Miscellaneous artifacts: Look for slumping on tall overhangs or worn detail in thin walls.
Common Mistakes & Fixes
Even with careful planning, errors can occur. Here are common temperature tower pitfalls and how to fix them:
Wrong Z height settings
If your temperature change triggers are set at the incorrect layer height, the script may apply the new temperature too early, too late, or not at all.
Tower not labeled
Most standard tower STLs lack printed temperature indicators, so it's harder to review the result. You can be acing a particular layer's quality but fail to recall the temperature it was performed at. To avoid that, use a adjustable tower model where every step is marked with its temperature or height.
Inconsistent ambient temps
Room temperature and drafts can impact print results. The abrupt drop in ambient temperature can cool filament too fast, causing layer bonds to be brittle. Conversely, an extremely hot or drafty room can lead to non-uniform cooling.
FAQs About 3D Printing Temp Tower
Q1: What is the best temperature for PLA temperature tower?
A: The best temperature for PLA usually falls between 190 °C and 220 °C, but it varies depending on the filament brand, color, and printer setup.
Q2: Can I use the same temperature tower for different filaments?
A: No, each filament type — such as PLA, ABS, PETG, or TPU — requires its own temperature tower because every material melts and bonds differently. For example, ABS typically prints between 230 °C and 260 °C, while PETG performs best between 220 °C and 250 °C.
Summary
A 3D printing temperature tower is a valuable tool for calibrating your 3D printing. By testing multiple temperatures in one go, you’ll find the perfect settings for each filament type—resulting in stronger, cleaner, and more professional 3D prints.
Explore more 3D printing calibration tests and download your free tower model on Creality Cloud today.