


Occasionally, your 3D printer seems to be working, the motor is turning, but the filament looks chewed up, and nothing comes out of the nozzle at all, you may be wondering if something inside your printer is broken. The truth is, you might be facing one of the most common beginner problems in 3D printing: filament grinding.
In this guide, we’ll walk through what filament grinding is, why it happens, how to identify it, and how to fix it step by step.
What Is Filament Grinding in a 3D Printer?
Filament grinding happens when your printer’s extruder fails to push filament forward and instead wears it down by repeatedly pressing against the same spot.
Techinally, inside the extruder is a small gear with teeth, much like a bicycle chain gripping a cog. When everything is working properly, that gear grabs the filament and steadily feeds it toward the hotend. The filament moves forward smoothly, one continuous motion.

But if something blocks the path ahead, the filament can’t move. The gear doesn’t know that. It keeps turning anyway, scraping the filament instead of pushing it forward. Over time, this wears the filament down, leaving flat or chewed marks on its surface.
How to Identify 3D Printer Filament Grinding
Beginners often miss the early signs because the printer still appears active. Watch and listen for these common symptoms:
-
A clicking or knocking sound from the extruder
-
Inconsistent extrusion or thin layers
-
Gaps or missing sections in the print
-
Filament that looks chewed, shaved, or flattened
-
Fine plastic dust near the extruder gear
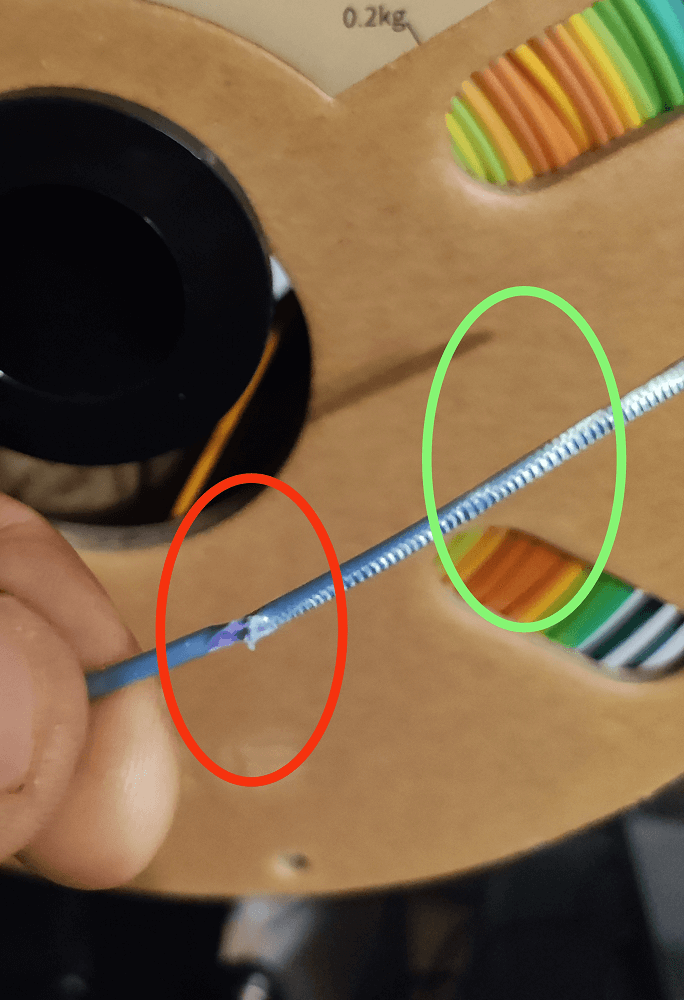
If you remove the filament and see deep bite marks or a rough, uneven surface, grinding has already occurred.
Filament grinding is rarely caused by just one issue. In most cases, it’s the result of too much resistance somewhere along the filament path. Below are the most common causes.
Main Causes of 3D Printer Filament Grinding
Filament grinding is rarely caused by just one issue. In most cases, it’s the result of too much resistance somewhere along the filament path. Below are the most common causes.
Nozzle Clog or Partial Blockage
A clogged nozzle is one of the top reasons filament grinding occurs. Even a partial blockage can create enough resistance to stop filament movement. The extruder continues to push, but the filament has nowhere to go. Common sources of blockage include:
-
Burnt material buildup
-
Dust or debris entering the hotend
-
Residue from previous prints
When the nozzle resists flow, grinding becomes almost inevitable.
Printing Temperature Is Too Low
If filament is not heated enough, it doesn’t melt smoothly. Instead, it behaves more like a soft solid than a liquid. The extruder tries to force it through the nozzle, meets resistance, and starts slipping. Over time, that slipping turns into grinding.
This issue often appears:
-
After switching filament brands
-
When printing faster than before
-
During long prints where temperature stability matters
Extruder Tension Is Incorrect
The extruder relies on tension to grip filament properly. If that tension is misadjusted, problems follow.
-
Too much tension: the filament gets crushed and deformed
-
Too little tension: the gear slips instead of pushing
Both situations can lead to grinding, just in different ways.
Printing Speed or Flow Is Too Aggressive
When a printer is asked to extrude more material than the hotend can handle, pressure builds up quickly. This can happen due to:
-
High print speeds
-
Excessive flow rate
-
Frequent or long retractions
Eventually, the extruder can’t keep up, and the filament becomes the weakest point in the system.
Moisture or Poor Filament Condition
While filament may look fine on the outside, internal moisture or brittleness can increase resistance during extrusion. Moist filament can:
-
Expand unpredictably when heated
-
Create bubbles that disrupt smooth flow
-
Increase back pressure in the nozzle
This added resistance contributes directly to grinding.
Dirty or Worn Extruder Gear
Over time, plastic dust can pack into the teeth of the extruder gear. When this happens, grip strength drops significantly.
In more severe cases, the gear teeth may become worn down and lose their sharp edges, making it impossible to push filament reliably.
If you’re dealing with filament grinding right now, follow these steps in order. You don’t need special tools or advanced skills.
How to Fix Filament Grinding (Step-by-Step)
Once you’re sure the extruder is grinding the filament, take these steps in order to resolve it. Work methodically and test after each change to see if the problem is fixed:
Step 1: Stop the Print and Remove the Filament
-
Pause or cancel the active print to prevent further damage;
-
Bring the hotend up to the standard printing temperature. Gently pull the filament out of the extruder once heated;
-
Cut off the ground-up, frayed, or thin section of the filament to remove the damaged material;
-
Feed the filament back in so a fresh, clean end is inside the extruder.
Step 2: Check and Clean the Nozzle
Double-check and clean the nozzle before anything else works. You can:
-
Heat the nozzle and manually extrude
-
Perform a cold pull
-
Replace the nozzle if cleaning fails
If material doesn’t flow smoothly by hand, grinding will return no matter what you adjust elsewhere.
Step 3: Increase Printing Temperature Slightly
Raise the printing temperature in small increments, by about 5–10 °C. This helps the filament melt more easily and reduces resistance inside the hotend. Don’t exceed the filament’s safe range; slow adjustments are safer and more effective.
Step 4: Slow Down the Print
Reduce print speed and extrusion-related settings. Fast prints usually demand the extruder move quickly; if the filament can’t keep up (especially after making the above fixes), the gear will start slipping/grinding. By doing so, it:
-
Gives the hotend more time to melt material
-
Reduces pressure buildup
-
Makes extrusion more forgiving
Step 5: Adjust Extruder Tension
This is often the simplest fix. If your printer has an adjustable idler spring or thumbscrew, slightly loosen it – turn the tension screw or knob a bit to reduce pressure. The goal is firm grip without crushing:
-
The filament should be marked, not mangled
-
It should move smoothly when extruding
Step 6: Clean the Extruder Gear
While reloading, check the hobbed (toothed) drive gear. During the cleaning, the following tools may be used:
-
A small brush
-
Compressed air
-
A toothpick for stubborn buildup
If the gear teeth look rounded or smooth, replacement may be necessary.
Step 7: Check Filament Path Hardware
If problems persist, inspect the Bowden tube (if applicable) and filament spool setup. Make sure the PTFE tube from the extruder to the hotend isn’t dented or loose, as a gap here can cause jams.
How to Prevent Filament Grinding in the Future
Once the issue is fixed, prevention becomes the priority. A few habits can dramatically reduce the chances of grinding returning.
-
Keep filament clean and dry. Store filament in a dry environment and avoid switching between different filament brands or types without adjusting settings, as temperature and flow needs can vary.
-
Avoid overly aggressive print settings. Extremely high print speeds or retraction values may save time, but they also increase stress on the extruder.
-
Perform regular extruder and nozzle maintenance. Periodically clean the drive gear and nozzle, and lubricate moving parts if your printer design requires it.
-
Watch the first layers closely. Early signs of uneven extrusion, clicking sounds, or inconsistent lines often appear at the start of a print.
-
Calibrate extruder tension correctly. Begin with the manufacturer’s recommended tension, then make small adjustments until the filament feeds smoothly without being crushed.
Filament grinding often starts quietly. Catching the early signs can save both time and material before a print fails.
Filament Grinding vs Other Extrusion Problems
New users often confuse filament grinding with other issues. Here’s a simple distinction:
| Issue | Results | Symptoms | Filament Conditions |
| Filament grinding | The extruder gear keeps turning while the filament is stuck | Clicking sounds, plastic dust near the extruder, extrusion stops | Chewed, flattened, or deeply marked |
| Under-extrusion | Filament flows, but less than required | Thin layers, gaps in prints, weak parts | Mostly normal, may look slightly worn |
| Filament slipping | The gear loses grip but doesn’t dig in | Inconsistent extrusion, little or no clicking | Smooth, no deep bite marks |
| Heat-related issues | Filament isn’t melting or flowing consistently | Sudden extrusion loss, stringing, uneven layers | Normal at first, damage appears later if grinding starts |
Final Thoughts
For beginners, filament grinding can feel like a mysterious failure hidden inside the printer. In reality, it’s your machine’s way of saying, “Something is resisting the flow.”
By understanding what filament grinding is, why it happens, and how to fix it methodically, you gain confidence and control over your prints. Once you’ve solved it once, you’ll recognize the signs early and fix it faster next time.