


Even if you know how to clean a 3D printer nozzle and maintain it regularly, nozzle clogs still can occur. Aside from the frustration, a clogged nozzle can cause failed prints; inconsistent or incomplete extrusion; wasted filament; and even worse, unnecessary downtime.
The good news is that clogs can be prevented and fixed. In this guide, we’ll break down the common causes of nozzle blockages, the key symptoms to recognize them quickly, and the most effective methods to unclog a 3D printer nozzle in 2026.
Why Does Your Nozzle Keep Clogging?
The first step to unclogging a 3D printer nozzle is understanding why clogs happen. Most nozzle blockages come from just a few common causes:
Low-quality or Water-absorbed Filament
Cheap or poorly stored filament often absorbs moisture or contains impurities. Upon heating, this causes popping and bubbling, along with uneven melting that leaves material swollen or poorly extruded inside the nozzle.
Materials such as PETG and nylon absorb moisture much quicker than PLA and, therefore, clog easier if not stored appropriately.
Incorrect Printing Temperature
Temperature settings are critical to the quality of the extrusion.
-
Too low: The filament doesn't melt enough and therefore causes partial extrusion and eventual clogs.
-
Too high: You may experience heat creep—where filament softens too far up the hotend and expands before entering the nozzle.
For instance, PLA normally prints between 190–220°C. Printing outside this range increases the risk of clogging. (See our detailed PLA temperature guide.)
Residual Carbonized Particles
If the molten filament sits too long inside the hot nozzle, it can burn and carbonize. These particles then harden and build up inside the melt zone, clogging the opening of the nozzle. This often happens when the printer is heated but idle—especially for long preheating periods.
Frequent Filament Changes
Switching between filaments with radically different melting points—PLA to ABS, for example—can leave behind incompatible residue inside the hotend. Any material left over which doesn't melt entirely in the subsequent print could cause partial blockages and eventually clog the nozzle.
3D Printer Clogged Nozzle Symptoms
A clogged nozzle usually shows several clear warning signs. Look for symptoms such as:
| Symptom | What It Means |
|---|---|
| Slow or weak extrusion | Partial blockage restricting flow |
| Gaps in layers / thin lines | Under-extrusion from restricted filament path |
| Clicking or grinding from extruder | Extruder cannot push filament through clog |
| Filament curls upward at nozzle | Filament isn’t exiting cleanly due to blockage |
| Extrusion stops mid-print | Complete nozzle blockage |
| Poor first layer / no filament at print start | Partially clogged nozzle delaying flow |
Another confirmation of clog would be to manually test the nozzle: 1) Heat the nozzle to proper temperature; 2) gently push filament manually.
| Result | Diagnosis |
|---|---|
| Smooth, steady extrusion | No clog |
| Thin, weak, or delayed extrusion | Partial clog |
| No extrusion at all | Full clog |

Use only light pressure when pushing filament. Forcing it can strip gears or damage the hotend.
What Tools Do You Need to Fix a Clogged Printer Nozzle?
Having the right tools makes nozzle cleaning safer and much easier. Most of these items are inexpensive and commonly included in 3D printer maintenance kits.
Essential Tools:
-
Small wrench or socket wrench – for removing the nozzle
-
Pliers (needle-nose recommended) – for gripping filament or hotend parts
-
Nozzle cleaning needles / fine steel wires – to clear small blockages
-
Heat gun or heating device – to assist with loosening stubborn residue
-
Cleaning filament (specialized cleaning material) – for internal hotend cleaning
-
Small brushes or compressed air – to remove dust and debris
-
Acetone – for dissolving ABS residue (use with caution; not for PLA/PETG)
-
Cotton swabs and a lint-free cloth – for external cleaning
-
Crescent wrench – optional, for additional leverage when removing nozzles
Safety Precautions Before You Start
Before cleaning or unclogging a 3D printer nozzle, always follow these steps:
-
Turn off and unplug the 3D printer
-
Let the nozzle cool down if the printer was recently in use
-
Use protective gear (heat-resistant gloves, eye protection)
-
Work in a well-ventilated area, especially if using acetone or heating burnt filament
-
Avoid touching the hotend directly, even when it's only partially warm
These precautions help prevent burns, damage to the hotend, and accidents during the cleaning process.
How to Unclog a 3D Printer Nozzle (4 Proven Methods)
Not all clogs are created equal, and neither are the solutions. The methods below cover the most reliable ways to restore smooth, consistent extrusion.
1. Cold Pull Your 3D Printer (Best for Light–Moderate Clogs)
How to Perform a Cold Pull
Step 1: Heat the nozzle to the normal printing temperature of the filament currently loaded. (Example: PLA at 200°C, ABS at 240°C.)
Step 2: Push the filament gently by hand until molten material starts to flow out.
Step 3: Lower the hotend temperature to: 90–100°C for PLA; ~120°C for ABS
When the nozzle has reached this temperature, grip the filament firmly and pull upward in one smooth, swift motion. If it is successful, the hardened filament end will be extruded out with the dark particles or residue.
Pros
- Safe, non-invasive
- Great for routine maintenance
- Can remove internal residue that needles can’t reach
Cons
-
Not effective for fully hardened or severe clogs
2. How to Unclog a Nozzle with a Cleaning Needle (Best for Partial Blockages)
Cleaning needles provide a quick fix when the nozzle tip is partially obstructed.
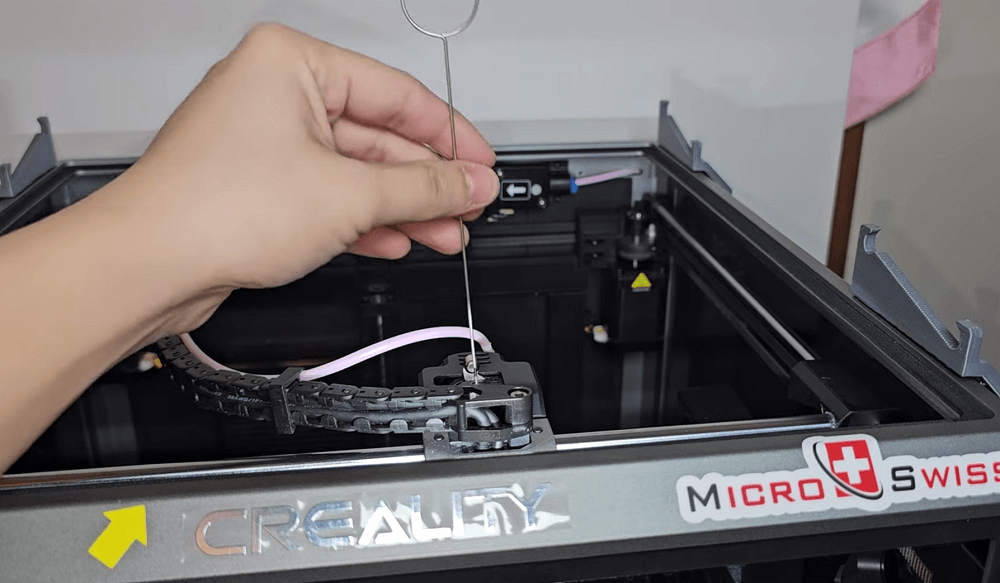
How to use a cleaning needle
Step 1: Heat the nozzle to the correct extrusion temperature.
Step 2: Insert a nozzle cleaning needle or fine steel wire gently through the nozzle opening.
Step 3: Move it up and down with light pressure to break up stuck debris.
Step 4: Extrude filament again to check whether the flow is smooth.
Pros
- Fast and effective for tip blockages
- Can be used mid-print if emergency cleaning is needed
Cons
- It requires a steady hand
- Pushing too hard may scratch the inner nozzle
3. High-Temperature Burnout (For Tough, Burnt-On Plastic)
This method removes stubborn clogs caused by heavily carbonized or baked filament.
How to Do a Burnout Cleaning
Step 1: Remove the nozzle from the hotend using a wrench.
Step 2: Place the nozzle on a heat-resistant surface (ceramic tile, metal plate, etc.).
Step 3: Use a heat gun or small blowtorch to heat the nozzle until burnt filament begins to burn off and turn to ash.
Step 4: Let the nozzle cool completely before handling or reinstalling.
Pros
- Very effective for severe, baked-on clogs
- It restores clogged nozzles that other methods can’t fix
Cons
- Too much heat may damage the nozzle
- It requires caution and ventilation
4. Remove the Nozzle for Deep Cleaning (Most Thorough Method)
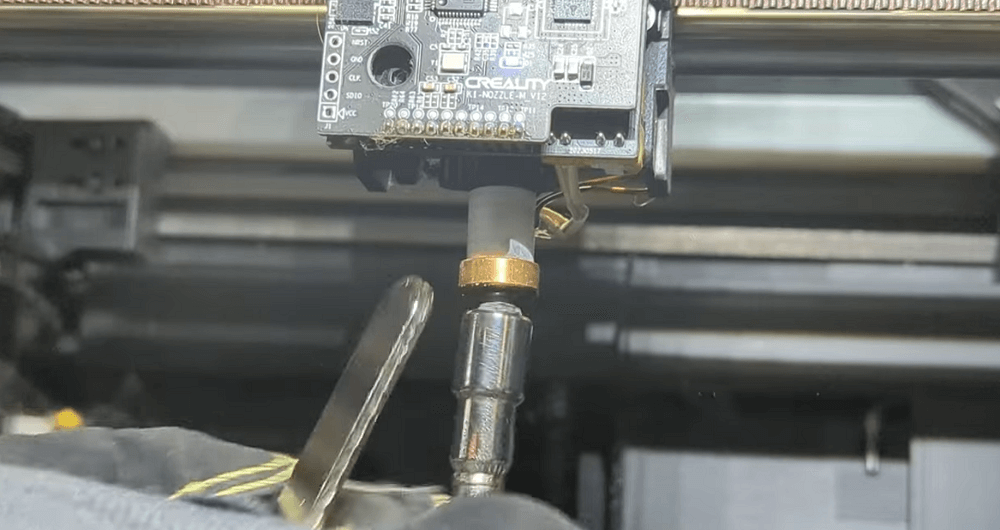
Deep cleaning ensures the nozzle is fully restored inside and out.
How to deep-clean a nozzle
Step 1: Heat the nozzle slightly so the filament softens and releases easily.
Step 2: Use a crescent wrench to hold the heater block while loosening the nozzle with a socket wrench.
(This prevents twisting the hotend or bending components.)
Step 3: Once removed, do not touch hot parts—accidental burns are extremely common.
Step 4: Soak the nozzle in:
- Acetone for ABS, or
- A material-appropriate solvent for other filaments
Step 5: Use a brush, needle, or compressed air to remove any residue.
Step 6: Dry completely and reinstall the nozzle while the hotend is warm.
Pros
- Deepest, most reliable cleaning method
- Restores nozzle performance fully
Cons
- More time-consuming
- Requires removing parts of the hotend
Preventive Maintenance: How to Avoid Nozzle Clogs
Preventative care extends the lifespan of your 3D printer and minimizes print failures. Here are the best practices to keep your nozzle clean and clog-free:
Use high-quality filament: Low-quality or poorly stored filament absorbs moisture and brings contaminants into the hotend. Moist filament pops, bubbles, and melts unevenly—leading to clogs.
Tip: Store spools in sealed containers with desiccant packs to keep them dry.
Store filament correctly: All common materials are sensitive to humidity—PLA, ABS, PETG, Nylon, and TPU. Dry filament ensures smoother extrusion and better print quality.
Tip: It is best to store filaments in a filament dry box or airtight storage system to maintain low moisture content..
It is best to store filaments in a filament dry box or airtight storage system to maintain low moisture content.
It is best to store filaments in a filament dry box or airtight storage system to maintain low moisture content.
Match temperatures to the material: Each filament type requires a specific temperature range: PLA: 190–210°C; ABS: 220–250°C; PETG: 230–250°C; Nylon: 240–260°C
Clean the nozzle regularly: Many users perform a light cleaning or cold pull when switching between filaments to prevent residue buildup.
Some printers—like the Creality K2 Pro—come with a quick-swap nozzle that make maintenance relatively easier and greatly reduce any downtime
Inspect the hotend frequently: Look for early signs of: a) burnt or carbonized debris; b) Leaks around the heater block or nozzle; c) loose fittings or unstable wiring. Detecting issues early prevents serious clogs and reduces maintenance time.
Conclusion
Exploring the landscape of 3D printing presents its own range of challenges, and a 3d printer blocked nozzle is certainly among the more frequent problems. But with the correct knowledge and equipment on hand, handling a clogged nozzle does not remain an overwhelming job.
Frequently Asked Questions (FAQ)
How do you unblock misting nozzles?
To clean the misting nozzles, which may be clogged from being inoperative, remove the nozzle and soak it for 30-60 minutes in either vinegar or descaling solution to dissolve mineral buildup. Use a small brush or needle to clear the opening, then rinse thoroughly with clean water before reinstalling. If these are stubborn clogs, repeat the soak or take a fine pin and gently dislodge the debris.
Which is better: cold pull or needle cleaning?
A cold pull is safer and works best for mild or moderate clogs because it removes residue without disassembling anything. Needle cleaning is more effective for stubborn tip blockages but requires heating the nozzle and using more precision.
How often should I clean the nozzle?
Most users clean their nozzle every 200–300 printing hours, or when print quality starts to visibly suffer. Materials such as PETG, ABS, and Nylon may require more frequent maintenance compared to PLA.
