


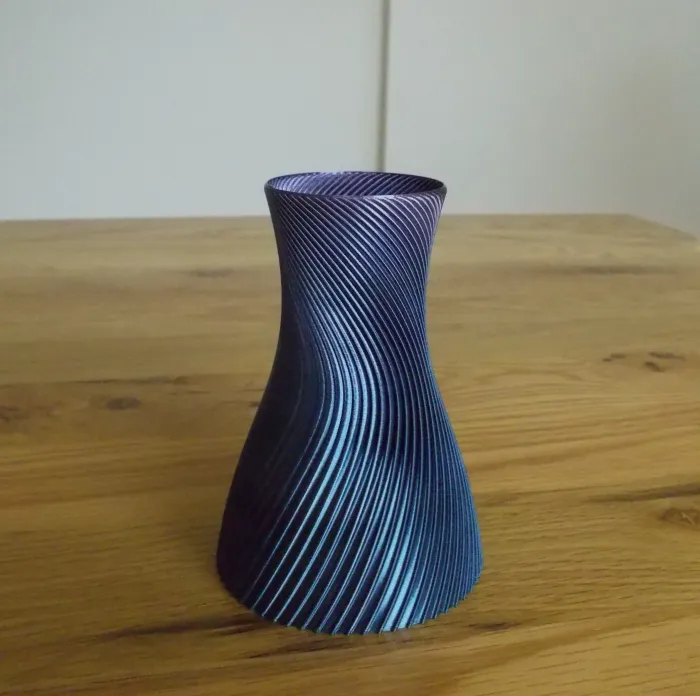
If you’ve ever seen a 3D printed vase with perfectly smooth walls and no visible seam, there’s a good chance it was printed in vase mode. For many people, vase mode feels a bit like a magic trick. You turn on one setting in the slicer, and suddenly the printer behaves very differently.
But vase mode is not just for vases, and it’s not a shortcut. It’s a specific way of printing that rewards the right models, the right settings, and a little patience. This guide walks you through what vase mode really is in 3D printing, how it works, how to enable it, and how to get good results even if you’ve never used it before.
What Is Vase Mode 3D Printing
In technical terms, it’s called a spiralized contour. Instead of printing in distinct steps, the printer moves in one continuous, gradual upward spiral—sort of like a soft-serve ice cream machine. Because the nozzle never stops extruding and never "jumps" to a new layer, there is no start/stop point. That means no Z-seam, no blobs, and no stringing in 3D printing.
The result is a print with:
-
No visible layer seam
-
No infill
-
No top layers
-
A very clean outer surface
When You Should and Not Use Vase Mode 3D Printing
Vase mode works well when:
-
You want a smooth, decorative surface
-
The model has a simple, continuous shape
-
Strength is not the top priority
-
You want fast prints with low material usage
Vase mode is not a good choice when:
-
The part needs to handle load or stress
-
The model has internal structures or multiple walls
-
You need a solid top surface
-
The object must be airtight or fully sealed
If the model relies on internal geometry, vase mode will almost always fail.
How Vase Mode 3D Printing Works
Imagine a standard print as a stack of pancakes. Each pancake is a separate layer. Vase mode is more like a Slinky. The printer starts at the bottom and just keeps winding upward.
This creates a constant flow. Because the Z-axis is moving up at the same time the X and Y axes are moving horizontally, the plastic is laid down in a smooth, uninterrupted ribbon. This is why vase mode prints often look shinier than regular prints. The plastic isn’t being constantly retracted and restarted, which keeps the texture incredibly consistent.
This continuous motion has a few important effects:
-
Seams disappear because there are no layer starts
-
Retraction is unnecessary
-
Print time often decreases
-
Material usage drops significantly
The tradeoff is strength. A single wall, even a thick one, will never be as strong as a multi-wall print with infill. Vase mode prioritizes surface quality over internal structure, which is why it works beautifully for decorative parts but poorly for load-bearing ones.
How to Enable Vase Mode in Popular Slicers
Every slicer likes to hide this setting under a different name, which can be annoying if you’re switching between machines. Let's take a closer look at how to switch on the vase mode:
What Is Vase Mode in Orca Slicer
Orca Slicer is the new favorite for many (especially Bambu Lab and Klipper users). In Orca Slicer, vase mode is usually called Spiral vase and can be enabled in the print settings.
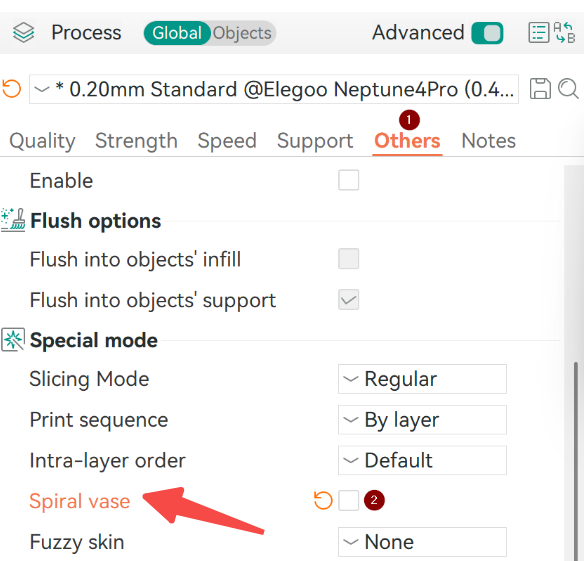
Step 1: Go to the "Prepare" tab and then navigate to "Process";
Step 2: Under the "Others" tab, look for the "Special mode". Then check the box for "Spiral vase".
Once turned on, Orca handles many adjustments for you, but there are still a few things you should check manually:
Does Creality Print Have a Vase Mode?
Yes, it does. Creality Print includes a spiral-style vase mode option, and it works similar to other slicers.
Step 1: Launch the program;
Step 2: In the "Process" tab, go for "Spiral vase" under the "Special mode";
Step 3: Always hit the "Yes" button when the pop-up window appears.
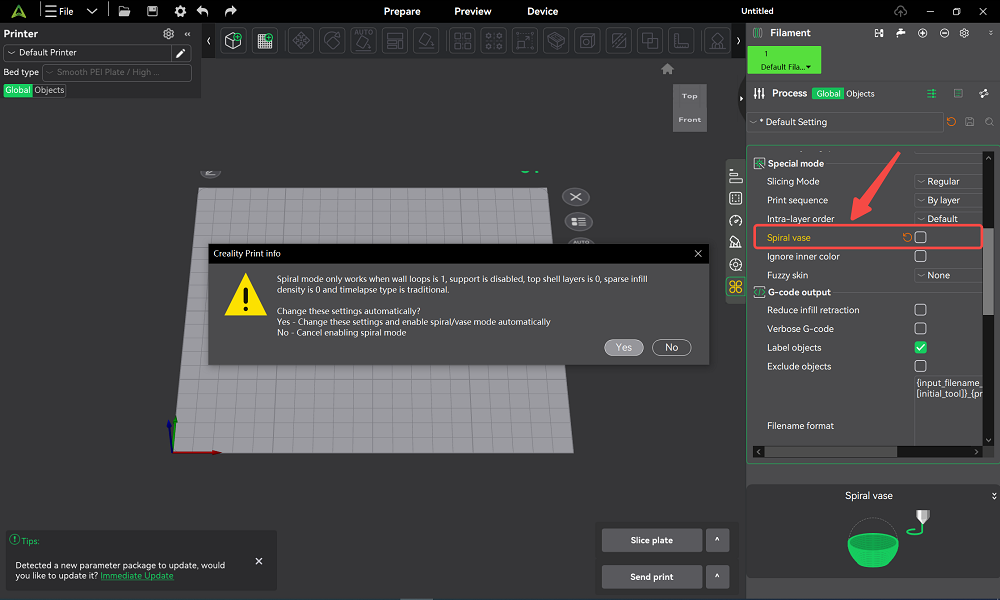
Note: Spiral mode is accessible only when the wall loop is 1, support in enables, top shell layer is 0, sparse infill density is 0, and the timelapse type is traditional.
Recommended Print Settings for Vase Mode
This is where most people mess up. If you use your default 0.4mm nozzle settings, your vase will be as fragile as an eggshell. However, vase mode settings are simpler than standard prints, but they matter more. Here's some general guidelines you can refer to
| Setting | Value | Reasons |
| Line Width | 0.6mm to 0.8mm | Wider lines create a thicker single wall, which noticeably improves strength even with a standard nozzle. |
| Layer Height | 0.2mm to 0.25mm | Slightly taller layers bond better in a continuous spiral and reduce weak spots. |
| Bottom Shells | 5 Layers | A thicker base adds stability and prevents the print from feeling flimsy. |
| Print Speed | 40mm/s | Slower, steady motion keeps extrusion consistent throughout the spiral. |
| Flow Rate | 105% - 110% | A small flow boost helps close tiny gaps in the wall and improves layer bonding. |
Model Requirements for Vase Mode Printing
Not every model can be printed in vase mode, even if it looks simple. A common mistake is trying to print a "hollow" vase model. If you download an STL that already has an inside and an outside wall, the slicer will try to print both. This ruins the spiral. You want a solid model. The slicer’s "Vase Mode" logic will ignore the solid "meat" of the object and only trace the very outer skin.
-
Has a single continuous outer surface
-
Contains no internal walls or floating features
-
Has no flat horizontal tops
-
Maintains consistent wall thickness
Before printing, switch to the slicer preview and confirm that the toolpath is one continuous spiral.
Best Vase Mode Prints You Can Try Today
If you need a shorter answer of how vase mode is applied in 3D printing, let's start simple:
-
Basic vases
-
Cylindrical containers
-
Pencil holders
-
Planters with smooth curves
More advanced vase mode prints often use twisting geometry or subtle surface texture, but the core shape is still one continuous shell.
Filament Choice and Material Tips When Using Vase Mode
Material choice matters more in vase mode than in standard prints. Generally,
When you turn on vase mode, ensure your materials are with stable flow and predictable cooling or bond well between layers, the following are good practices:
PLA: The gold standard. Specifically, Silk PLA hides the tiny spiral lines so well it looks like ceramic or metal.
PETG: If you want it to hold water, use PETG. It has better "layer bridges," meaning it's less likely to leak between the spirals.
Translucents: Any "Clear" or "Transparent" filament works best in Vase Mode because there is no internal infill to create shadows.
FAQs
Q: How do you make a vase mode stronger?
A: There are several ways to improve strength without abandoning vase mode:
-
Increase line width
-
Use a larger nozzle
-
Slightly raise the extrusion temperature
-
Choose tougher filament materials
Some users also simulate vase mode with thicker walls instead of a true single-wall spiral, trading surface purity for strength.
Wrapping Up
Vase mode in 3D printing is simple in concept but surprisingly nuanced in practice. When used with the right models and settings, it delivers some of the cleanest prints an FDM printer can produce.