


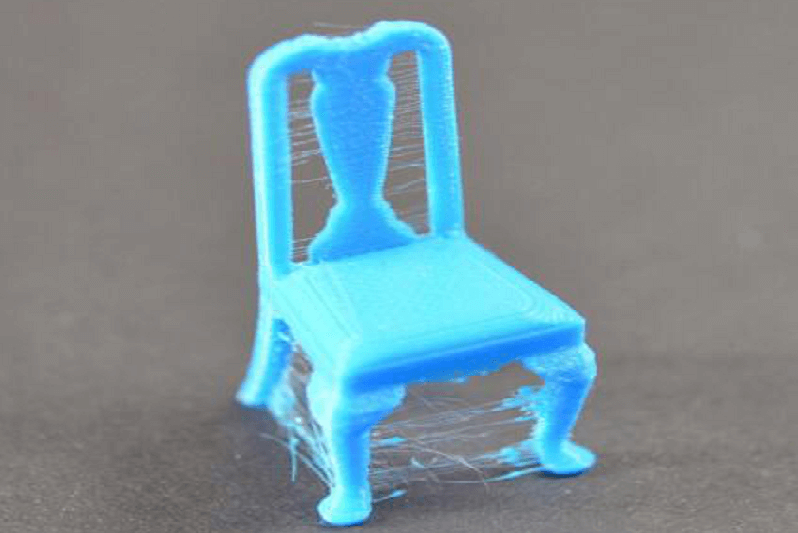
In 3D printing, retraction is instrumental in preventing the excessive flow of material, thereby maintaining prints that are accurate and clean. Prints not sticking to the bed, terrible layers, blobs forming – these minor flaws occur when the melted filament drips from the nozzles while the printhead moves. To prevent this, the printer's extruder pulls the filament back during retraction, which stops excess material from oozing out. Specifically, the extruder pulls the molten filament back to reduce the risk of stringing and blobs caused by excess material being forced out during hot-end pressure buildup. Retraction helps fix these flaws.
This guide outlines what retraction is in 3D printing, how it works, the best retraction settings, and how to obtain sharper, cleaner, and string-free outcomes on each print.
What Exactly is Retraction in 3D Printing?
Retraction, as the name suggests, intends to remove burring, stringing, or other faults by having the filament retracted (pulled out) to lower the pressure within the hot printhead.
Once the nozzle completes printing one part, it draws filament back a little before going across open space. This reverse movement prevents melted filament from dripping, the primary reason for threading or fine plastic hairs between components.
Creality Print automatically adds retraction commands to the G-code, ensuring precise and clean prints. These instructions operate during non-print movement, while the printhead switches from one segment of the model to another, not extruding material. The printer is instructed to perform retraction during these non-print moves to prevent oozing and stringing.
Among precisely configured settings, they can remove blobs, stringing, bumps, and other print quality issues. Though the at-hand retraction settings vary over slicers, multiple are similar across programs. Typical retraction distance and typical retraction distance ranges depend on the extruder configuration, and different retraction settings are needed for different setups and filament types.
Additionally, different printer kinds manage retraction with varying effectiveness. Direct drive setups, such as the ones utilized in Ender-3 V3 and Creality K1C, provide accurate control because the extruder motor is near the nozzle.
Bowden systems, with a longer tube between the hotend and motor, need a longer distance or longer length for retraction to attain the same impact because of elevated filament flexibility and travel distance. This is due to their extruder configuration, which requires a greater retraction length to prevent stringing and oozing.
When You Should Turn Retraction On?
Retraction is very practical when your printer conducts travel moves among different parts of a model. Typically, these precise, non-print motions lead to stringing when the melted filament trickles from the nozzle. So, activating retraction during such moments maintains the prints clean and thorough. You can enable retraction in your slicer software, such as Cura, to reduce stringing and oozing by adjusting the retraction settings.
Prototypes having several fine features, like articulated shapes, miniatures, or large designs, make full use of active 3D printer retraction. Every flow path around open air can generate unwanted strands; therefore, pulling back before each shift helps avoid material from dripping. The printhead is constantly moving during the printing process, and retraction helps ensure clean transitions as the printer continues printing after each travel move.
This attribute largely applies to FDM 3D printers like Ender-3 V3 or Creality K1C, where melted filament moves via a heated nozzle.
On the contrary, resin printers avoid the usual 3d printing retraction, because their procedure depends on curing liquid resin layer by layer.
Key Retraction Settings Explained
Regulating 3D printer retraction settings can significantly enhance print quality. Important retraction settings include retraction distance, retraction speed, and Z-hop, and different settings may be required for different printers and materials to achieve optimal results. Retraction settings differ between direct drive and Bowden extruders, so users should adjust these parameters based on their specific setup. For this, there are some key concepts you need to master: retraction distance, retraction speed, and Z-hope.
1. Retraction Distance
Retraction distance means how much filament is pulled back by the extruder within the nozzle whenever retraction occurs. This is also referred to as retraction length. Too little distance results in stringing, too long, and the filament might cause rubbing or delays in extrusion restart.
A general retraction distance varies between 2-7mm; however, this relies on the extruder system (Bowden or Direct), hot end, and other elements. Slicers often provide a default value for retraction distance, but this default value should be adjusted based on your printer and filament. There exists no one ideal value.
-
Bowden setups: 4-6 mm
-
Direct drive printers: 0.5-2.0mm
Adjust little by little till stringing ends without under-extrusion. To fine-tune your settings, print test prints or a test model at different retraction distances and observe the results.
2. Retraction Speed
Another important retraction setting decides how fast the filament pulls back. This is known as the retraction speed setting, and it can be adjusted in your slicer to optimize print quality. This setting is crucial as it can affect print duration, along with how efficiently retraction clears stringing. Quicker speeds remove pressure quickly; however, it might burden the extruder motor. Faster speeds can help reduce stringing and oozing, but if set too high, they may cause filament grinding or blobs.
-
Most printers execute best around 25-50mm/s.
Creality printers manage faster retraction speeds effectively because of their accurate motion control setups. To fine-tune your retraction speed settings, consider printing retraction test models, such as retraction towers, to evaluate the impact of different parameters on print quality.
3. Minimum Travel Distance
This setting informs the slicer to retract just when the nozzle travels beyond a particular distance. A very small value can result in needless retractions, multiplying damage. The standard is 1-2 mm for most models.
4. Z-Hop (Lift During Travel)
Z-hop lifts the nozzle a little before shifting to another area. It minimizes blobs and prevents scratches on thin layers. For the majority of prints, a 0.2-0.4mm Z-hop is enough.
Adjusting Z-hop and retraction settings can also help minimize the appearance of the z seam and layer starts, which are minor imperfections or seams visible at the beginning of each layer. Additionally, using a random seam setting in your slicer can further reduce visible marks on the print surface by varying the seam location, resulting in a cleaner and more seamless finish.
5. Retraction Extra Prime
Retraction extra prime is an important setting in 3D printing that helps ensure your prints remain smooth and free from gaps after the retraction process. During retraction, a small amount of excess filament can be lost as the nozzle pulls back and then resumes printing. If this lost material isn’t compensated for, you might notice under-extrusion—thin or missing lines—at the start of each new segment.
The retraction extra prime setting allows your 3D printer to push a little extra filament through the nozzle right after a retraction, making up for any material lost during the process. This adjustment is especially useful for reducing stringing issues and maintaining consistent extrusion, particularly when working with different materials or longer travel distances.
6. Maximum Retraction Count
The maximum retraction count is a safeguard setting designed to protect your filament and maintain print quality during the 3D printing process. This parameter limits how many times the printer can perform retractions within a certain length of filament, as defined by the minimum extrusion distance window. If too many retractions occur in a short span, the filament can become ground down or even break, leading to jams and inconsistent extrusion.
By setting a maximum retraction count, you help prevent filament grinding and reduce wear on your extruder, especially during prints with lots of small moves or intricate details. However, if the limit is set too low, you might see an increase in stringing or oozing, since the printer may skip necessary retractions to stay within the allowed count.
Best Retraction Settings for Popular Materials
Different filaments react exclusively to retraction due to their melting qualities and viscosity. Regulating retraction speed and retraction distance for every kind guarantees spotless, more dependable results. Different retraction settings are required for different materials, especially flexible materials like TPU or TPE, which may need reduced or even disabled retraction to avoid stretching or clogging. A direct extrusion setup (direct drive) typically requires shorter retraction distances compared to Bowden setups, helping to reduce stringing and prevent nozzle clogs. Additionally, the melt zone in the hot end—the area where the filament transitions from solid to molten—affects how the filament responds to retraction and plays a crucial role in managing extrusion and oozing during travel movements.
PLA
PLA is forbearing and user-friendly.
-
Distance: 0.8-1.5 mm (direct drive) / 4-5 mm (Bowden)
-
Speed: 35-45mm/s
PLA manages retraction better, creating concise details with minimum stringing.
PETG
PETG is inclined to drip more because of its sticky nature.
-
Distance: 0.6-1.2 mm (direct drive) / 3-5 mm (Bowden)
-
Speed: 25-35 mm/s
Hold the retraction less and the printing temperature medium to prevent blobs.
TPU
Flexible filament, such as TPU, is an example of flexible materials that require special consideration for retraction settings.
-
Distance: 0.5-1.0 mm
-
Speed: 15-25 mm/s
Excessive retraction can expand or block adaptable material inside the extruder.
ABS / ASA
ABS/ASA filaments gain from managed retraction and steady heat.
-
Distance: 0.8-1.8 mm (direct drive) / 4-6 mm (Bowden)
-
Speed: 30-40 mm/s
Keep away from speedy retraction to avoid nozzle clogging resulting from heat creep.
|
Material |
Retraction Distance |
Retraction Speed |
Notes |
|
PLA |
0.8–1.5 mm (Direct Drive) / 4–5 mm (Bowden) |
35–45 mm/s |
Easy to tune |
|
PETG |
0.6–1.2 mm (Direct Drive) / 3–5 mm (Bowden) |
25–35 mm/s |
Avoid overheating |
|
TPU |
0.5–1.0 mm |
15–25 mm/s |
High retraction may jam |
|
ABS / ASA |
0.8–1.8 mm (Direct Drive) / 4–6 mm (Bowden) |
30–40 mm/s |
Heat reduces stringing |
Troubleshooting Retraction Problems
In fact, with well-optimized settings, sometimes retraction can lead to printing problems. Therefore, knowing the reason behind every sign helps put it right instantly and maintain print quality.
-
Persistent Stringing: Extend the retraction distance a bit or lower the nozzle temperature to 5–10°C if you still observe fine strings among parts. Elevated heat holds the filament very dilute, causing leakage during movements. Excess material can be forced out during travel moves, leading to stringing. A minor change mostly resolves the problem without impacting extrusion flow.
-
Clogging or Grinding: Generally, nozzle blocks or filament rubbing suggest your retraction speed or retraction distance is very high. Minimize the two by discrete steps till extrusion feels smooth again. Some slicers allow you to set a maximum number of retractions to prevent filament grinding. Inspect that the filament course is clean and the nozzle is uncluttered.
-
Weak Extrusion After Travel: When the printer restarts printing after retraction, it might under-extrude for a few millimeters. For this, validate an “extra prime amount” in your slicer settings to make up for the little gap left after retraction.
When Retraction Can Cause More Harm Than Good?
Retraction is helpful but not always essential. Overdoing retraction can damage print quality and burden printer parts. So, mastering when to lower or deactivate it keeps the printer operating effortlessly.
Increased retraction multiplies wear on the extruder motor and can smash brittle materials such as PLA. Moreover, it can draw partially melted filament in the cold area of the hotend, resulting in partial blocks or jams.
Adaptable filaments like nylon or TPU are particularly vulnerable to this and use minimum retraction. Big, continual prints with some travel moves do not need retraction. In such scenarios, concentrate on constant extrusion flow rather than modifying small transitions.
A logical approach is most suitable, begin with small retraction values and raise slowly while monitoring outcomes. To determine if retraction is needed for your specific print, consider printing retraction test models, such as retraction towers, which help evaluate and optimize retraction settings.
Conclusion
Retraction might sound like a minor setting; however, it plays a big role in obtaining accurate, clean 3D prints. Learning retraction distance, retraction speed, and associated variables helps remove stringing, manage oozing, and enhance the overall surface finish of your models. Don’t forget to consider your particular printer and filament attributes, and shortly, you will have retraction fixed almost perfectly.