


Your 3D print looks great—until you realize it’s just a lifeless hunk of plastic. The surface is rough, the color’s bland, and paint won’t stick no matter what you try. Sound familiar? Many creators struggle with streaky finishes, chipping paint, or not knowing where to even begin.
If you’re wondering how to paint 3D prints the right way, you’re in the right place. This guide covers everything from surface prep and priming to picking the best paint for 3D prints—plus expert tips for getting that smooth, professional look. Ready to color 3D prints? Let’s get started.
Prepartation: What Tools You Need to Paint 3D Prints
Before we dive in, you need to ensure that your 3D model is ready, then ask yourself whether you need to make a perfect painted 3D prints? In the following section, we have listed down every necessary tools for difference levels:
Quick & Easy Paint Job (Beginner)
If you need a beginner-friendly way with minimal effort to paint 3D prints, then these tools may hit the need:
-
Soft sanding sponge or 400–600 grit sandpaper (light smoothing)
-
Acrylic craft paint (e.g., Apple Barrel, FolkArt)
-
Basic brush set
-
Optional: Clear spray sealer (matte or gloss finish)
This method is perfect for fast results on cosplay props, toys, or test prints. This process requires no primer or fillers. The paint adheres well enough for casual use.
Clean Finish with Good Durability (Intermediate)
Wonder how to paint 3D printed miniatures, display models, and hobby-grade prints? These tools and materials may come into handy:
-
Multiple grit sandpaper (start with 200–400, finish with 800–1000)
-
Tamiya White Putty or other gap filler (for print lines)
-
Plastic primer spray or gesso
-
Acrylic model paint or thinned craft paint
-
Quality brushes or entry-level airbrush
-
Clear coat spray (to seal and protect)
During this process, a primer ensures better paint adhesion while Putty smooths surfaces and hides layer lines.
Professional-Quality Finish (Advanced)
OK, for those who pursue high-quality painted 3D models, tools you need are far more:
-
Full sanding set (from 120 up to 1500 grit)
-
Needle files and precision sanding sticks
-
Tamiya White Putty, Bondo Glazing & Spot Putty, or UV resin filler
-
Automotive filler primer or airbrush primer
-
High-end acrylic paints (e.g., Vallejo, Citadel, Tamiya)
-
Dual-action airbrush kit with compressor
-
Masking tape for color separation
-
Varnish/sealant spray (matte, satin, or gloss finish)
By applying these materials onto the 3D printed models, you can gain maximized durability, color depth, and detail fidelity.
Tips: What is the best type of paint for 3D prints?
Acrylic paint works best on 3D printed miniatures, especially PLA. It is easy to use, fast-drying, non-toxic, and comes in rich, dramatic colors. More advanced users can also get away with enamel or spray paints—just be sure that they are compatible with your primer and material.
How to Ensure a Smooth Finish
Before you start to paint the 3D prints, here are some preparation steps:
Step 1: Clean and wash the 3D model
Before painting, clean your 3D print to remove any leftover supports, oils, or residue. Start by trimming off excess material with pliers or a scraper. Then, wash the model with warm, soapy water to eliminate dust and grease. Let it dry completely—moisture can cause paint to peel or bubble.
Step 2: Sand the surface for smoothness
Utilize a coarse grit sandpaper, such as 200, to eliminate larger imperfections and gradually work your way to finer grits, up to 2000, for a polished outcome. After sanding, it's crucial to clean the model again to remove any dust particles that can affect primer adhesion.
Utilize a coarse sandpaper (around 200–400 grit) and work up to finer grits like 1000–2000 for a smooth, polished surface. Sand in circular motions to avoid straight marks. Once done, wipe the model with a dry cloth or compressed air to remove any leftover dust.
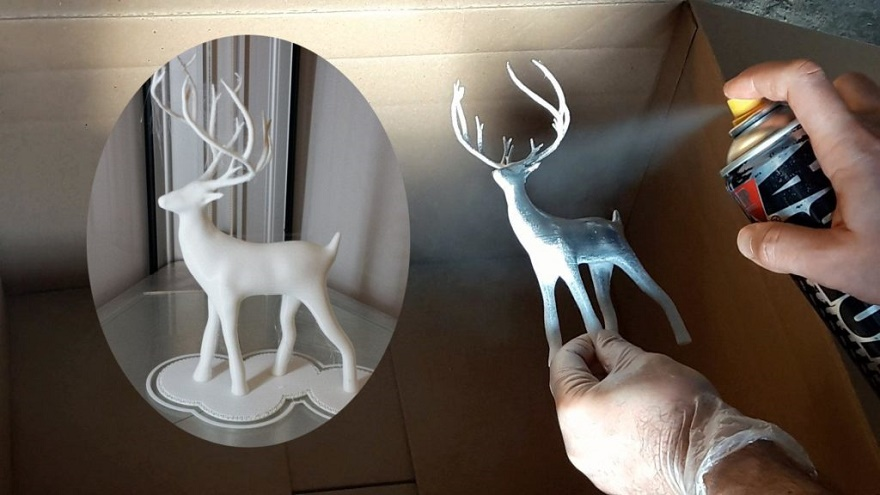
Step 3: Apply the primer for better adhesion
Apply the primer in light, even coats, ensuring each coat dries thoroughly before applying the next. Remember to conduct this step in a well-ventilated area or outdoors to ensure safety and optimal drying conditions.
Choose a spray primer made for plastic or PLA. Apply it in light, even coats, keeping the spray can at a distance of about 6–8 inches. Let each coat dry before adding another. Priming also reveals any flaws that need extra sanding before painting.
Note: Do you really need to prime the 3D prints?
Yes, priming is highly recommended. It gives the paint a smooth, even surface to adhere to, enhances color vibrancy, and makes it possible to correct blemishes before painting. Skipping the primer will lead to an uneven paint job and less durable finish.
How to Paint 3D Prints (Step-by-step)
When it comes to painting 3D printed miniatures, there are some crucial steps you need to follow, otherwise you may not get an ideal painted models.
Step 1: Choose the right paint type
For most PLA prints, acrylic paints are the go-to solution due to their convenience and rate of drying. They dry quickly and adhere well to the surface, offering a good range of vibrant colors to outfit your models.
Step 2: Apply the base coat evenly
Begin with a strong base coat to provide a clean slate for the details. Spray or brush on the paint in thin coats, with time between coats to dry. Don't overdo it—thick coats have a tendency to run and hide the details. The ideal is an even, smooth surface that adds depth of color and durability.
Step 3: Add details and highlights
Employ fine brushes on minor areas, dry brushing on highlights, and use washes to put shadows or aging effects. Gradually build up layers for depth. Always allow each layer to dry before adding the next to prevent smudging.
Step 4: Seal and protect your 3D painted print
Once painted, seal and protect your artwork by applying a clear coat. Select matte, satin, or glossy finishes to suit your style. Spray on thin, even layers, allowing each to dry before adding additional coats.
Tips for Making a Perfect Painted 3D Prints
Even though you have followed the guide above step by step, you still cannot obtain the desired painted 3D prints. Why so? Don't worry, in this section, some useful tips and errors you can commit while painting 3D models are presented below. Let's start!
Can I paint 3D prints without sanding?
No. Sanding makes your prints smooth out the imperfections and allows for an ideal surface to accept primer and paint. Apply a series of sandpaper grits, beginning from coarse to fine, to get the best results for your 3D print finishing projects. After sanding, clean the print thoroughly to ensure dust is removed prior to applying primer.
Remember to prime your print
Priming leaves a smooth finish and enables paint to stick better, making your D model painting job look better. Your paint would be patchy and have no sticking power without primer, especially on prints made from PLA.
Use thin coats
Uneven layers can result from using thick paint or a lack of using a consistent technique. To correct this, dry and thin out your paints a little to increase flow and control. Paint thin, flat coats with a lot of drying time between coats.
Store/display your model properly
After your 3D print is fully painted and sealed, pack it away from direct sun, humid or dusty areas where the surface might be damaged over the years. If on display on a shelf, place in a transparent case or dust jacket. To store, wrap the model in bubble wrap or soft tissue and place it in a sturdy box.
Conclusion
In summary, how to paint 3D paints is no longer a tough issue after following the detailed steps outlined in this guide. You can easily transform your basic models into vibrant, eye-catching masterpieces right away.
FAQs
Q: How do I add different color text to 3D prints?
A: You can paint the text using a fine-tipped brush after printing, or model multicolor text in CAD and use a multi-material 3D printer. Another option is to pause the print and change filament for each color layer.
Q: Airbrush vs brush 3D prints, which is better?
A: Airbrushes provide smoother, more professional finishes and are ideal for large models. Brushes are cheaper, beginner-friendly, and great for detail work. Use both for best results.
Q: What are best airbrushes for 3D prints?
A: Top choices include: Iwata Eclipse HP-CS (great all-rounder); Master Airbrush Kit (budget-friendly); Badger Patriot 105 (durable and easy to use). Choose one based on budget, experience, and project size.
Q: What can I do to deal with paint runs and drips?
A: These issues often happen when too much paint is applied or drying time is rushed. To avoid this, use thin, even layers with a quality brush or airbrush. If drips occur, let the paint dry, sand the area gently with fine-grit sandpaper, then repaint.