


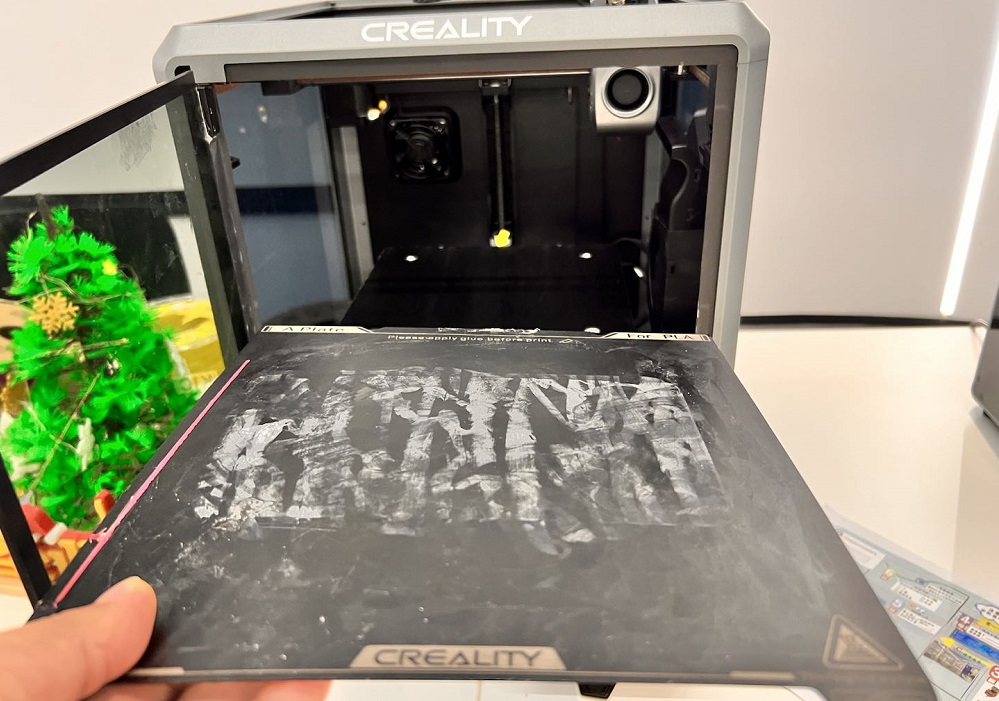
If your prints no longer stick, start peeling from the corners, or begin lifting mid-print, the print surface should be the first thing you should look into. The presence of skin oils, dust, and residual filament residue all work together, causing a decline in adhesion on the first layer over time.
In this 2026 guide, we'll take you through how to clean a 3D printer bed step by step, with practical methods for common bed types and clear advice on what to avoid so you don’t damage the build surface.
Key Takeaway: How to Clean a 3D Printer Bed
Before diving into specific methods, we provide a simple takeaway about 3D printer bed cleaning solutions:
-
Switch off the printer and allow the bed to cool.
-
Remove loose debris or bits of filament.
-
Clean the surface using a process compatible with the material of the bed.
-
Ensure the bed is completely dry before next print.
It can do more damage than good if steps are skipped or the wrong cleaner is employed. A little extra time spent here saves many failed prints later.
3D Printer Pre-Cleaning Preparation
Begin with the basics. Safety and ground protection are more important than speed.
-
Turn off the printer and disconnect it.
-
Remove loose debris or bits of filament.
-
Clean the surface using a process compatible with the material of the bed.
-
If possible, remove the printer build plate and wash it by hand.
The cleaning of a hot bed is not only dangerous but may damage some materials or warp the removeable plate.
Note: One important thing is to not use household cleaners that have ammonia in them. They can residue and also harm common build surfaces like PEI or BuildTak.
Cleaning Methods by Bed Type
Not all print beds are the same, and cleaning different print beds in the same manner can shorten the life spans of the print beds. The following are cleaning practices for the different print beds that can be safely used without any negative consequences:
Glass Print Beds
The advantage of a glass bed is that it is flat and easy to examine; despite that, it builds up oils and grime.

How to clean a glass 3D printer bed:
-
For maintenance, the surface can be wiped down using a lint-free cloth soaked in isopropyl alcohol.
-
Soaking the glass plate using warm water with a tiny bit of soap if the glass plate is removable cleans it nicely through 10-15 minutes.
-
Wipe gently with a soft sponge or cloth.
-
Rinse thoroughly and dry completely before reinstalling.
What to avoid:
-
Metal scrapers may result in micro-scratches
-
Abrasive sponge or powders
Scratches however small can also have an influence on the efficiency of printing.
PEI Spring Steel Build Plates
PEI-coated spring steel plates are common on modern printers like Creality K1 Series because of their strong adhesion properties.
How to clean a PEI build plate:
-
Wash the petri dish with warm water and a bit of soap.
-
Wipe gently in one direction using a soft sponge or cloth.
-
Rinse thoroughly to remove soap traces.
-
Dry completely before putting it back on the printer.
When it comes to fingerprints or lighter residue, a swipe of isopropyl alcohol will take care of the problem. It's best applied sparingly.
What to avoid:
-
Acetone, which can degrade PEI coatings.
-
Aggressive scrubbing or abrasive tools.
Textured and BuildTak-Style Surfaces
Textured build surfaces rely on their coating to grip filament. Keeping that texture intact is key to long-term performance.
How to clean textured build plates:
-
Warm the bed slightly to soften residue, then turn the printer off and let it cool a bit.
-
Scrape off stubborn filament using a plastic scraper.
-
Clean with warm water and mild soap.
-
Wipe gently with a soft sponge.
What to avoid:
-
Strong solvents not approved for the surface.
-
Household cleaners with unknown additives.
These sheets are not invincible, but proper maintenance can help extend their life.
Cleaning a 3D Printer Bed by Contaminant Type
Sometimes the bed material isn’t the issue. It is what sticks to it. Being aware of the residue allows you to clean more appropriately.
PLA Residue
PLA is usually easy to deal with.
-
Use warm water and mild detergent
-
Wipe gently with a microfiber cloth
ABS Residue
ABS can leave more stubborn marks.
-
Use acetone only on bare glass or non-PEI surfaces
-
Apply sparingly and wipe gently
Glue Stick or Hairspray Buildup
Adhesive buildup often causes uneven first layers.
-
Start with warm, soapy water
-
For heavier buildup, a mild citric acid solution can help dissolve residue
Fingerprints and Oils
Skin oils are a common cause of sudden adhesion problems.
-
Clean with warm water and mild soap
-
Dry the surface completely before printing
Common Mistakes to Avoid When Cleaning a 3D Printer Bed
The following are several common mistakes that can be avoided when cleaning the 3D printer bed. Even routine cleaning, if not done properly, may cause harm. So let's take a closer look:
Using metal scrapers: Metal tools scratch glass and damage coated surfaces. Plastic scrapers are much safer.
Printing before the bed is fully dry: Even a little moisture can be enough to destroy adhesion. Allow the bed to air dry thoroughly, and use a lint-free cloth if necessary.
Using acetone on PEI: Acetone gradually dissolves PEI coatings and diminishes grip. Don't use it at all on a PEI-based bed.
How Often Should You Clean a 3D Printer Bed?
Short answer: The more you print, the more often you need to clean.
-
After every print: quick wipe to remove dust or fingerprints
-
Every 5 to 10 prints: deeper cleaning with soap and water
-
Anytime adhesion drops: inspect and clean immediately
Most first-layer problems can be prevented before they arise by regular maintenance.
FAQ
Q1: Why is my printer bed still sticky after cleaning?
A: This typically means that soap or adhesive residue was left on the bed. Rinse it thoroughly with clean water. Let it dry completely
Q2: What is the best cleaner for 3D printing beds?
A: There’s no single best option. Warm water, mild dish soap, and isopropyl alcohol cover most situations when matched to the right bed type.
Q3: Can you use 70% isopropyl alcohol to clean printer heads?
Yes, with caution. It’s good for wiping exterior surfaces to remove oil or grime but should not be used inside nozzles or around exposed electronics.
Conclusion
Cleaning a 3D printer bed is one of the easiest ways to improve print reliability. A clean surface helps filament stick where it should, reduces warping, and leads to more consistent first layers.
By using the right cleaning method for your specific bed type and avoiding common mistakes, you can maintain strong adhesion without replacing parts or relying on harsh chemicals. Make bed cleaning part of your regular maintenance routine, and your prints will reflect the effort.