


If you’ve ever tried 3D printing, the most common issue you are likely to have run into is bed leveling. A poorly leveled bed can cause poor first layer adhesion issues, detaching prints from the build plate, nozzle clogging or bed scratching, and just a lot of frustration.
Although many 3d printers nowadays have an automatic leveling bed feature. Learning how to level a 3D printer bed is one of the most important skills you can acquire for successful 3D printing. In this guide, we will explain the different ways to level a 3D printer bed. We will give you practical tips and show you how to use a test print file to check your results. Let’s start without further ado!
What is 3D Printer Bed Leveling?
3D printer bed leveling is the process of making the print bed parallel to the plane of the nozzle’s movement. That means the print nozzle must be at the same height from the bed across the whole printing area. This helps the filament come out evenly and stick to the bed well during the first layer. This gives the printer a strong base for the rest of the print.
If the bed is too far away from the nozzle, it might start printing in mid-air and your print would not stick at all. By learning how to level a 3D printer bed correctly, you get the peace of mind that your prints will always stick to the bed.
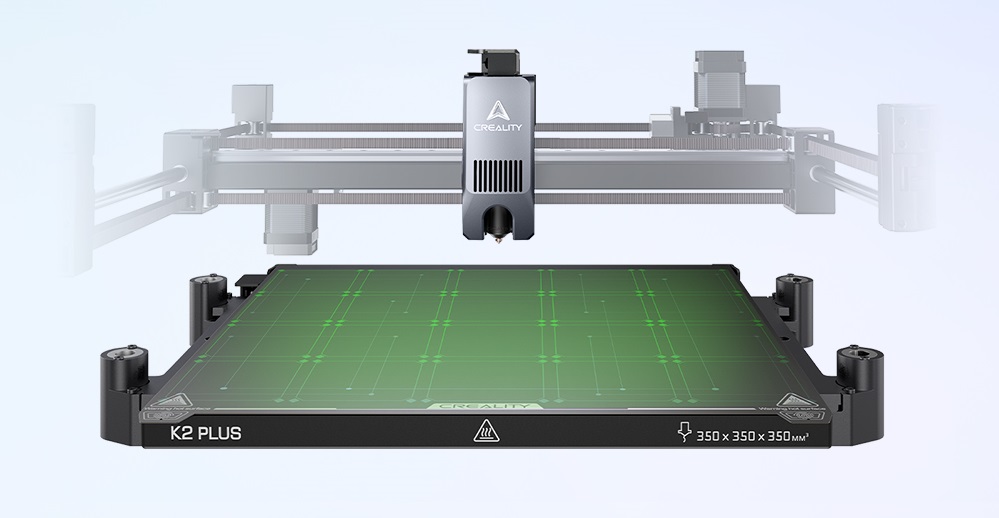
3D printers such as the Creality k2 plus make this process easier. They offer features like assisted or automatic leveling. However, even with automatic systems, a mechanically level bed is.
When Should You Level Your 3D Printer Bed?
Whenever the first layer does not stick well, you should level the bed of your 3D printer. This is important after moving the printer or making mechanical changes. The following are additional specific situations in which leveling your print bed could be necessary:
- Prior to initial use: Your new 3D printer bed should always be level.
- After relocating the printer: Transport may cause the bed or frame to be out of alignment.
- After parts replacements: The distance between the nozzle and the bed may change with new nozzles, build plates, or hotends.
- During regular maintenance: Vibrations and wear can slowly knock the bed out of level over time.
- After Firmware Updates or EEPROM Resets: Z-offsets or mesh calibration data may be reset.
- If You Notice Uneven Layer Lines or Warping, these can occasionally be due to a poorly leveled bed.
Bed Leveling Methods
There are three typical methods for leveling a 3D printer bed: manual, assisted, and automatic.
- Manual leveling: The bed height is adjusted by turning the leveling screws (usually spring nuts) under the corners of the hot bed. Requires the user to move the nozzle to each corner and test the gap between the nozzle and the bed with a piece of paper.
- Assisted leveling: like the Ender-3 V3 KE walks you through manual adjustments with on-screen suggestions. People often pair assisted leveling with automatic bed leveling to achieve the optimal bed level.
- Automatic bed leveling: like the K2 Plus Combo, uses sensors to find height differences in the bed. It automatically adjusts the nozzle while printing. This gets rid of any imperfection that may not be.
Even when using ABL, it is a good idea to print a leveling test STL. This helps adjust the Z-offset and makes sure bed leveling works well.
How to Level a 3D Printer Bed: Step-by-Step
Let’s walk through leveling your 3D printer bed, whether manually or with assistance.
Preparation
Remove any filament residue or dust with isopropyl alcohol. A clean printing surface guarantees that bed adhesion issues do not arise as we level our bed. Now heat up the nozzle and bed to your standard printing temperatures. This takes into account any thermal expansion on the bed, which may affect accuracy.
Select a filament color that contrasts with your bed’s hue. White filament works great on a black or dark grey print bed.
Manual Bed Leveling
Manual bed leveling levels the printer bed physically so that minimum software compensation is required by the printer. This involves adjusting the bed corners' screws to keep the nozzle at the same distance from the surface throughout the print area. Follow these steps:
Home the Printhead We will begin by homing the printer via the display to bring the nozzle down to the bed. Some printers may raise the Z-axis after homing, in which case, use the movement buttons to take it down to 0 mm.
Adjust the Bed Using Paper Take the nozzle to a corner using the guided bed leveling menu or manual movements, and place a piece of standard printer paper between the nozzle and the bed. It may be helpful to do it beforehand if needed. Slowly adjust the nearest bed screw until you feel a tiny drag when moving the paper. The goal is gentle resistance—tight enough to feel but loose enough to allow the paper to move.
Repeat at All Key Points Move the nozzle to each of the remaining corners and repeat the paper test. Then, check the center of the bed using the same method. Make fine adjustments until you get consistent resistance at all five points. Feel free to repeat it as many times as needed to get optimal bed leveling.
This simple method is highly effective when learning how to level a 3D printer bed manually. If your printer allows it, you might want to check the bed mesh on the display or from your control software to ensure the bed is completely level.
Verify With a Leveling Test STL
Now that you've leveled your bed, it’s time to print a leveling test STL file. These test patterns usually consist of a thin grid or several squares spread across the build area. This print visually shows how well the bed is level.
Here’s a great 3D printer bed level test STL file. Adjust size as needed.
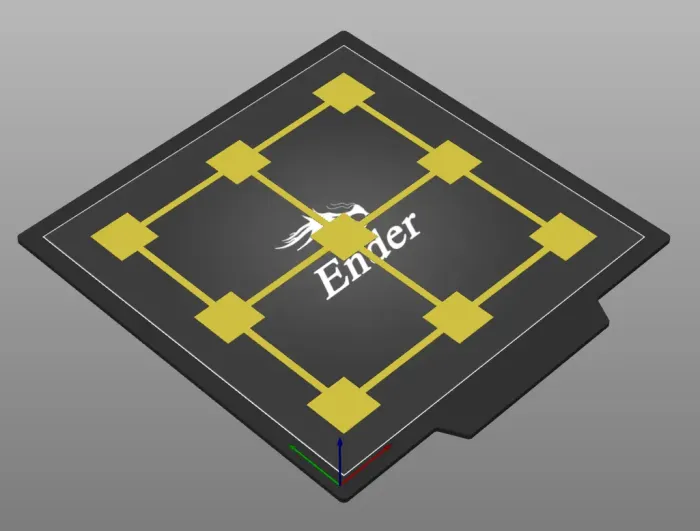
Interpret Test Results
Having the perfect first layer takes some close observation and a little bit of experience that you will gain over time. On your first layer, try to look for:
- Even, smooth lines: The filament has just the right amount of squish, where the lines just barely overlap one another. Your bed is correctly leveled.
- Gaps between lines: The nozzle is too high; raise the bed.
- Lines look squished or textured: The nozzle is too low; lower the bed slightly.
Here, tweak your bed level and Z-offset if necessary, then run the test again until the pattern looks perfect.
Pro Tips for Better Bed Leveling
For the best bed leveling, opt to use silicone bed leveling mounts or good-old screw and nuts. This ensures a solid bed mount that doesn’t go out of alignment from vibration or human interaction over time.
I cannot emphasize this enough: fine-tune your Z-offset exceptionally precisely when using ABL. It is easy to blame a bad first layer on a misaligned bed. However, with a sensor like CR Touch, it critically depends on your Z-offset. Leveling is managed by the software.
Troubleshooting Common Bed Leveling Issues
- Nozzle too high or too low at certain spots: In these cases, re-level your print bed and adjust your Z-offset correctly. It is generally advisable to lean a little bit towards a squished first layer.
- The center of the bed is too low. This can happen with some cheaper 3D printers.
- It is caused by sagging or warping of the print bed when it heats up. Modern printers solve it by using thicker aluminum plates. Using a glass heated bed is an easy way to counter this issue, as glass is generally very flat.
- Z-offset can go out of alignment too often. If your printer frame, bed mounts, or bed axis are not strong enough, your bed level can quickly become misaligned. You can omit this by tightening your frame screws and swapping out the bed mounts for some silicone heated bed mounts. Avoid placing too much weight or pressure on your print bed to ensure it does not deform over time.
The suggestion is that you learn to bed and choose your favorite auto leveling 3d printer at Creality.
Final Thoughts
Leveling your 3D printer bed is key to consistent, high-quality prints. We hope this guide helped you to level your print bed and understand some key aspects of a leveled print bed. Whether you have automatic features like CR Touch or a bed leveling menu, it is important to keep your bed level. This helps you get the best print quality from your machine.