Change a time-honored method of creating molds for jewelry and other items into a modern technique with 3D printing lost wax casting. This is specifically used to make smaller metal objects which cannot be created with a 3D printer directly. Best of all, it lets you print once and create your unique designs over and over again.
Today, 3D printing with wax filament makes this process easier and quicker. The growing popularity of this art opens up new opportunities for design in materials like metal that were not often associated with high-tech printing. In this guide, we’ll walk you through the 3D printing lost wax casting process starting with the initial digital model and finishing with the polished metal part or object.
What Is Lost Wax Casting?
Before you understand lost wax 3D printing, it helps to know the traditional method. A created object or form was made from wax with attached sprues or tubes. This was coated in a ceramic coating so it was hard. Then, the wax was melted away to create the hollow mold. Molten metal was poured inside through the sprues, allowed to harden, and then removed by breaking the mold.
With the evolution of digital fabrication from early days in the 1960s, things have changed quite a bit. Early 3D printers could not work with the same types of materials commonly used today. The ability to move away from standard plastic or PLA filament to create a 3D printed wax mold has expanded the possibilities even more. Using wax helps jewelry designers and prototype creators make metal objects with ease.
How Did 3D Printed Wax Molds Make the Casting Process Easy
With the old-fashioned casting process, you had to make a wax mold for every individual item you created. This took much more hands-on effort than setting up a
3D printer and letting it do its thing automatically. Mass production was quite challenging. Just like this modern tech allows you to print models passively, it can also keep making the wax molds over and over again without much additional input from you.
Besides repeatability, 3D printing wax for investment casting adds a considerable amount of precision to the process. The wax itself and resin alternatives can create much smaller details and specific measurements than the old methods. This is really only limited by your design skills with the CAD program and the thickness of the filament you choose. Of course, printer capabilities matter, which is why choosing a high-quality, professional one from
Creality makes sense.
Materials and Printers Used for 3D Wax Printing
As mentioned above, you cannot create the forms from PLA filament. Instead, you will need wax filament with both a very low and slightly higher melting points. The latter is for the sprues and any structural parts that need to stand up to the process a bit stronger. The choice depends largely on the size and design complexity of the final item. Some people do make the mold with castable resin and then pour or inject wax inside to make the initial mold. This adds an extra step to the overall process.
In most cases, your existing 3D printer will undoubtedly work well for this technique. You can use SLA, DLP, or LCD options in any size that suits the items you wish to create. The full collection of
Creality printers can suit your needs. You can use whatever metal you wish for the final item: gold, silver, brass, bronze, copper, aluminum, and more. All that matters is whether you can melt it and pour it safely into the mold.
Step-by-Step Guide on How to Make a Mold for Wax Casting with 3D Printing
If you are making jewelry or other metal objects, you cannot simply print a resin mold with a hollow inside. It will melt when you pour in the final material. The creation of a wax model and investment mold makes the process work.
- Create your design in CAD (computer aided design) software. This is the first step for a 3D printed wax mold or any other project. You need a high-quality, accurate design to get to a great finished model.
- Feed the wax filament into your printer, send the design over, and print. Check the wax model carefully for quality before you move on. Of course, you can also use castable resin filament instead. This stronger material is ideal for more intricate designs.
- Remove all extraneous support bumps or lines from the wax model. Keep or place a sprue line in order to suspend it in the plaster or other mold creation material.
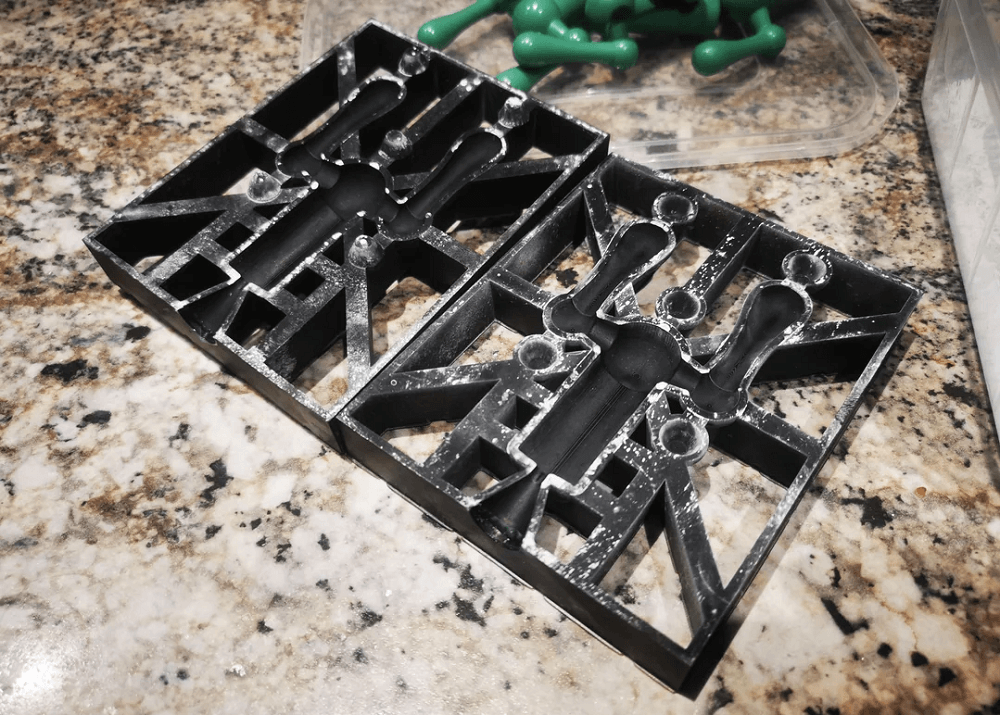
- Create the investment mold. You do this by forming the material around the wax or resin 3D printed design. After drying and curing completely, burn out the wax or resin.
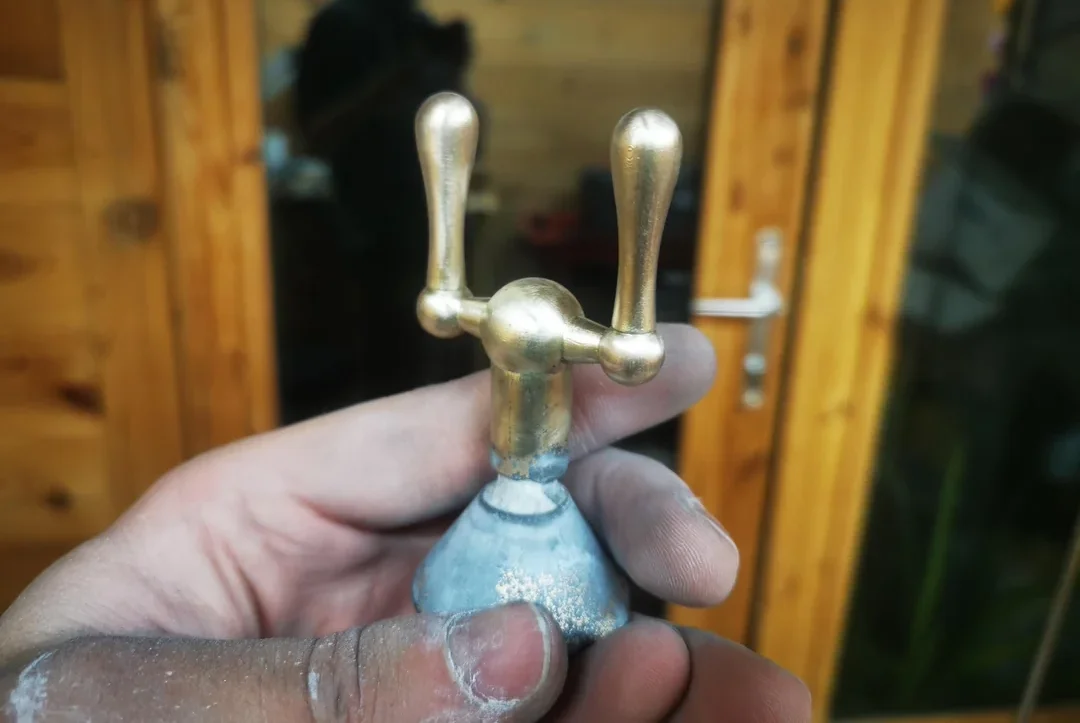
- When the mold is completely dry and cured, you can start creating the final metal items. Carefully pour the molten gold, silver, or aluminum into the investment mold, wait for it to cool, and then remove it. The hands-on process of polishing then begins.
Common Use Cases for Lost Wax Casting with 3D Printing
Crafting fine and costume jewelry is one of the top reasons to use this 3D printing lost wax casting method. With the intricacy of wax printed models, it becomes much easier than ever before to create rings, necklaces, earring sets, and brooches out of fine metals.
Using the same methods, you can also create more practical objects. These include everything from elegant or sleek metal drawer handles to machine parts. Many manufacturing companies also 3D print metal prototypes for the products or parts they want to share with customers before mass production begins. It is impossible to list all the potential items that 3D printing with wax molds can help you make. Use these steps for anything small, intricate, and metal.
Top Tips for Successful 3D Printed Lost Wax Casting Projects
While the instructions above give you the basics of this technique, and you can practically ensure success with the right 3D printer and wax or resin filament, these extra tips may help.
-
Design the model with appropriate sprues or a top support line to make creation of the investment mold easier.
-
Avoid too many concave angles with inconsistent thickness. These are challenging when it comes to mold creation.
-
Use the right type of wax or resin filament for your printer and the process. Not all of them – especially beginner models for light crafting – can handle wax.
-
Pay attention to the burnout schedule and timing for the material you use. The material must burn out cleanly with no ash or residue left behind.
-
To make the best investment mold, pour smoothly, tap or vibrate to work out air bubbles, and seal it well before use.
Of course, take care when using hot wax and especially molten metal in the final creation step. Use proper safety gear to avoid serious burns.
Conclusion
The high-tech capabilities of 3D printers make lost wax casting the perfect answer for jewelry making, prototype creation, and production of any small, detailed metal parts. It is the perfect blend of a time-honored method and the technology of CAD and Creality printers. Explore all the possibilities and experiment with unique style ideas. With 3D printing lost wax casting, creators of all kinds can achieve unique intricate designs in metal faster and with less headaches than ever before.


