


Have you wondered how 3D printers achieve ultra-smooth top surfaces on intricate models? If yes, let me walk you through it. Some settings on your printer might be affecting the quality of your prints. However, there are ways to improve this. One solution is 3D print ironing.
What is ironing in 3D printing? 3D print ironing is a printing technique that enhances the surface finish of prints, particularly the top layers.
Why Does 3D Printing Ironing Matter?
Every printer, commercial, or hobbyist wants to end up with the dream design coming to life. When the print comes with lines and imperfections, it doesn’t achieve that dream. The overall goal of ironing is to improve aesthetics and functionality—and set the stage for a deeper exploration. If you are making commercial pieces, it can reduce your overall post-production time since ironing leaves you with smooth surfaces that oftentimes do not need post-production processing.
Creality takes you through the process of 3D ironing, giving you insights into how it works and how to optimize the process on your favorite slicer.
What is Ironing in 3D Printing?
3D ironing is a process where the 3D printer hot nozzle passes over the top layer of a print multiple times while extruding small amounts of new filament, smoothing out imperfections.
It borrows its name and inspiration from ironing clothes. A hot iron box presses the cloth against the ironing surface smoothening lines, curls, and imperfections. From that concept, you can see what ironing does. The difference between 3D ironing and actual ironing is that there is no pressing, and the printer uses new filaments to smooth out imperfections.
How does ironing compare with standard printing? Ironing is a finishing technique, while printing is structural. Ironing also works only for flat surfaces. As All3DP notes, it does not solve other print-related imperfections such as warping, stringing, etc. Those imperfections can only be solved during print settings.
How Does Ironing Work?
Once you have enabled ironing on your slicer, the printer completes the top layer as usual. The nozzle then reheats and moves over the surface in a controlled pattern, melting and redistributing existing filament. Unlike normal printing, which prints flat surfaces in straight lines, when ironing, the printer moves diagonally. However, you can set it to run concentric or rectilinear patterns.
Contrary to popular belief, ironing extrudes filament but at a very low rate. PLA has one of the lowest print temperatures. When ironing it, the extrusion is so minimal that you may think there is no filament extrusion. Most printers use PLA. That is because the final layer can be heated much better by the hot nozzle than other filaments.
So, ironing is a combination of three quick actions. The first action is heating the top layer that has unwanted lines. Second, smoothening the hot, uneven surface with the hot nozzle. Third, the extrusion of some filaments to fill out any holes. The fan facilitates the three to give your print a polished look.
Is the ironing feature available in all slicers?
The ironing feature is available in popular slicers. When printing on Creality, you can use Creality print, which offers a smooth ironing experience.
Why is Ironing Important?
Ironing has many benefits. One is aesthetic benefits.
Smoothening surfaces
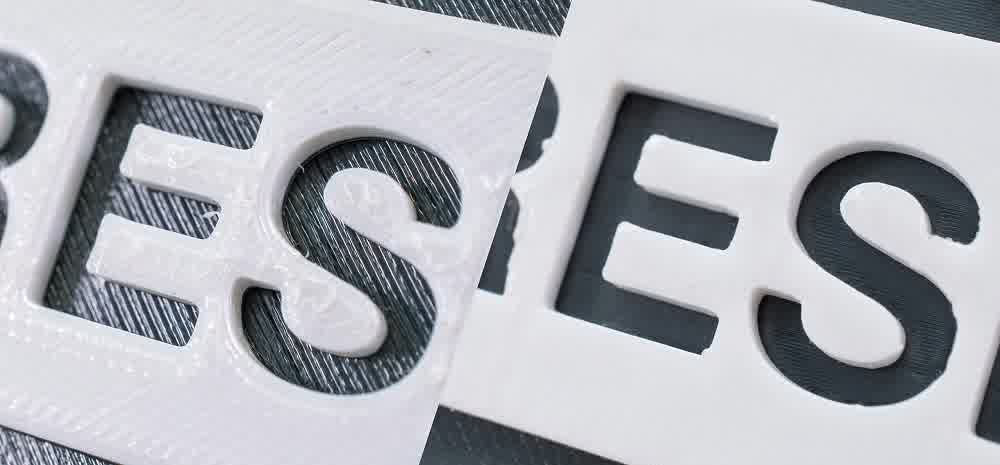
When done well, it produces smooth, professional-looking surfaces ideal for display models or decorative items. If you are making trading or presentation items, such as logos and nameplates, ironing will give you the perfect blend of aesthetics and originality, unlike polishing, which can look a bit industrial.
Another advantage is functionality.
This is because it enhances surface flatness, which can improve fit for mating parts or reduce post-processing needs. It is also helpful for prints requiring a polished top, such as coasters or enclosures.
Ironing limitations
Like every other good thing, ironing has its limitations. That is because it can only be used on flat surfaces. Surfaces that have a bend or a curve cannot be ironed. That means you cannot cure poor print quality using ironing.
How to Set Up 3D Ironing
As mentioned, all top slicers have ironing. However, they have different ironing settings.
Creality Print
To enable ironing on Creality Print, you must click on advanced setting mode. Go to "Print Settings," then "Infill." Under Infill, you will find the ironing feature. You can turn it on or off. You can also make custom changes to flow rate, flow pattern, and spacing.
Cura
To enable ironing on Cura, click on the hamburger icon. You can find the icon next to the search bar settings. It will allow you to “manage setting visibility” features. Once you click on it, you will have access to all features. Search for the ironing feature and enable all the features you want to control.
Ironing pattern
You can control the ironing pattern. Options include concentric, zigzag, or rectilinear, and their visual effects are markedly different. Test them to see which one delivers the best possible result. Notably, you want to pick concentric patterns for circular objects and zigzag for speed printing.
Flow Rate
Another feature that you can control is the flow rate. This feature helps you adjust filament flow at 10% to control smoothing without over-extrusion. The default setting for most slicers is 10%, but you can change that to 5% or 15%. Be careful with this feature. If you extrude too much, you may inadvertently increase object size. For mated parts, you may end up with mismatched parts. You may also end up with a low-quality finish, and improve print time and print resources.
Ironing Speed
You can also control the ironing speed. Slower speeds between 10mm and 20 mm/s improve results but increase print time. Going too fast may lead to little or no noticeable improvement in print. Strike a balance between quality and speed.
Spacing
Spacing is also a feature you can control. This is the distance between the nozzle and the surface, usually set at 0.1mm. Ironing spacing affects the smoothness and the nozzle. If it is too close, the nozzle clogs more often and can affect ironing. Too far, and the nozzle cannot heat the last layer well; hence, more filament is extruded. Strike a balance between 0.1mm and 0.15mm.
Ironing Temperature
You may also tinker with the ironing temperature. Slightly higher nozzle temps can enhance melting and flow, especially for stubborn materials such as ABS and PETG. However, lower nozzle temperatures might be better for PLA.
When Should You Use Ironing?
Ideal Use Cases for 3D Ironing.
- When working flat-topped models like boxes, lids, or decorative plaques.
- Prints where top-layer aesthetics matter more than speed.
When to Skip 3D Ironing.
- Complex geometries with minimal flat surfaces.
- Time-sensitive prints, as ironing extends the print duration.
Material Considerations
Ironing works best with PLA and PETG. It is trickier with ABS due to warping risks.
Tips for Successful Ironing
- Calibrate and test ironing on small prints to dial-in settings before deploying it for final printing.
- Layer Height: Use finer layers, typically between 0.1mm and 0.2mm, for better results.
- Avoid Overdoing It: Too much ironing can cause heat build-up or clogging—start with moderate settings.
- While undoubtedly ironing improves flat surfaces, post-production processing can improve the quality further. You can pair it with sanding or painting for near-perfect finishes.
- Pick a printer with great built-in ironing features. If you are doing print farm-grade work, try Bambu Lab’s optimized ironing features for their printers. It will give you much better ironing outcomes.
Common Challenges and Solutions
Uneven surfaces or over-extrusion
The solution is to lower the flow rate or increase the spacing between lines.
Increased print time
The solution lies in applying optimal ironing settings such as ironing only critical top layers, reducing flow rate, and increasing spacing. Balance all these to get quality finishes on the required surfaces without spending too much time and resources.
Nozzle wear or residue build-up
You can solve this problem by cleaning the nozzle regularly and monitoring filament compatibility. PETG and PLA work well. ABS will give you more problems.
Conclusion
Ironing is a powerful tool for enhancing 3D print quality, specifically when smoothing top surfaces. It can significantly reduce post-production time and work and give you market-ready prints. You can try it in your next printing, and be sure to share your findings with the 3D print community.