


Having trouble with distorted prints or lack of adhesion on the first layer? Such frequent 3D printing problems usually result in failed prints. A raft can assist—serving as a temporary bottom layer to increase stability and bed adhesion.
This manual discusses what a raft is, when to use it, how to install it in your slicer, and how to troubleshoot common problems—so you can achieve more consistent, high-quality prints.
What Is a Raft in 3D Printing?
A 3D printing raft is a temporary, sacrificial layer of extruded plastic printed directly onto the build plate before the main object begins. It serves as a stable foundation, improving first-layer adhesion and helping to prevent warping or print failure—especially when working with challenging materials like ABS.
A raft is usually made of multiple layers, including:
-
Base layer – Thick and slow-printed to bond well with the bed
-
Middle layer(s) – Adds structure and height
-
Top layer – Smooth platform where the model is printed
Printed in a grid or lattice pattern, the raft separates the model from the bed to increase consistency and control.
Types of Rafts in 3D Printing
While most slicers offer a default raft setting, some variations exist depending on your needs:
|
Raft Type
|
Description
|
|
Full Raft
|
Standard multi-layer raft offering maximum stability and bed adhesion
|
|
Thin Raft
|
Fewer layers, faster print, easier removal but less support
|
|
Custom/Advanced Raft
|
User-defined settings in slicers like Cura or PrusaSlicer (air gap, offset, etc.)
|
|
Zig-Zag Raft
|
Uses minimal filament in a zig-zag pattern—great for quick-release builds
|
Each type balances material usage, removal ease, and first-layer quality differently. The full raft is most common when reliability matters most.
Why Use a Raft in 3D Prints?
A raft in 3D printing is not just another layer; it is a tactical tool that provides a variety of benefits, especially when dealing with common printing issues.
Stronger Bed Adhesion
Rafts ensure your print adheres more to the bed—particularly with problematic materials such as ABS or if the bed surface does not provide excellent grip. Plastic adheres better to plastic, and that's precisely what the raft does.
Reduced Warping and Curling
Rafts create a cushion between the hot bed and the printing surface, enabling layers to cool more consistently. This prevents warping or curling, especially for materials that contract when cooled.
Better Support for Small or Delicate Parts
If your model has a small footprint, thin details, or delicate detail, a raft gives it a solid foundation so it won't wobble or detach halfway through the print.
Helps with Uneven Beds
A raft can compensate for slightly scratched or rough print beds, giving your model a smoother surface to start on—even if your bed is less than perfect.
Smoother Bottom Surface
Since the model will be printing on top of the raft, any build plate imperfections (like rough surfaces or elephant's foot) will not affect the bottom of your piece.
When to Use and Not Use a Raft
If you're unsure when and how to use a raft in 3D printing, the following are typical scenarios for your reference:
When to Use a Raft
Even though rafts are perfect only in a few situations, they're worthwhile in the following cases:
For difficult materials
Rafts are suitable for warping-prone materials like ABS, ASA, and Nylon, which need extra thermal and adhesive support.
For challenging geometries
Use a raft for:
- Small footprints that can easily peel off
- Slender edges or tall, narrow sections requiring additional stability
- Large bases which may distort due to thermal stress
- Intricate designs requiring a successful first layer
For uneven or imperfect beds
If your build plate has a slight warp or damage, a raft can even the surface out and offer a flat surface.
When other adhesion methods fail
If glue, tape, or brims aren't addressing your adhesion problems, a raft is the next step.
For a cleaner first layer
Rafts absorb blemishes, enabling you to achieve a smoother, cleaner bottom surface—ideal for parts where presentation is important.
When to Skip a Raft
A raft in these cases is not needed and could even be counterproductive.
For easy-to-print materials
Materials like PLA or PETG, especially with a clean, leveled bed, often stick well without a raft.
To reduce print time & waste
Rafts add extra layers and filament consumption. If material efficiency or print speed is a concern, omit it—especially for batch printing.
When surface finish matters
Rafts can leave marks after removal. If your model needs a flawless bottom surface, and other adhesion methods work, avoid using a raft.
If a brim is enough
For flat models with decent surface area, a brim offers extra adhesion with less material and faster cleanup.
When the base is large and stable
If the model already has a wide, flat base, it likely doesn’t need a raft for adhesion or support.
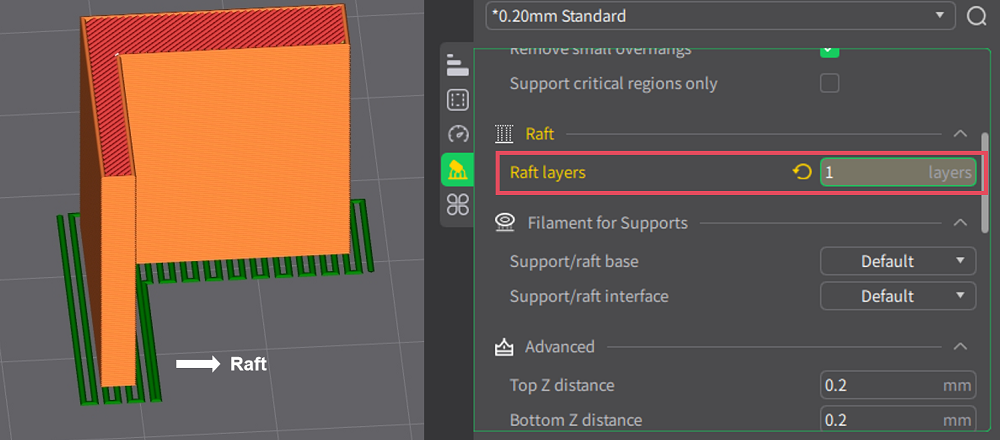
How to Add Rafts in Your Slicer
Most slicer software on the market enables you to add rafts to your 3D prints, now we just take Creality Print as an example to show you how to do it:
Step 1: Launch the Print on your PC and navigate to the menu next to the plate;
Step 2: Hit the "Support" > "Enable support" buttons respectively;

Step 3: Go to the "Raft" option and change the raft layers or raft contact Z distance.
Common Problems With Rafts & Fixes
Even if properly utilized, rafts may cause issues. Here's how to determine and fix the most common ones:
Raft Sticks Too Well to the Print
If the air gap (or separation distance) is too small, or if there is over-extrusion, your rafts stick too tightly to the print. Here's how to fix it:
Increase separation distance: Try ~0.4mm to shatter stickiness.
Check flow rate: Calibrate extrusion to avoid excess material.
Material tips:
-
For PLA, turn off or lower bed heat after first layer.
-
For ABS, allow it to cool fully before removing.
Removal technique: Use a sharp putty knife; work gently from the edges.
Print Won’t Stick to Raft
It happens your print cannot stick to the raft, what for? The large air gap, high speed, or not enough top raft layers can lead to this.
Lower separation distance: Try reducing it to ~0.1mm.
Slow down “Above Raft” print speed: Print slower for the first layer on the raft.
Add raft top layers: Use 2–3 layers to create a smooth bonding surface.
Raft Lifting from the Bed
In some case, bed adhesion issues or low-quality raft base can lift your rafts from the print bed. Here's several practical solutions:
Re-level the bed: Proper leveling is crucial.
Adjust bed temp: Match filament needs (e.g., PLA 50–60°C, ABS 90–100°C).
Clean the bed: Remove oil/dust with alcohol or mild soap.
Use adhesion aids: Apply glue stick or hairspray to boost grip.
Slow down base layers: Print raft base slowly and thick enough for a solid hold.
Use an enclosure: Prevent warping and drafts for temperature-sensitive filaments like ABS.
To Sum Up
While often misinterpreted, the 3D printing raft is a highly effective method for addressing two of FDM printing's most long-standing issues: poor bed adhesion and warping. Use rafts sparingly—not as a default—and adjust parameters like separation distance to get optimal results.