


The K2 Combo is beyond just a 3D printer; it is a ready-to-go, complete setup designed for those who appreciate creativity, accuracy, and efficiency. Creality built it for anyone who desires professionalism in prints without the lengthy setup procedure or experience curve.
Key Highlights
-
Multicolor Printing Capacity: This 3D printer supports up to 16 color combinations, making it perfect for artistic and complex or creative projects. Regardless of prototypes, models, or decorative designs, the K2 Combo brings each layer to life with vibrant color..
-
Smart Filament Management: The printer incorporates the Creality Filament System (CFS) that automatically locates, loads, and monitors filament usage. This reduces manual handling errors and allows users to focus on designing rather than maintenance.
-
Out-of-the-Box Readiness: This unit is made for quick installation and instant operation. Now, you can proceed from unboxing the 3D printer to your first print in under an hour.
-
Superior Print Quality: Created with a sturdy form and precision components, the printer minimizes noise and vibration, ensuring smooth finishes, sharp edges, and consistent print quality.
-
Smart Auto Leveling: The K2 Combo involves a modern auto-leveling system that eliminates the hassle of manual bed leveling. The printer auto-calibrates to keep ideal initial layer adhesion each time.
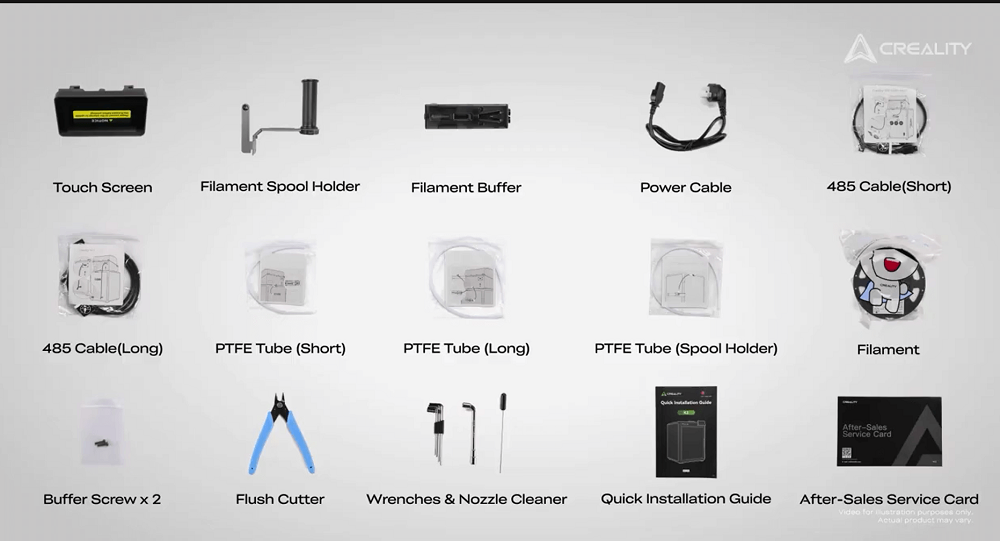
What’s Inside the Box: First Look at the K2 Combo Package
Creality certifies that every detail of the K2’s Combo packaging reflects quality, protection, and professionalism.
The box opens easily, and every part is safely placed within custom foam enclosures to avoid movement while shipping.
Inside the Box, You’ll Find:
-
The CFS unit (Creality Filament System), built for advanced filament management.
-
Touch screen
-
Filament spool holder
-
Filament buffer
-
Power cable
-
Both long and short 485 cables
-
Different PTFE tubes for filament path: long, short, and one for the spool holder
-
Necessary equipment and add-ons, involving a flush cutter, buffer screws, wrenches, and a nozzle for maintenance
-
A quick installation guide and after-sales service card for your convenience.
Getting Ready for Setup: Pre-Installation Checklist
Prepare a reliable workspace before beginning the installation. The surface should be clean, level, and vibration-free to ensure the K2 Combo 3D printer operates smoothly during setup and printing.
Start by taking out all protective layers used while shipping. Remove the outer box, pick up the foam layers, and put aside all accessories. Take out the boxed-up lid connected to the side and remove any extra foams inside the printing chamber.
Lift off the Z-axis fastener and strip away the sticker based on the back cooling fan. Lastly, pull out the four screws that hold the heatbed in position for transport.

Before adjustment, ensure that the following are nearby:
-
Touch screen
-
Power cable
-
CFS unit
-
PTFE tubes (long, short, and for spool holder)
-
Filament buffer
-
485 cables (long and short)
-
Wrench, screws, and cutter
Step-by-Step Installation: Setting Up the K2 Combo
The installation process involves only a few simple steps and requires no special tools. Every connection is designed for a secure and precise fit.
1. Connecting the Screen and Cables
Begin by finding the screen cable. Push it through the front connection hole of the printer. Attach the cable to the touch screen and slowly insert the screen into its slot till it falls into place.
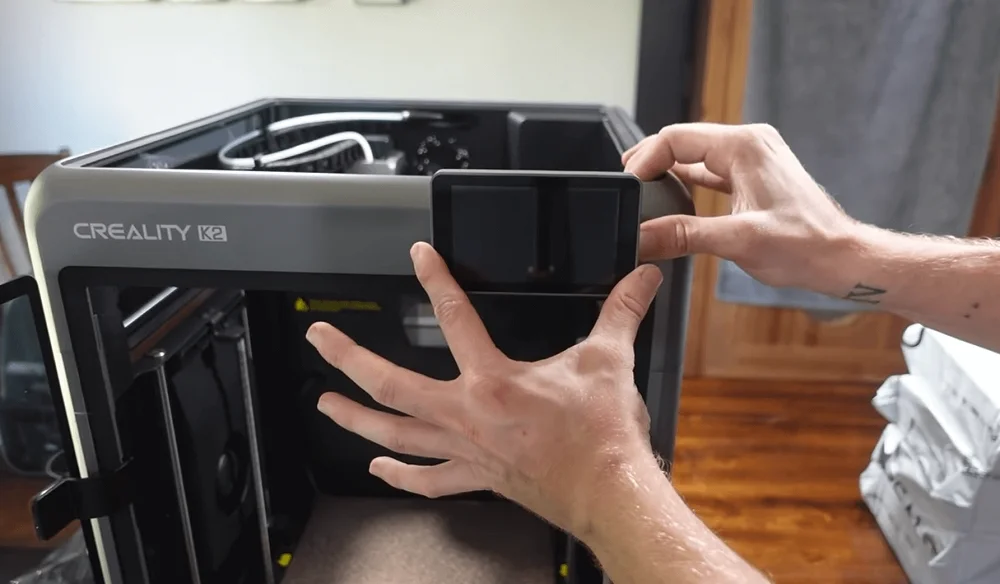
The touch screen functions as the main control interface; therefore, confirm that it is installed appropriately and stable.
2. Placing the CFS and Filament Buffer
Next, put the Creality Filament System (CFS) at the top of the printer. This unit controls filament detection and feeding. Connect the filament buffer on the back of the printer, through the two provided screws.
The alignment must be right for the system to work properly. The buffer minimizes pressure on the filament, helping to avoid complications during multicolor printing.
3. Connecting Tubes and Cables
Get ready the 485 cables and PTFE tubes. Put one PTGE tube in the extruder inlet. Move the buffer latch leftward and put the other end of the same tube. Attach another PTFE tube between the CFS unit and buffer inlet.
Now, connect the filament buffer to the CFS using the short 485 cable. Then, utilize another 485 cable (long) to link the printer to the CFS. After all tubes and cables are set up, inspect that every connection is steady and correctly installed.
Powering Up for the First Time
With all parts connected, now is the time to switch on the K2 3D printer. Insert the power cable and turn on the main power button. The touchscreen will power on and display the startup guide. Follow the on-screen prompts to complete the initial setup.
During the initial start, the printer does an automatic self-check. This procedure confirms that essential parts like the extruder, motion system, and sensors are working properly.
The self-check needs a few minutes, so wait until it’s completed. Once finished, your 3D printer is set for filament loading and calibration.
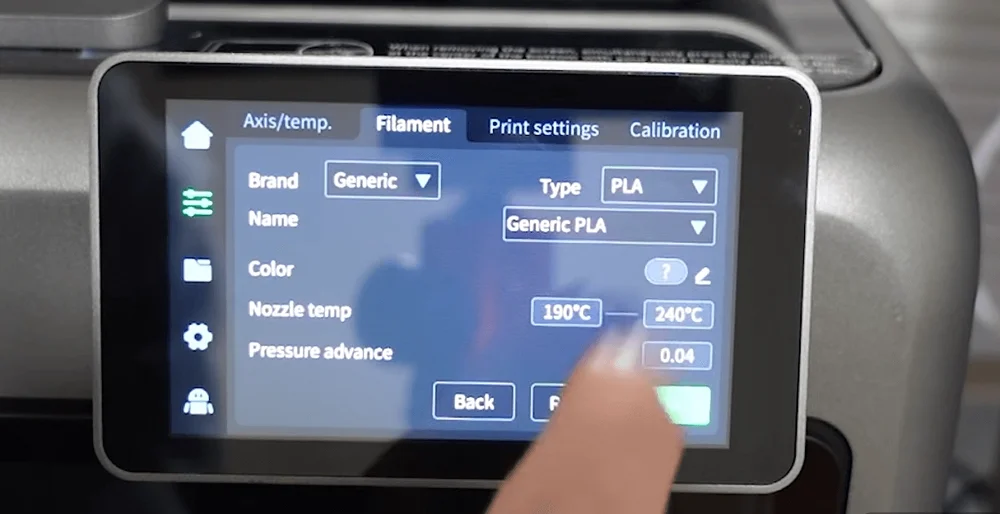
Loading Filament and Getting Ready to Print
The K2 Combo supports both RFID and standard non-RFID filaments. Begin by putting an RFID filament into the feeding tube linked to the extruder. The printer automatically reads the RFID tag, identifying details such as color and material type.
Regarding non-RFID filaments, you can input filament data manually via the touch screen. Moreover, the Creality Filament System (CFS) empowers you to feed multiple filaments at once. Next, choose a local multicolor model from the printer’s library and begin printing.
Tips for Smooth Printing and Maintenance
Routine maintenance ensures lasting reliability and consistent results. Here are the core practices for the best performance of the 3D printer.
-
Keep the print surface clean: Extract debris and waste after every print. A neat surface enhances bed adhesion and avoids print errors.
-
Regularly check all PTFE tubes and cable connections to ensure they are secure. Loose connections can disturb filament course or impact sensor readings.
-
Update firmware when available: Typically, firmware updates involve efficiency improvements, calibration enhancements, and bug fixes. So, always maintain the system updated for optimal outcomes.
-
Perform regular calibration checks: Though the K2 Combo comes with advanced auto-leveling, frequent manual verification confirms consistent precision.
-
Handle filaments correctly: Preserve filaments in a dry environment to stop humidity absorption, which can cause rough extrusion.
Conclusion
The Creality K2 Combo is a perfect blend of simplicity and high efficiency. Simply follow the step-by-step unboxing and setup guide. The system demands minimum effort, letting creators concentrate on innovation instead of assembly.