


Want your 3D prints to cry out “splendid”? One way to electroplate. Electroplating 3D prints is a finishing procedure that attaches a real metal layer to plastic components. The process provides prints with shine, weight, and durability. Also, electroplating PLA introduces conductivity for contacts or sensors. This guide explores what electroplating is, the complete step-by-step process, and tips to get the best results.
What Electroplating is and What It Can (and Can’t) Do
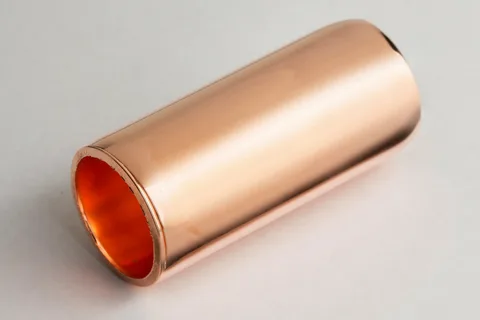
Electroplating is a technique of covering a conductive item with a light metal layer. It carries metal ions onto a surface using an electric current. The print serves as the cathode and the metal bar as the anode. Electricity causes metal to shift from the solution to the print surface. In this way, you can electroplate 3D printed parts with nickel, copper, or other metals.
What Electroplating Improves
Electroplating 3D prints transforms just how the part feels and appears:
-
The metallic sheet brings a bright metallic finish.
-
The component gains weight and a raw metal feel.
-
The metal layer increases strength.
-
Electroplating PLA permits a light electric current after sealing.
What Electroplating Cannot Fix
Electroplating imitates the surface beneath it. The metal layer does not fix errors.
-
The procedure does not cover layer lines.
-
It does not increase the part's durability inside.
-
It does not secure weak print joints.
-
It does not repair deformed geometry.
Which 3D Prints Are Best for Electroplating?

Electroplating 3D prints function better on hard display objects. For instance:
-
Jewelry shells
-
Cosplay armor plates
-
Display trophies
-
Decorative masks
-
Mock props
These models survive sanding and polishing during preparation.
Best Materials to Start With
PLA electroplating does better for newbies. PLA maintains form during sanding and plating. PLA is resistant to heat during coating cycles.
Other plastics present an early danger:
-
Nylon avoids coating adhesion.
-
TPU warps under metal weight.
-
Thin PETG walls bend under copper buildup.
The Tools and Supplies You’ll Need
-
Adaptable low-voltage power supply
-
Electrolyte solution compatible with the metal
-
Anode metal bar, like nickel or copper
-
Glass container or plastic tank
-
Alligator clips, copper wires, hanging hooks
-
Graphite powder paint
-
Conductive copper spray for polished shells
Surface Preparation Supplies
-
Filler primer and spot putty
-
Sandpaper
-
Polishing compound and microfiber cloth
-
Isopropyl alcohol, soap, distilled water
Safety Equipment
-
Eye protection
-
Nitrile gloves
-
Ventilated area
-
Spill-resistant tray under the bath
Step-by-Step: How to Electroplate a 3D Print
Follow these steps to electroplate 3D printed parts efficiently and safely:
Prep the Surface Until It Is Smooth
Surface preparation handles the final look. Begin sanding at 120 grit to reduce high ridges and layer lines. Switch to 240 grit, later to 400 grit, to achieve an even surface. Spray filler primer to fill up small holes and shallow lines.
Utilize spot putty on joints, seams, or deep scratches. Leave it to dry, then sand again. Finish at 800 grit for a soft, matte surface. An uneven foundation creates a rough metal coat, so this sets a limit for your finish.
Clean the Part Completely
Cleanse plastic bonds better. Wipe the component with hot soapy water to extract sanding dust and primer debris. Wash with distilled water to prevent minerals from remaining on the surface. Clean with isopropyl alcohol to extract residues.
Let the component dry naturally in a clean space. Skin oils prevent metal adhesion; therefore, manage the part with gloves after cleaning.
Apply the Conductive Layer
Plastic cannot plate without a conductive skin. Spray the conductive coating in even, light passes. Turn the component between coats so edges and corners get coverage. Let every coat dry completely. Cover the zones that must remain exposed.
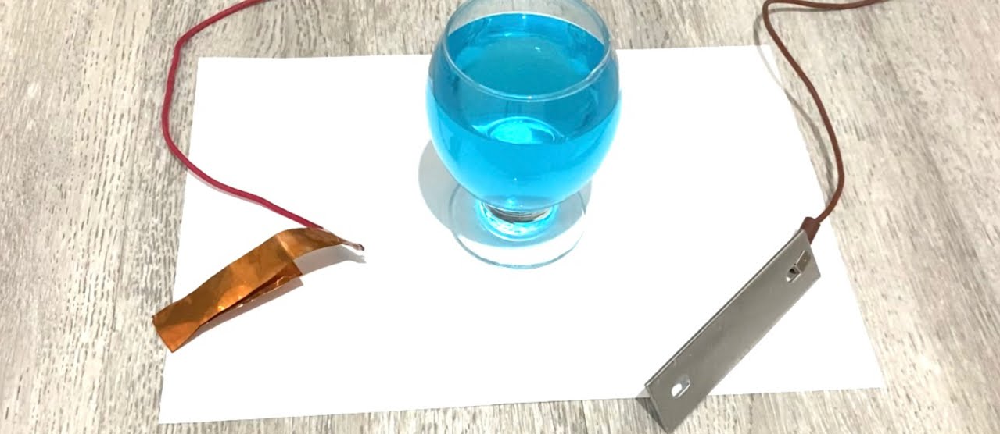
Set Up the Plating Bath
The bath structure manages consistency and thickness. Put the electrolyte solution in a container for your target metal. Position the metal anode beside the container wall so it faces the print.
Hang the print in the middle as the cathode. Maintain even spacing from all sides. Rotate the part slowly manually in the bath.
Control Voltage and Time
Begin at low voltage. Increase the current gradually till bubbles develop. Observe dark edges or powder buildup. Scale for 15 to 30 minute cycles. Elevated current burns sharp curves.
Rinse, Inspect, Repeat
Every cycle requires a reset. Wash the part after each plating cycle to extract the solution waste. Dry the part and check dull patches, thin zones, or uneven areas.
Polish softly between copper coats to hold the surface smooth and set for the next coat. Resume plating to get the thickness and look you want.
Finishing Work to Make It Look Like Real Metal
Fine-grit sanding eliminates tool stains left from accumulation. Then, buffing pads refine copper into a radiant sheen. This converts electroplated 3D printed parts into true metal replicas.
Moreover, clear coating secures copper from the air and prevents tarnish and fingerprints. Numerous artists seal parts after electroplating PLA to protect the color tone.
Tips That Make a Big Difference in Your Results
-
Plate in brief sessions rather than one long cycle. It creates even layers.
-
Gently polish between copper layers to eliminate bumps before shifting to nickel.
-
Turn the part in the bath to prevent thick edges and thin centers.
-
Maintain solution temperature steady for balanced metal flow.
-
Use rounded edges in your prototype to avoid burning at sharp edges.
-
Always check the voltage on a scrap print first.
Common Problems and How to Fix Them
Here are the most common problems that can occur during the plating procedure:
-
Patchy Coverage: Filthy surfaces hinder metal contact. Also, weak conductive paint leads to dead spots. Wipe the model again and recoat the conductive layer before continuing the electroplating process.
-
Grainy or Rough Texture: High voltage pushes copper to clump instead of adhere. Reduce the current and increase the plating duration. Light agitation restores seamless growth when you electroplate parts.
-
Peeling or Flaking Metal: Bad adhesion reflects thin walls or flexible prints. Hard PLA shells hold metal weight without breaking.
-
Burn Marks or Black Edges: Current focus on sharp ends. Scrape corners a bit before plating. This helps avoid edge burn and preserves surface detail.
Conclusion
Electroplating 3D prints converts plastic into actual metal surfaces. The procedure introduces weight, durability, and gloss to printed parts. Precise sanding, clean surfaces, and slow copper accumulation manage final quality. Beginners achieve optimal results when they begin with electroplating PLA. Every step improves skill, and each plated model enhances finish control.